

Bienvenidos || Welcome
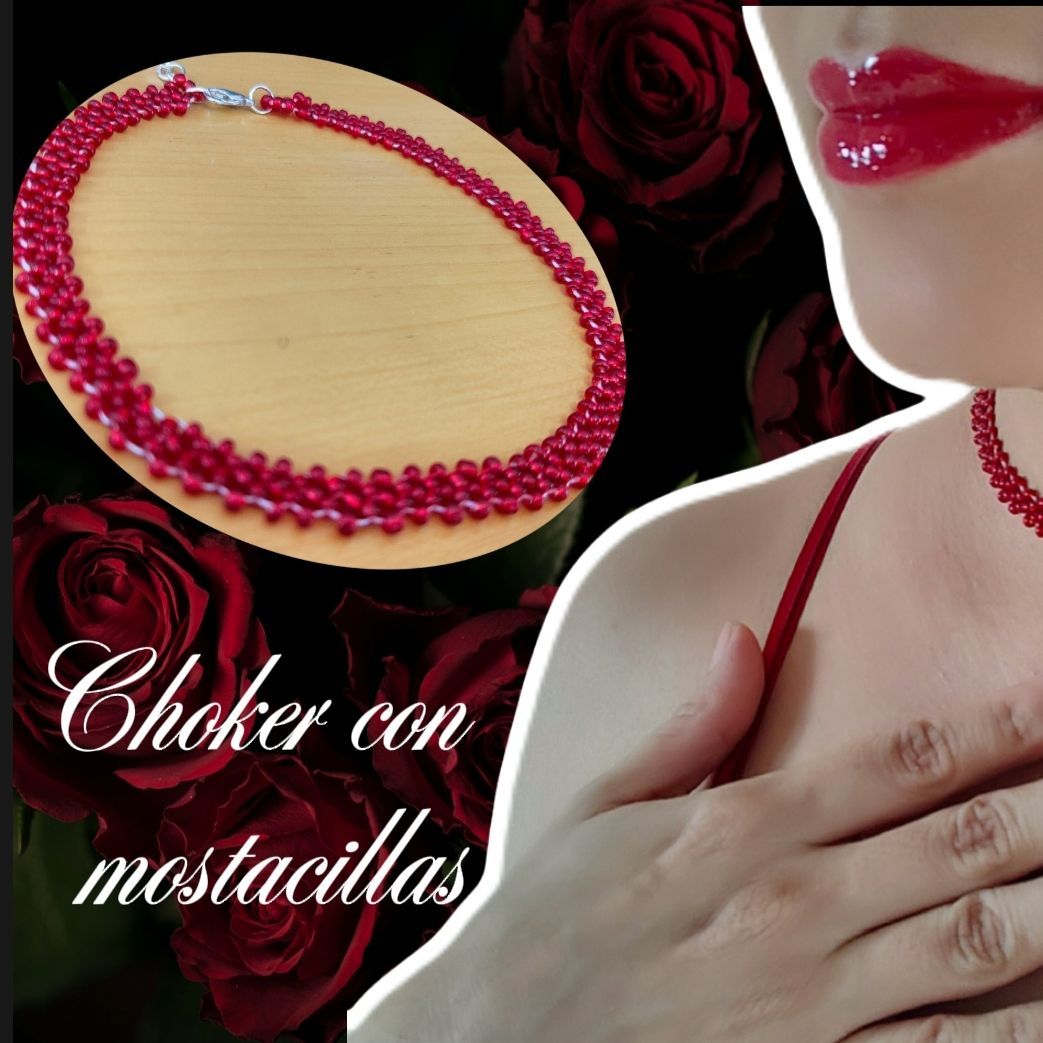
Feliz noche estimado amigos luego de unos días bastante movido, hoy tengo la dicha y alegría de estar aquí y compartir con ustedes una vez más, en esta ocasión les enseñaré el paso a paso de cómo elabore un choker con mostacillas rojas el cual me encantó mucho por lo delicado que se ve, para elaborarlo utilice los siguientes materiales:
Happy evening dear friends after a few days quite busy, today I have the joy of being here and share with you once again, this time I will show you the step by step of how to make a choker with red beads which I loved very much by how delicate it looks, to make it use the following materials:
Materiales || Materials
✨ Mostacillas de color rojo.
✨ Hilo nailon.
✨ Aguja.
✨ Tijera.
✨ 1 tranca.
✨ Aritos.
✨ Red beads.
✨ Nylon thread.
✨ Needle.
✨ Scissors.
✨ 1 lock.
✨ Earrings.

Pasos ||Steps
✨ Paso 1. Iniciamos tomando 2 metros de hilo nailon y ensartando la aguja, seguidamente vamos a ensartar 7 mostacillas en tono rojo y llevaremos hasta casi el final de nuestro hilo.
✨ Step 1. We start by taking 2 meters of nylon thread and threading the needle, then we are going to thread 7 beads in red tone and we will take until almost the end of our thread.

✨ Paso 2. Ahora vamos a ensartar las mostacillas de nuevo con nuestra agujas la aguja deberá ir en la nuevamente hacia el lado superior de laa mostacillas.
✨ Step 2. Now we are going to thread the beads again with our needles the needle should go in the again towards the top side of the beads.

✨ Paso 3. para así lograr formar un círculo con las mostacillas y con el extremo corto del hilo que dejamos en conjunto con el extremos largo vamos hacer 2 nudos y procedemos a cortar el sobrante del hilo corto.
✨ Step 3. in order to form a circle with the beads and with the short end of the thread that we left together with the long end we will make 2 knots and proceed to cut the excess of the short thread.

✨ Paso 4. Para los siguientes pasos y su demostración estaré usando mostacillas blancas y rojas para un mayor entendimiento, sin embargo es importante acotar que mi collar será en su totalidad rojo, ahora bien del aro de 7 mostacillas dejaremos 4 en la parte de atrás de nuestro dedo para que en este posiciones al final el arito de bisutería y dejaremos 3 mostacilla al frente que son con la que vamos a comenzar a realizar nuestro choker, ahora bien vamos ensartar 1 mostacilla blanca, 3 rojas y 1 blanca es decir un total de 5 Mostacillas en la aguja y seguidamente pasaremos la aguja por la mostacillas que está en la parte inferior de las 3.
✨ Step 4. For the following steps and its demonstration I will be using white and red beads for a better understanding, however it is important to note that my necklace will be entirely red, now from the ring of 7 beads we will leave 4 in the back of our finger so that in this positions at the end the jewelry ring and we will leave 3 beads in front that are with which we will begin to make our choker, now we are going to thread 1 white bead, 3 red beads and 1 white bead that is a total of 5 beads on the needle and then we will pass the needle through the bead that is at the bottom of the 3 beads.

✨ Paso 5. En este punto se formará un círculo con las 5 mostacillas, vamos a llevar nuestro hilo hacia arriba y lo vamos a posicionar entre la primera y segunda mostacilla.
✨ Step 5. At this point we will form a circle with the 5 beads, we are going to bring our thread up and position it between the first and second bead.

✨ Paso 6. Seguidamente vamos atravesar la segunda mostacilla en la parte superior del círculo que se formó previamente, aquí es importante ajustar bien el hilo para que el choker vaya tomando su respectiva forma a medida que vamos formando.
✨ Step 6. Next we are going to cross the second bead at the top of the circle that was previously formed, here it is important to adjust the thread well so that the choker will take its respective shape as we are forming it.

✨ Paso 7. Ahora vamos a volver a ensartar en la aguja 5 mostacillas más, este número de mostacillas siempre va ser el mismo hasta que culminemos el choker.
✨ Step 7. Now we are going to string 5 more beads on the needle, this number of beads will always be the same until we finish the choker.

✨ Paso 8. Ensartamos de nuevo la aguja en la segunda mostacilla de la parte inferior y aquí volveremos a repetir los pasos anteriores.
✨ Step 8. We thread the needle back into the second bead at the bottom and here we will repeat the previous steps again.

✨ Para elaborar este diseño es importante que todas las mostacillas sean del mismo tamaño ara que el entramado salga simétrico de lo contrario quedará el choker con un entramado poco prolijo, este fue uno de los motivos porque mi choker fue elaborado con un solo color de mostacillas.
✨ To make this design it is important that all the beads are of the same size so that the weave is symmetrical, otherwise the choker will have a not very neat weave, this was one of the reasons why my choker was made with only one color of beads.

✨ Otro aspecto importante que debemos tener en cuenta es que siempre debemos ajustar bien el hilo.
✨ Another important aspect to keep in mind is to always tighten the thread properly.

✨ Es un trabajo de requiere paciencia ya que consta de paso repetitivos.
✨ It is a job that requires patience as it consists of repetitive steps.

✨ Paso 9. Cuando alcanzamos el largo deseado para nuestro choker vamos a finalizar con 4 mostacilla para formar en estre extremo un círculo también.
✨ It is a job that requires patience as it consists of repetitive steps.

✨ Paso 10. En un extremo del choker vamos agregar un arito de mostacilla más la tranca y en otro extremo colocaremos varios aritos.
✨ Step 10. At one end of the choker we are going to add a bead of bead plus the clasp and at the other end we will place several beads.

De esta manera habremos terminado de hacer nuestro choker, ¿Que le ha parecido el paso a paso ? Y el ¿Resultado? Se atreverían a recrear este entramado de mostacillas?
In this way we will have finished making our choker, What did you think of the step by step? And the result? Would you dare to recreate this weave of beads?
Resultado || Result


Espero el resultado haya sido del agrado de ustedes estimados amigos, gracias a todos por llegar hasta aquí, como siempre gracias por la atención, apreciación, tiempo y apoyo será hasta un próximo post, un fuerte y cálido abrazo desde Ecuador.
I hope the result has been to your liking dear friends, thank you all for getting here, as always thank you for the attention, appreciation, time and support will be until a next post, a strong and warm embrace from Ecuador.
La creatividad no tiene límite. || There is no limit to creativity. ✨💎🎉🌷

Hasta la próxima...
See you next time... 🩷


🎥Imágenes y vídeo creados con: |Images and video created with: CapCut | Giphy| Canva
🇪🇸Traducido con DeepL