A delicate combination of pearls and ballerinas attached to two different types of chain started an adventure that spiraled out of control and what started as a bracelet to wear for Christmas dinner ended up as a choker, bracelet and earrings set. What can I tell you, that's just me!

Happy #jewerly day friends I hope you had a great week and that the preparations to welcome the new year are going smoothly. Today I want to share with you some cute accessories I created for myself on Christmas Eve.
Yes, in the middle of December 24th with a lot of things to do I had the idea of making myself a "bracelet ", which was already a little crazy because only the hallacas were done, but I'm not very normal friends, so between one thing and another I decided to make my bracelet for Christmas Eve, but the thing ended up in a complete set for me and one for my daughter Miranda!
Luckily everything flowed super fast, especially the design which is what takes me more time and with that in mind I looked for the necessary materials to get down to work and for that I would need two different types of chains since the bracelet would be a "mix ", two different halves joined by a golden ball.
As I told you I started with one piece and ended up with three, but don't be afraid, today we will only make the bracelet and leave the other two pieces for another opportunity. Remember that you can make them in the colors of your preference and with the materials you like the most and that's the beauty of working with our hands, being able to do it to our liking. The idea is that you take the idea and adapt it to you!

For one side I used a link chain with very nice carving on the sides that gives it a very pretty look and I used it doubled for a distinctive touch.
The other side is a bit more elaborate and for that I used a chain with a completely different design than the other one, plus small pearls and smaller golden beads than the one I used to separate the two sides of the bracelet. I liked the result so much that I decided the design would look beautiful on a choker and while we were at it, why not make the earrings!
I think it's a pretty simple kit to make even though it may look complicated, but it's really not. The most elaborate or that may present some difficulty is to connect the pearls and beads and I will try to be very detailed with the step by step but remember that practice makes perfect. For me they are still not perfect but I have been improving.
And now, without further delay, let's start our work and for this we will do it with the bracelet, which in principle was the only thing I would do!

Arrange the materials to be used on our blanket to avoid bouncing and our pieces falling to the floor.

We will start with the simplest side of our bracelet, for which we will need the link chain, a golden ball, two caps, wire and a ring.
We will measure the length of the link chain and fold it in half. Remember that it should cover only half of the wrist, since the other half will be a different design.

To assemble our bullet we insert a cap through the wire and the bullet. I have these that come already cut and with a closed side, but you can perfectly use a long one and go cutting.
We insert the other cap and with the pliers we cut the wire to proceed to close it with the pliers. To do this we take the tip of the wire with the pliers and bend in the direction of the ball and we will have our piece ready.


The next thing we will do is to attach the ring to the link chain and inside the ring the piece with the ball. Close the ring and the first part of the bracelet is ready.


For the second side we will need fragments of the chain with which we will create the contrast, beads, wire and smaller balls than the one we used for the other part of the bracelet that would be the central part of the bracelet.
We will start assembling the pieces with the pearls in the same way as we did with the golden ball. We insert them in the wire, cut and close.


We attach to one of the chain fragments the piece with the pearl we already have ready and attach it to the other end of our bracelet.


We elaborate another piece with the pearl and we join it to the previous one and in this way we are giving life to our design.
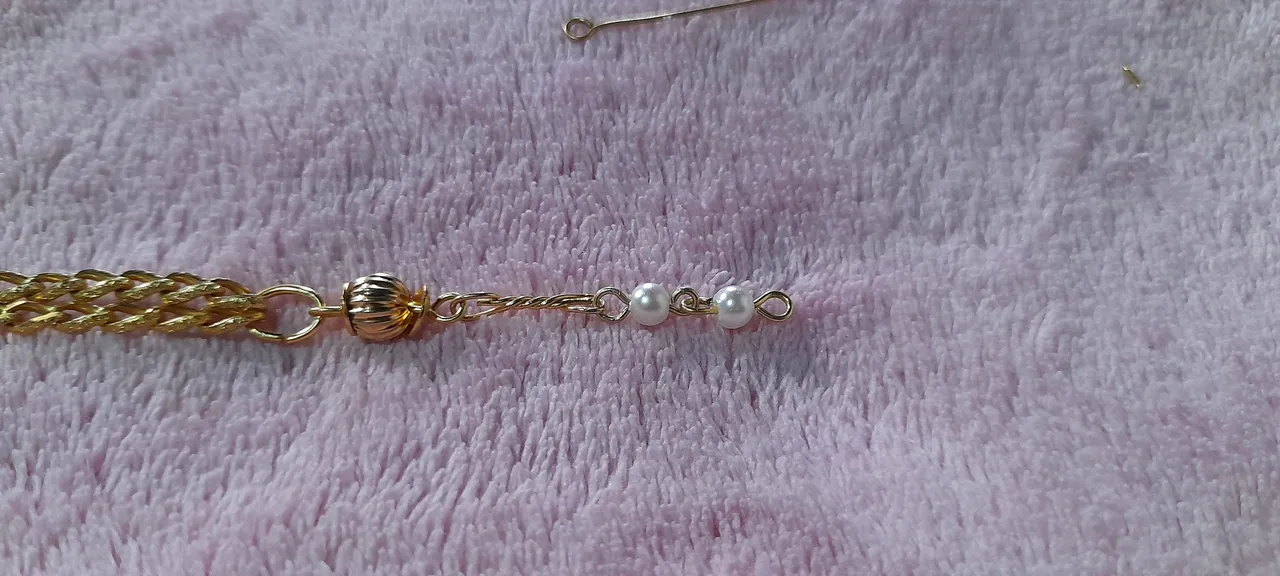
Next we will assemble a ball that we will join to our last bead and to continue with the pattern we will add another fragment of chain, we incorporate two more beads and with this we would have ready the second side of our bracelet.


Now all that's left is to attach the clasp to our bracelet, for which we will need three rings and a clasp.

At one end of our bracelet we will place a medium ring and a smaller one attached to it which will be the one we will need to connect the clasp.
At the other end we place a ring and next to it the clasp and in this way our bracelet is finished.


As you can see the result is a very delicate garment that can be combined with all kinds of clothes, which is great because this way we do not fill ourselves with accessories that eventually we will not use and will be accumulating in the dresser.
And if we have an outfit like this it is not necessary to use the three garments together, we can use them separately or combined with others, which will make them look like different pieces.
Stay tuned for my next post so you can see the elaboration of the two remaining garments. Kisses and blessings!
Una delicada combinación de perlas y balines unidos a dos tipos diferentes de cadena dieron inicio a una aventura que se salió de control y lo que comenzó como una pulsera para usar en la cena de Navidad terminó siendo un conjunto de gargantilla, brazalete y zarcillos. ¿Qué les puedo decir?, así soy yo!

Feliz día amigos de #jewerly espero hayan tenido una semana estupenda y que los preparativos para recibir el año nuevo estén marchando sobre ruedas. Hoy quiero compartir con ustedes unos lindos accesorios que cree para mí la víspera de Navidad.
Sí, en pleno 24 de diciembre con muchas cosas pendientes por hacer se me ocurrió la idea de hacerme un "brazalete", lo que ya era medio loco porque sólo estaban hechas las hallacas, pero yo no soy muy normal amigos, así que entre una y otra cosa me dispuse a hacer mi pulsera para Noche Buena, pero la cosa terminó en un juego completo para mí y uno para mi hija Miranda!
Por suerte todo fluyo súper rápido, sobre todo el diseño que es lo que me toma más tiempo y con eso en mente busqué los materiales necesarios para ponerme manos a la obra y para ello necesitaría dos tipos de cadenas diferentes ya que el brazalete sería un "mix", dos mitades diferentes unidas por un balin dorado.
Como les comenté inicié con una prenda y terminé con tres, pero no se asusten, hoy sólo haremos el brazalete y dejaremos las otras dos piezas para una nueva oportunidad. Recuerden que pueden elaborarlos en los colores de su preferencia y con los materiales que más le agraden y eso es lo lindo de trabajar con nuestras manos, poder hacerlo a nuestro gusto. La idea es que tomen la idea y la adapten a ustedes!

Para uno de los lados utilicé una cadena de eslabones con un labrado muy bonito a los lados que le da una vista muy preciosa y lo usé doble para darle un toque distintivo.
El otro lado es un poco más elaborado y para ello usé una cadena con un diseño completamente diferente a la otra, además de perlas pequeñas y balines dorados más pequeños que el que utilicé para separar los dos lados de la pulsera. El resultado me gustó tanto que decidí que el diseño se vería hermoso en una gargantilla y ya que estábamos en eso, por qué no hacer los zarcillos!
Creo que es un kit bastante sencillo de hacer a pesar que pueda parecer complicado, pero en realidad no lo es. Lo más elaborado o que puede presentar algo de dificultad es conectar las perlas y balines y trataré de ser bien detallada con el paso paso pero recuerden que la práctica hace al maestro. A mí aún no me quedan perfectas pero he ido mejorando.
Y ahora sí, sin más demora iniciemos nuestro trabajo y para ello lo haremos con la pulsera que en principio era lo único que haría!
Disponer los materiales a emplear sobre nuestra manta para evitar rebotes y que nuestras piezas caigan al suelo.
Iniciaremos con el lado más sencillo de nuestra pulsera, para lo que necesitarenos la cadena de eslabones, un balin dorado, dos tapitas, alambre y una argolla.
Mediremos el largo que necesitaremos de la cadena de eslabones y doblamos a la mitad. Recordemos que debe cubrir sólo la mitad de la muñeca, ya que la otra mitad será un diseño diferente.
Para armar nuestro balin insertamos una tapita por el alambre y el balin. Yo tengo estos que ya vienen cortados y con un lado cerrado, pero perfectamente pueden usar uno largo e ir cortando.
Insertamos la otra tapita y con la tenaza cortamos el alambre para proceder a cerrar con la pinza. Para ello tomamos la punta del alambre con la pinza y doblamos en dirección al balin y ya tendremos lista nuestra pieza.
Lo siguiente que haremos será unir la argolla a la cadena de eslabones y dentro de la argolla la pieza con el balin. Cerramos la argolla y ya estaría lista la primera parte del brazalete.
Para el segundo lado necesitaremos fragmentos de la cadena con la que crearemos el contraste, perlas, alambre y balines más pequeños que el que usamos para la otra parte del brazalete que vendría siendo la parte central del mismo.
Iniciaremos armando las piezas con las perlas de la misma forma que lo hicimos con el balin dorado. Insertamos en el alambre, cortamos y cerramos.
Unimos a uno de los fragmentos de cadena la pieza con la perla que ya tenemos lista y la unimos al otro extremo de nuestro brazalete.
Elaboramos otra pieza con la perla y la unimos a la anterior y de ésta forma estamos dándole vida a nuestro diseño.
Seguidamente armaremos un balin que uniremos a nuestra última perla y para continuar con el patrón agregaremos otro fragmento de cadena, incorporamos dos perlas más y con ésto tendríamos listo el segundo lado de nuestra pulsera.
Ahora sólo nos queda colocar el cerrador de nuestro brazalete, para lo que necesitaremos tres argollas y un broche.
A un extremo de nuestro brazalete colocaremos una argolla mediana y una más pequeña unida a ella que será la que necesitaremos para conectar el broche.
En el otro extremo colocamos una argolla y junto a ella el cerrador y de ésta manera queda finalizado nuestro brazalete.
Como ven el resultado es una prenda bastante delicada y que nos puede combinar con todo tipo de ropa, lo que es genial porque así no nos llenamos de accesorios que finalmente no utilizaremos y se estarán acumulando en la cómoda.
Y si tenemos un conjunto como éste no es necesario que usemos las tres prendas juntas, las podemos utilizar por separado o combinadas con otras, lo que las hará ver como piezas diferentes.
Estén atentos a mi próxima publicación para que puedan ver la elaboración de las dos prendas restantes. Besitos y bendiciones!

Fotografía por:| Photography by:

Edición por:| Edtion by:
Traducido con:| Translated with www.DeepL.com/Translator (free version)