Hoy no se libraron de mí! Decidí venir a hacerles compañía en la mañana y compartir con ustedes una creación súper linda de hace unos días, y es que mientras elaboraba uno de los brazaletes que les mostré hace poco, la musa llegó a mí y aproveché la inspiración para hacer otro y tenía pendiente traerlo al blog.
You weren’t going to get away from me today! I decided to pop in this morning to keep you company and share with you a really lovely creation I made a few days ago. You see, whilst I was making one of the bracelets I showed you recently, inspiration struck, so I seized the moment to make another one, and I’d been meaning to post it on the blog.

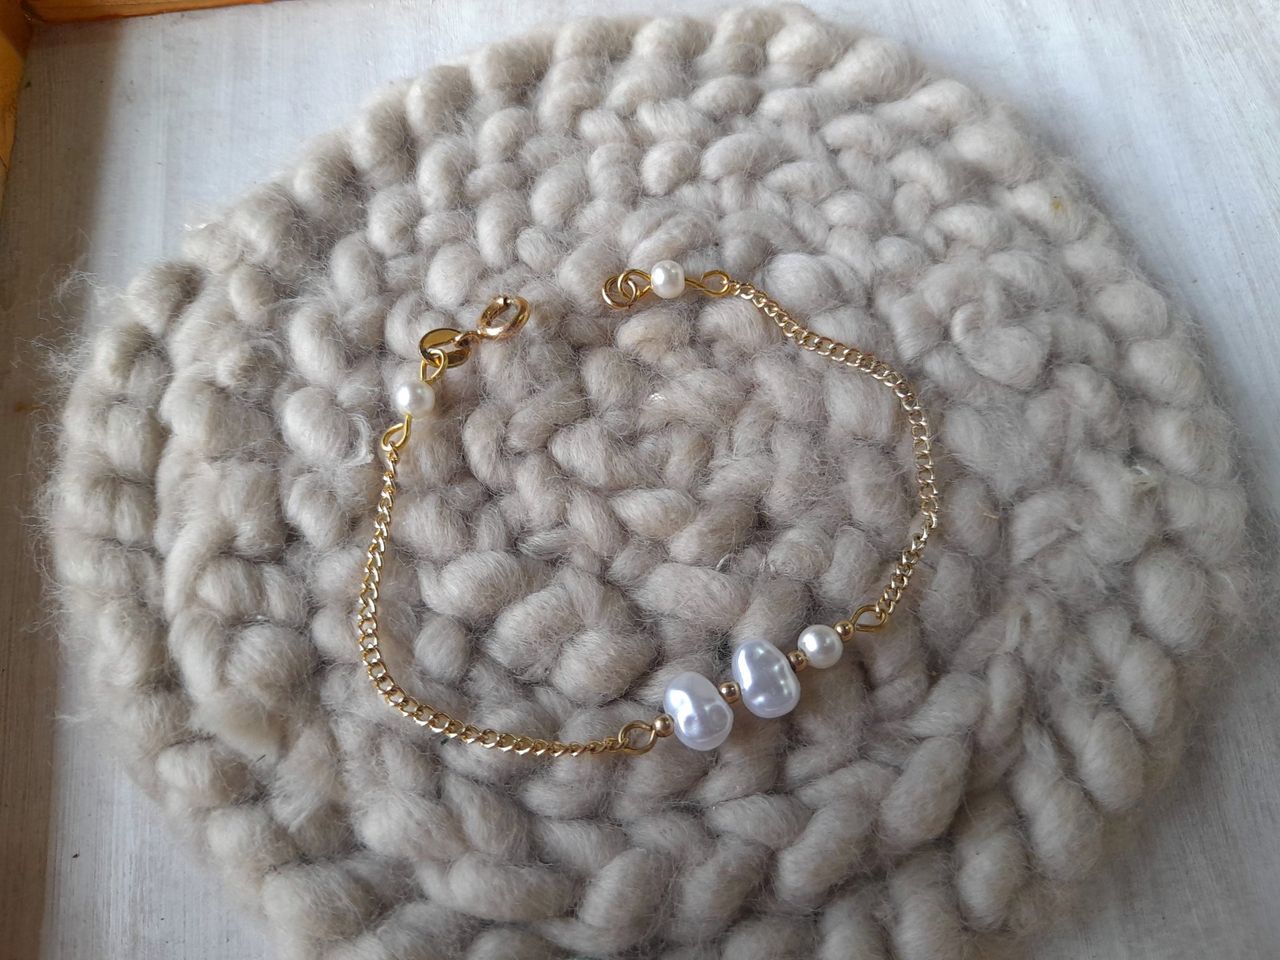
Se trata de un brazalete de cadena con una especie de "placa" de perlas en diferentes tamaños y balines mini, una combinación que la verdad me gustó muchísimo y creo que el toque especial se lo ha puesto esta cadenita delgada que he usado últimamente, y como la verdad es bastante sencilla de elaborar quise compartir con ustedes el paso a paso, no solo para que la elaboren en casa, sino que puede servirles de inspiración para hacer sus propias creaciones, así que. sigan leyendo.
It’s a chain bracelet featuring a sort of “plate” made of pearls in different sizes and mini beads – a combination I really loved, and I think the special touch comes from this thin chain I’ve been wearing lately. As it’s actually quite simple to make, I wanted to share the step-by-step process with you, not just so you can make it at home, but also to inspire you to create your own designs, so… keep reading.

Materiales
Cadena delgada
Balines mini
2 perlas medianas
1 perla pequeña
Alfileres de ojo
Argolla pequeña
Cerrador
Tenaza
Pinza plana
Pinza redonda
Materials
Thin chain
Mini beads
2 medium beads
1 small bead
Eye pins
Small jump ring
Closure
Pliers
Flat-nose pliers
Round-nose pliers
Paso a paso/Step by step
Para la elaboración de este brazalete vamos a crear dos piezas diferentes. una que será la pieza central o focal de nuestro brazalete que va a estar formada por tres perlas y balines y la segunda es una pieza con perlitas en solitario.
Y la primera pieza con la que vamos a trabajar es nuestra pieza central, y para ello vamos a necesitar un alfiler de ojo, 2 perlas medianas, una perla pequeña y 4 balines mini, y lo que vamos a hacer es pasar por el alfiler de ojo un balín, luego una perla mediana, otro balín, otra perla mediana, un balín, y, finalmente, una perla pequeña seguida de un balín.
En este punto necesitamos crear un arito en el extremo del alfiler, así que como hacemos siempre utilizamos la pinza redonda, la ubicamos en el extremo del alfiler de ojo y giramos hacia dentro sobre sí misma, creando de esta forma nuestro aro.
To make this bracelet, we’re going to create two different pieces. One will be the central or focal piece of our bracelet, made up of three beads and seed beads, and the second is a piece featuring individual seed beads.
The first piece we’ll be working on is our centrepiece, and for this we’ll need an eye pin, 2 medium beads, one small bead and 4 mini seed beads. What we’ll do is thread a seed bead onto the eye pin, followed by a medium bead, another seed bead, another medium bead, a seed bead, and finally a small bead followed by a seed bead.
At this point, we need to create a loop at the end of the eye pin, so, as we always do, we use the round-nose pliers, place them at the end of the eye pin and twist them inwards on themselves, thus creating our loop.


La otra pieza que vamos a crear es una bien sencilla, ya que solo vamos a utilizar una perlita, y por supuesto el alfiler de ojo, y lo que haremos es tomar el alfiler de ojo pasar la perla por él para seguidamente cortar el excedente del alfiler de ojo y crear nuestro aro de la misma forma en que lo hicimos anteriormente.
De ésta pieza vamos a crear dos.
The next piece we’re going to make is a very simple one, as we’ll only be using a single bead and, of course, the eye pin. What we’ll do is take the eye pin, thread the bead onto it, then cut off the excess length of the eye pin and create our ring in the same way as before.
We’re going to make two of these pieces.


El siguiente paso es cortar la cadena según el tamaño que vamos a necesitar. En este caso, por supuesto, debemos cortar 2 piezas, y el largo dependerá cuán largo desean su brazalete, además, en esta oportunidad como voy a agregar una pieza de perlas individuales a cada cadena, debemos tomar en cuenta antes de cortarla que eso va a alargarla un poco más.
The next step is to cut the chain to the required length. In this case, of course, we need to cut two pieces, and the length will depend on how long you want your bracelet to be. Also, as I’m going to add a strand of individual beads to each chain, we need to bear in mind before cutting that this will make them a little longer.

Una vez hemos cortado la cadena el siguiente paso es conectarlas a la pieza central del brazalete, y para ello lo que vamos a hacer es que con ayuda de la pince redonda abrimos solo un poco cada extremo y conectamos la cadena en cada uno de los lados para luego cerrarla muy bien con la pinza plana.
Once we have cut the chain, the next step is to attach it to the centre piece of the bracelet. To do this, we’ll use the round-nose pliers to open each end just a little, attach the chain to each side, and then close it securely with the flat-nose pliers.

Listo este paso, para continuar con la elaboración del brazalete, en cada extremo de la cadena vamos a incorporar nuestra pieza de perla individual ya que me pareció que es un toque súper lindo, además de diferente, así que le dará un toque único a nuestro brazalete.
Para conectarla lo que hacemos es abrir un poco el ojo de uno de los extremos de la pieza de perla individual con la pinza redonda y hacemos pasar la cadena, cerramos finalmente y aseguramos con la pinza plana, y repetimos el proceso con el otro extremo de la cadena.
Now that this step is complete, to continue making the bracelet, we’re going to add our individual pearl piece to each end of the chain, as I thought it would be a really lovely touch – and a bit different too – so it will give our bracelet a unique look.
To attach it, we use the round-nose pliers to slightly open the eye at one end of the individual pearl, thread the chain through, then close it and secure it with the flat-nose pliers. We then repeat the process with the other end of the chain.

En este punto solo nos falta conectar las piezas que nos van a permitir cerrar nuestro brazalete, y para esto en uno de los extremos vamos a colocar una argolla pequeña y en el otro nuestro broche para cerrar, y esto lo haremos de la misma manera en que conectamos todas las piezas, es decir, abrimos el "ojo", hacemos pasar la pieza que necesitamos conectar y cerramos nuevamente.
De esta forma, tenemos listo nuestro brazalete que como pueden ver, es una belleza.
At this point, all that remains is to attach the parts that will allow us to fasten our bracelet. To do this, we’ll attach a small ring to one end and our clasp to the other, and we’ll do this in the same way we attached all the other parts: that is, we open the “eye”, thread the part we need to attach through it, and close it again.
And there you have it: our bracelet is ready, and as you can see, it’s a real beauty.

Un procedimiebto sencillo, muy fácil de hacer y con un resultado realmente bonito y sobre todo muy delicado.
A simple process, very easy to do, with a truly beautiful result and, above all, a very delicate finish.
📷Photography by|Fotografía por: