The accessories are undoubtedly an important part of the out fit of every day and is that the one who least likes accessories, at least a pair of earrings used.

Happy Power Up day, #jewerly community. Today we kick off the most beautiful month of the year for my family. Not only because it commemorates the birth of Jesus Christ, but because in that month my precious Miranda was born and starting the year, just on Three Kings Day, my son Matías is born, so December 2010 and 2012 were some of my happiest Christmases with my babies in my tummy and the expectation of finally meeting them!
Today I wanted to take advantage of #powerupday to share the step by step of the bracelet or bracelet promised in my last post in this community and as I told you in that opportunity it would be a little more elaborate than the previous one since we will not work with elastic thread, but with different types of chains, brooches, wire, beads and other little things to create a very nice accessory.
This is a three in one bracelet, that is three bracelets joined by a single clasp, which unlike the one I made for Miranda LINK can not be used separately because they will be joined by a ring.

I confess that at first I thought it was a good idea to make it that way because it would have much more body, but then I thought that making them separate would have given me the option of having four different options! But very much against my crazy obsessions, I didn't undo it a second time (yes, I did it once!) and kept my perfectionist self at bay, ultimately I can do more!
So today our step by step will be to create a gorgeous three in one bracelet that of course can be modified to your liking. In my case I used three chains of different sizes, some golden beads; square and rectangular and a piece of lycra, creating a combination that for me looks modern and very delicate at the same time.
So without further ado I leave you the list of materials and tools I used to create this beautiful bracelet.

I must confess that for me to do this kind of activities requires some order and previous preparation because I like to have everything at hand to not get up every so often to look for something, so I am very careful when placing at my fingertips everything I need to work.
And as I mentioned in the previous post, the first thing to do is to come up with the design we want for our accessory or just start and let our imagination fly.
In my case, I already had clear that it would be a three in one bracelet and that one of the pieces would wear fuchsia lycra because I wanted to give it a casual look and create an accessory with a casual air, but being very feminine I wanted that despite the casual and even sport touch that lycra can give, it had a delicate appearance, which in my opinion I achieved with a much thinner chains and some delicate touches with the small beads.

And now we go to our step by step and as always, the first thing we will do, will be to prepare the work area by placing all the pieces on a thick blanket (very personal recommendation).

For the first bracelet we will need three equal sized pieces of the thinnest of the three selected chains, two square pieces and wire to bind everything together.
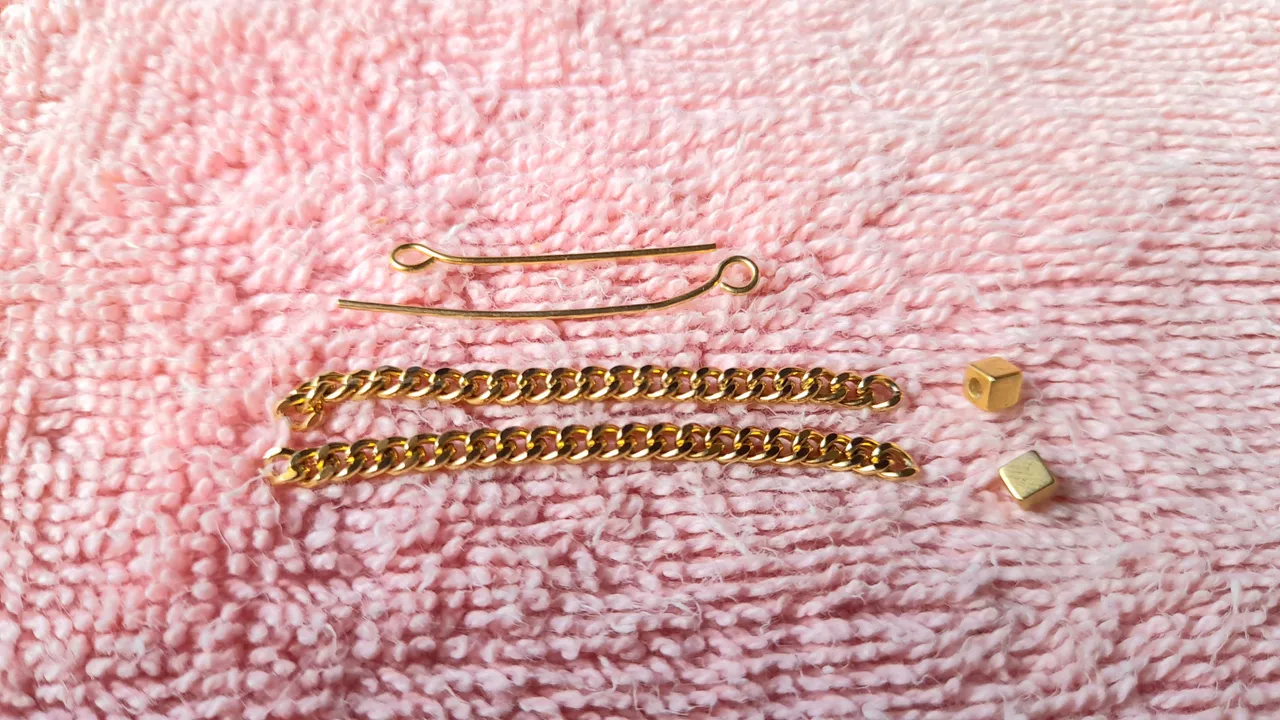
Attach to one of our chains the wire as shown in the pictures. Incorporate the golden piece, trim the remaining wire and with the help of the pliers connect to the other portion of chain.
In my case I bought these pieces of wire that already come with one of the ends prepared so I only have to open and connect, but for the other end is to cut and help us with the pliers to bend and join the pieces.


We repeat the procedure with the remaining materials and with that we will have ready the first of our three bracelets.


For the next one, we will need two pieces of the same size as our second selected chain (a little thicker than the first), a piece of wire and a rectangular gold piece.
To join the pieces we will use the same procedure we used for the first bracelet, that is, we join the first piece of chain to the wire, insert the golden rectangle, make the connection to the other end of the wire, incorporate the chain and close. With this we would be ready two of the bracelets that form our bracelet.

For the last bracelet of our trio we are going to need a piece of lycra, our thickest chain and a hairpin or hair clip.

Pass the piece of lycra through each of the links of our chain. For this we will help us with the hairpin as if we were sewing and we will do this until we finish with the whole chain. Cut the remaining chain and close at each end with a knot to keep the lycra in place.


With the help of the pliers we join the three pieces elaborated with a hoop to which we will place a clasp or pin to close our bracelet.


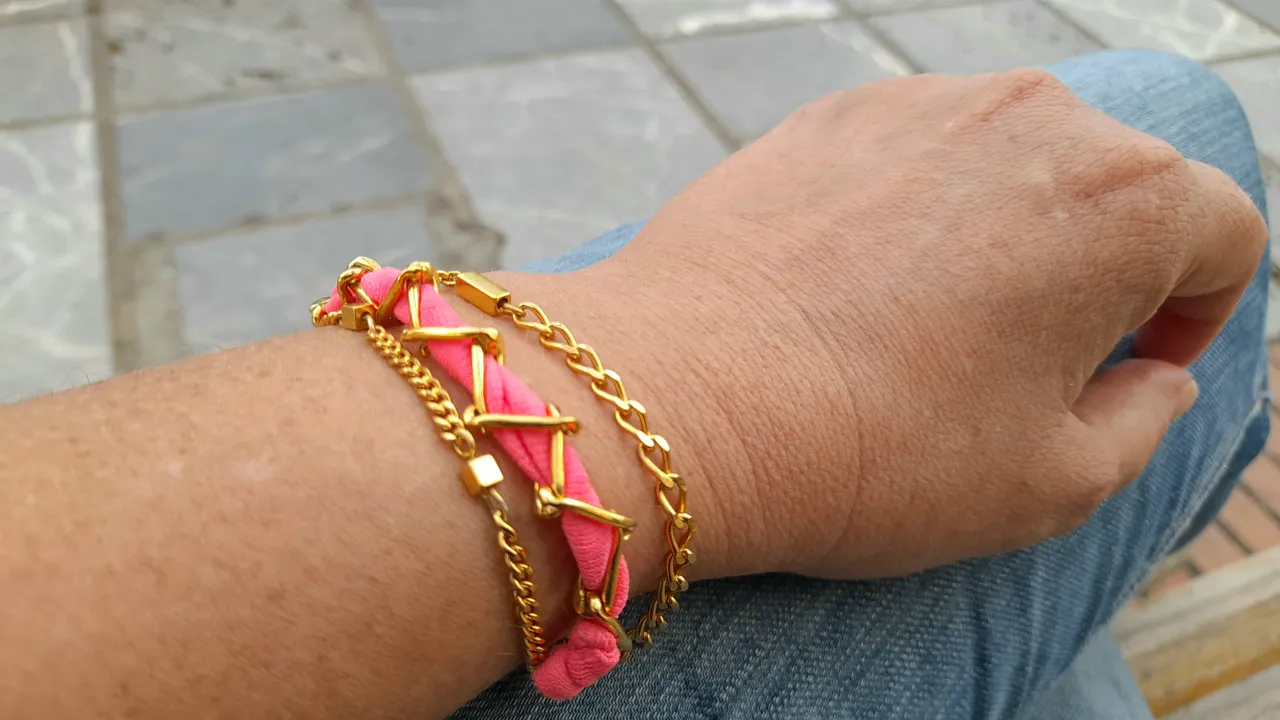
On the other end of the bracelet join the pieces with a ring. And with this we will have ready a beautiful accessory. I could not resist and the same day I finished it I used it! Luckily it matches with most of my clothes and that is of great importance when creating our accessories.

I hope you will be as in love with it as I am and remember that you can substitute any piece according to your taste, because that is exactly the beauty of making something with our hands. Adapt them to our tastes and needs.
And with this I say goodbye for today friends, I hope you are encouraged to make yours, if I could you more. Kisses and blessings creative people!
ESPAÑOL
Los accesorios sin lugar a dudas forman parte importante del out fit de cada día y es que a la que menos le gustan los accesorios, por lo menos un par de aretes usa.

Feliz día del Power Up, comunidad de #jewerly. Hoy damos inicio al mes más bello del año para mi familia. No sólo porque se conmemora el nacimiento de Jesucristo, sino porque en ese mes nació mi preciosa Miranda y comenzando el año, justo el día de Reyes, nace mi hijo Matías, así que Diciembre del 2010 y 2012 fueron de mis navidades más felices con mis bebés en la pancita y la expectativa de al fin conocerlos!
Hoy quise aprovechar el #powerupday para compartir el paso a paso del brazalete o pulsera prometida en mi último post en ésta comunidad y como les comenté en esa oportunidad sería un poco más elaborado que el anterior ya que no trabajaremos con el hilo elástico, sino con distintos tipos de cadenas, broches, alambre, cuentas y otras cositas para crearnos un accesorio muy bonito.
Se trata de un brazalete tres en uno, es decir son tres pulseras unidas por un sólo broche, que a diferencia de la que hice para Miranda ENLACE no se puede usar de forma separada ya que estarán unidas por una argolla.
Confieso que en un principio me pareció buena idea hacerla de esa manera porque tendría mucho más cuerpo, pero luego pensé que hacerlas separadas me hubiese dado la opción de tener cuatro opciones diferentes! Pero muy en contra de mis obsesiones locas, no la deshice una segunda vez (sí, lo hice una vez!) y mantuve a raya a mi yo perfeccionista, a fin de cuentas puedo hacer más!
Por lo que hoy nuestro paso a paso será para crear un bellisimo brazalete tres en uno que por supuesto puede ser modificado según su gusto. En mi caso yo utilicé tres cadenas de diferente tamaño, unas cuentas doradas; cuadradas y rectangulares y una pieza de licra, creando una combinación que para mí luce moderna y muy delicada a la vez.
Así que sin más les dejo la lista de materiales y herramientas que utilicé para crear éste bello brazalete.

Debo confesar que para mí el realizar éste tipo de actividades requiere cierto orden y preparación previa pues me gusta tener todo a la mano para no levantarme cada tanto a buscar algo, así que tengo mucho cuidado al momento de colocar a mi alcance todo lo necesario para trabajar.
Y como les comenté en el post anterior lo primero es tener ideado el diseño que queremos para nuestro accesorio o simplemente arrancar y dejar volar nuestra imaginación.
En mi caso, yo ya tenía claro que sería un brazalete tres en uno y que una de las piezas llevaría licra fucsia porque quería darle vistosidad y crear un accesorio con aire casual, pero al ser muy femenina quería que a pesar del toque casual e incluso sport que puede otorgar la licra tuviese una apariencia delicada, lo que a mí parecer logré con unas cadenas mucho más delgadas y algunos toques delicados con las pequeñas cuentas.
Y ahora sí vamos a nuestro paso a paso y como siempre, lo primero que haremos, será preparar el área de trabajo colocando todas las piezas sobre una manta gruesa (recomendación muy personal).
Para la primera pulsera necesitaremos tres piezas de igual tamaño de la más delgada de las tres cadenas seleccionadas, dos piezas cuadradas y alambre para unir todo.
Unir a una de nuestras cadenas el alambre según se aprecia en las imágenes. Incorporar la pieza dorada, recortar el restante de alambre y con ayuda de la pinza conectar a la otra porción de cadena.
En mi caso yo compré éstas piezas de alambre que ya vienen con una de las puntas preparadas por lo que sólo debo abrir y conectar, pero para el otro extremo corresponde cortar y ayudarnos con la pinza para doblar y unir las piezas.
Repetimos el procedimiento con los materiales restantes y con ello tendremos lista la primera de nuestras tres pulseras.
Para la siguiente, necesitaremos dos piezas del mismo tamaño de nuestra segunda cadena seleccionada (un poco más gruesa que la primera), una pieza de alambre y una pieza dorada rectangular.
Para unir las piezas usaremos el mismo procediendo que utilizamos para la primera pulsera, es decir, unimos la primera pieza de cadena al alambre, insertamos el rectángulo dorado, hacemos la conexión al otro extremo del alambre, incorporamos la cadena y cerramos. Con ésto ya estarían listas dos de las pulseras que forman nuestro brazalete.
Para la última pulsera de nuestro trío vamos a necesitar una pieza de licra, nuestra cadena más gruesa y una horquilla o gancho para el cabello.
Pasar la pieza de licra por cada uno de los eslabones de nuestra cadena. Para ésto nos ayudaremos con la horquilla como si estuviésemos cosiendo y haremos esto hasta finalizar con toda la cadena. Recortamos el restante y cerramos en cada extremo con un nudo para mantener la licra en su lugar.
Con ayuda de las pinzas unimos las tres piezas elaboradas con un aro al cual colocaremos un broche o pasador para cerrar nuestro brazalete.
En el otro extremo del brazalete unir las piezas con una argolla. Y con ésto tendremos listo un bellisimo accesorio. Yo no pude resistirme y el mismo día que la terminé la usé! Por suerte combina con la gran mayoría de mis prendas de vestir y eso es de gran importancia al momento de crear nuestros accesorios
Espero queden tan enamorados de ella como yo lo estoy y recuerden que pueden sustituir cualquier pieza según sea su gusto, pues eso justamente es lo bonito de hacer algo con nuestras manos. Adaptarlos a nuestros gustos y necesidades.
Y con ésto me despido por hoy amigos, espero que se animen a elaborar las suyas, que si yo pude ustedes más. Besitos y bendiciones gente creativa!

Fotografía por:| Photography by:

Edición por:| Edtion by:
Traducido con:| Translated with www.DeepL.com/Translator (free version)