
| Esp | Eng |
|---|---|
| Hola amigos creativos de nuestra linda comunidad @Jewelry, en está oportunidad les traigo mi trabajo de hoy un LINDO BRAZALETE DE OSITO PANDA, Esté hermoso brazalete ideal para una niña fue hecho con un conector de oso panda tejido o elaborado en la TÉCNICA LADRILLO. A continuación la lista de materiales y el procedimiento. | Hello creative friends of our cute community @Jewelry, in this opportunity I bring you my work today a NICE PANDA BEAR BRACELET, This beautiful bracelet ideal for a little girl was made with a panda bear connector woven or made in the CASTING BRICK TECHNIQUE. Below is the list of materials and the procedure. |

| Materiales: | Materials: |
|---|---|
| Mostacillas negras y blancas, hilo negro para mostacillas, aguja para mostacillas, cuentas fucsia número 0.8, hilo chino negro y fucsias, pinzas para bisuteria, tijeras, yesqueros. | Black and white beads, black beading thread, beading needle, fuchsia beads number 0.8, black and fuchsia Chinese thread, jewelry tweezers, scissors, plasterers. |

| Instrucciones: | Instructions: |
|---|

| Paso 1 | Step 1 |
|---|---|
| Corté 1 metro de hilo negro para mostacilla y enhebre en la aguja mostacillera. | I cut 1 meter of black mustard thread and thread on the mustard needle. |

| Paso 2 | Step 2 |
|---|---|
| Para construír la base principal de la figura introduje 6 mostacillas blancas en la aguja, las lleve a la mitad del hilo aproximadamente a los 50 cm, para que esté hilo sobre para la construcción del otro lado de la figura. | To construct the main base of the figure I introduced 6 white beads in the needle, I took them to the middle of the thread at approximately 50 cm, so that this thread would be left over for the construction of the other side of the figure. |

| Paso 3 | Step 3 |
|---|---|
| Introduje la aguja por la segunda mostacilla hacia abajo. | I inserted the needle through the second bead downwards. |

| Paso 4 | Step 4 |
|---|---|
| Seguimos introduciendo la aguja en cada mostacilla siempre hacia abajo. En la imagen observamos la primera fila terminada. | We continue inserting the needle in each stitch always downwards. In the picture you can see the first finished row. |

| Paso 5 | Step 5 |
|---|---|
| La segunda fila es de 7 mostacillas iniciamos con dos mostacillas blanca y negra, introducimos la aguja en el primer puente de hilo de unión de las mostacillas de abajo, e introducimos la aguja en la mostacilla negra de abajo hacia arriba, hasta culminar toda la fila. | The second row is of 7 beads, we start with two white and black beads, we introduce the needle in the first thread bridge of the beads below, and we introduce the needle in the black bead from the bottom to the top, until the whole row is completed. |

| Paso 6 | Step 6 |
|---|---|
| En la imagen observamos la tercera fila repetimos el mismo procedimiento, y comenzamos en el primer puente de unión, ya que no necesitamos hacer ni reducciones ni ampliaciones por lo menos no en estás primeras columnas. | In the image we observe the third row we repeat the same procedure, and we start in the first bridge of union, since we do not need to make neither reductions nor enlargements at least not in these first columns. |

| Paso 7 | Step 7 |
|---|---|
| En esta cuarta fila la iniciamos igual en el primer puente sin reducción ni ampliación. | In this fourth row we start it the same as in the first bridge without reduction or enlargement. |

| Paso 8 | Step 8 |
|---|---|
| En está quinta fila que corresponde a la parte superior de la cabeza la iniciamos con reducción de un espacio, para eso llevamos la aguja hacia las mostacillas de abajo, luego llevamos la aguja hacía las mostacillas de arriba hasta salir a la segunda mostacillas y de allí comenzamos esta quinta fila. | In this fifth row that corresponds to the upper part of the head we start it with the reduction of a space, for that we take the needle towards the lower beads, then we take the needle towards the upper beads until we go out to the second bead and from there we start this fifth row. |

| Paso 9 | Step 9 |
|---|---|
| La sexta fila tiene reducción y ampliación. | The sixth row has reduction and extension. |

| Paso 10 | Step 10 |
|---|---|
| Esté fila corresponde a la última fila que corresponde a las puntas de las orejas. | This row corresponds to the last row corresponding to the tips of the ears. |

| Paso 11 | Step 11 |
|---|---|
| En el siguiente paso observamos la elaboración de las filas de la parte inferior del cuerpo del osito. | In the next step we observe the elaboration of the rows of the lower part of the bear's body. |

| Paso 12 | Step 12 |
|---|---|
| El oso sera el conector del brazalete para eso se colocó a los lados por la fila mas ancha los aritos usando el orificio de las mostacillas. | The bear will be the connector of the bracelet, for this purpose the earrings were placed on the sides of the widest row using the hole of the beads. |

| Paso 13 | Step 13 |
|---|---|
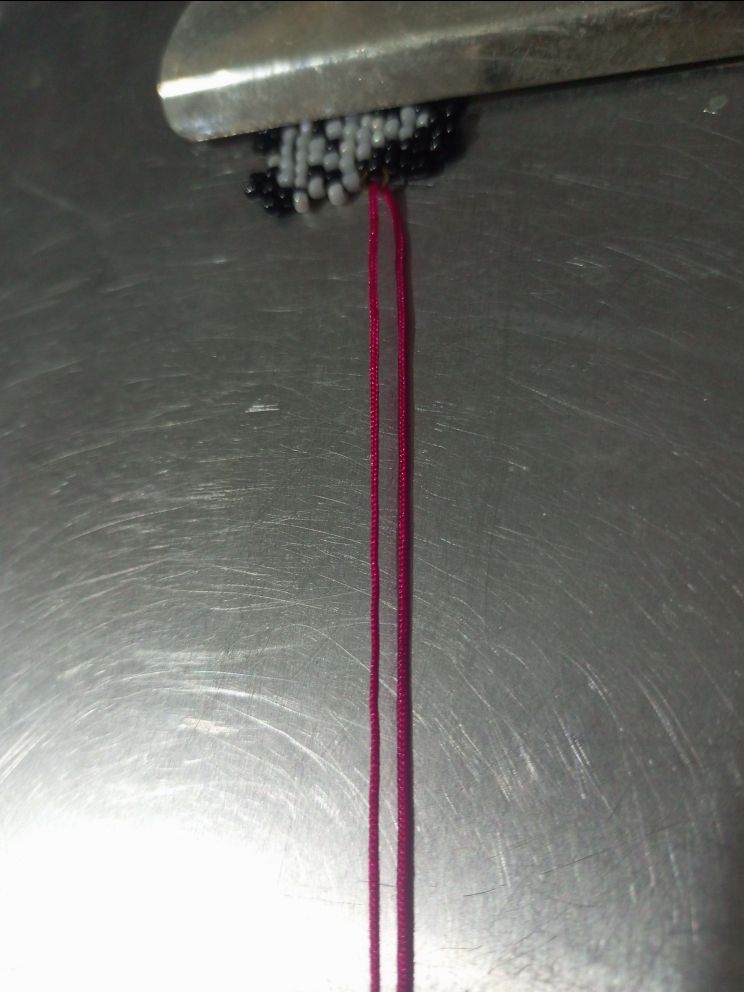
| Para la manilla corté 1 pieza de hilo chino de 40 cm, lo doble a la mitad y lo introduje por el aro del conector. Para comenzar a tejer sujete con el gancho de una carpeta el conector. | For the handle I cut 1 piece of 40 cm Chinese yarn, folded it in half and inserted it through the ring of the connector. To start knitting I fastened the connector with the hook of a folder. |
| Paso 14 | Step 14 |
|---|---|
| introduje 4 perlas en cada hilo. | I inserted 4 beads on each thread. |

| Paso 15 | Step 15 |
|---|---|
| Corté un hilo chino negro de 40 cm y realice dos nudos planos en el inicio del hilo fucsia. | I cut a 40 cm black Chinese thread and tied two flat knots at the beginning of the fuchsia thread. |

| Paso 16 | Step 16 |
|---|---|
| Tomamos dos perlas y de cada lado y con los hilo negros hacemos dos nudos planos sujetando bien, cuidando que los hilos negros queden en el medio y los oculten las perlas. | We take two pearls and on each side and with the black threads we make two flat knots holding them well, taking care that the black threads remain in the middle and are hidden by the pearls. |

| Paso 17 | Step 17 |
|---|---|
| Cerramos con 10 puntos planos en macramé. | We close with 10 flat macramé stitches. |

| Paso 18 | Step 18 |
|---|---|
| Repetimos el proceso para el otro lado de la manilla. | Repeat the process for the other side of the handle. |

| Paso 19 | Step 19 |
|---|---|
| Corté 15 cm de hilo negro, sujete los hilos de las manillas del brazalete con el gancho de la carpeta y realice 10 nudos planos para cerrar la manilla del brazalete. | Cut 15 cm of black thread, fasten the bracelet handle threads with the binder hook and tie 10 flat knots to close the bracelet handle. |

| Paso 20 | Step 20 |
|---|---|
| En los hilos de cada lado introduje una perla y realice un nudo franciscano de dos vueltas, corté y quemé el excedente de hilo. | In the threads of each side I introduced a pearl and made a Franciscan knot of two turns, cut and burned the excess thread. |

| Despedida | Farewell |
|---|---|
| Y esté es mi post del día de hoy BRAZALETE CON CONECTOR DE OSO PANDA. Espero que hayan disfrutado mi post, un trabajo hecho con mucho amor, me despido y espero disfruten mi post. | And this is my post for today BRACELET WITH PANDA BEAR CONNECTOR. I hope you enjoyed my post, a work made with a lot of love, I say goodbye and I hope you enjoy my post. |


| Créditos | Credits |
|---|---|
| Traductor: www.DeepL.com/Translator (free version).Las fotos fueron tomadas con mi Celular Tecno Sport 7T. Foto de portada editada con Canva y PhotoRoom. Banner:https://images.app.goo.gl/5N3pujMb9u2AePz87. | Translator: www.DeepL.com/Translator (free version). The photos were taken with my Tecno Sport 7T cell phone. Cover photo edited es Canva and PhotoRoom. Banner:https://images.app.goo.gl/5N3pujMb9u2AePz87. |
