
Buenas tardes a todos los miembros de esta comunidad #diyhub, una de mis favoritas. Espero que sigan disfrutando de estos días navideños en familia. Dios les bendiga.
El tejer me gusta mucho, me emociona ,me desestresa , me olvido de todo al hacerlo. Por lo tanto verán muchos post, relacionado con el tejido , por ahora estoy haciendo proyectos relacionados a la navidad.
Hoy quiero mostrar como hacer un lindo posavaso de árbol de navidad,tejido a crochet.
Especial para adornar y colocar los vasos en la mesa en donde haremos la cena o también sirve para colocarlo en el árbol de navidad o en cualquier lugar de la casa.
¡Celebremos la navidad con alegría!
Good afternoon to all members of this #diyhub community, one of my favorites. I hope you continue to enjoy these Christmas days with your families. God bless you.
I really like knitting, it excites me, it de-stresses me, I forget everything when I do it. Therefore, you will see many posts related to knitting. For now, I am doing Christmas-related projects.
Today I want to show you how to make a cute crocheted Christmas tree coaster.
It's perfect for decorating and placing glasses on the table where we'll have dinner, or you can also put it on the Christmas tree or anywhere else in the house.
¡Let's celebrate Christmas with joy!

Lindo posavaso con motivo de árbol de navidad
Cute coaster with Christmas tree motif

Materiales que se necesitan para la realización del lindo posavaso de árbol navideño:
- Hilo de tejer , colores: blanco ,marrón y verde.
- Aguja de tejer , número 3.
- Aguja lanera.
- Silicona liquido.
- Tijera.
- Adorno de una flor de navidad.
Materials needed to make the cute Christmas tree coaster:
- Knitting yarn, colors: white, brown, and green.
- Knitting needle, size 3.
- Wool needle.
- Liquid silicone.
- Scissors.
- Poinsettia decoration.

Paso a paso de la realización del posavasos:
- Lo primero que se hace es,tomar el hilo de tejer blanco con la aguja , hacer un anillo mágico, meter dentro del anillo 6 puntos bajos, este sería la primera vuelta.
- Para la segunda vuelta,hacer un aumento en cada vuelta , que sería 12 puntos bajos.
- Para la tercera vuelta, un punto bajo y un aumento para 18 puntos bajos, cabe resaltar que las vueltas terminan en un punto deslizados.
- Cuarta vuelta, hacer dos puntos bajos y un aumento , para un total de 24 puntos.
- Quinta vuelta ,tres puntos altos y un aumento para un total de 30 puntos.
- Sexta vuelta, cuatro puntos bajos y un aumento para un total de 36 puntos y la última vuelta 5 puntos bajos y un aumento, así se hará hasta terminar la vuelta.
- Tomamos el hilo marrón y en cualquier parte del primer motivo,hacemos siete puntos bajos, luego volteamos y hacemos un aumento en el primer punto, cuando lleguemos al último hacemos otro aumento para un total de 9 puntos bajos.
- Damos otra vuelta ,un aumento en el primer punto y otro aumento en el último ,para un total de 11 puntos. - Así terminamos la parte de abajo del árbol. Con el hilo color verde ,hacemos las ramas del árbol, tomamos una aguja insertamos el hilo luego hacemos la forma de las ramas. Pueden guiarse por la imagen.
- Al final pegamos con silicona la flor . Y ya estálisto el lindo posavaso.
Step-by-step instructions for making the coaster:
- First, take the white knitting yarn and the needle, make a magic ring, and work 6 single crochet stitches into the ring. This is the first round.
- For the second round, increase in each stitch, which will give you 12 single crochet stitches.
- For the third round, make one single crochet and one increase for 18 single crochets. Note that the rounds end in a slip stitch.
- Fourth round: make two single crochets and one increase for a total of 24 stitches.
- Fifth round: make three double crochets and one increase for a total of 30 stitches.
- Sixth round, four single crochets and one increase for a total of 36 stitches, and the last round, 5 single crochets and one increase, continuing in this manner until the round is complete.
- Take the brown yarn and, anywhere in the first motif, make seven single crochets, then turn and make an increase in the first stitch. When you reach the last stitch, make another increase for a total of 9 single crochets.
- Work another round, increasing in the first stitch and again in the last stitch, for a total of 11 stitches. - This completes the bottom part of the tree. Using the green yarn, work the branches of the tree. Take a needle, insert the yarn, and then work the shape of the branches. You can use the image as a guide.
- Finally, glue the flower on with silicone. And your beautiful coaster is ready.


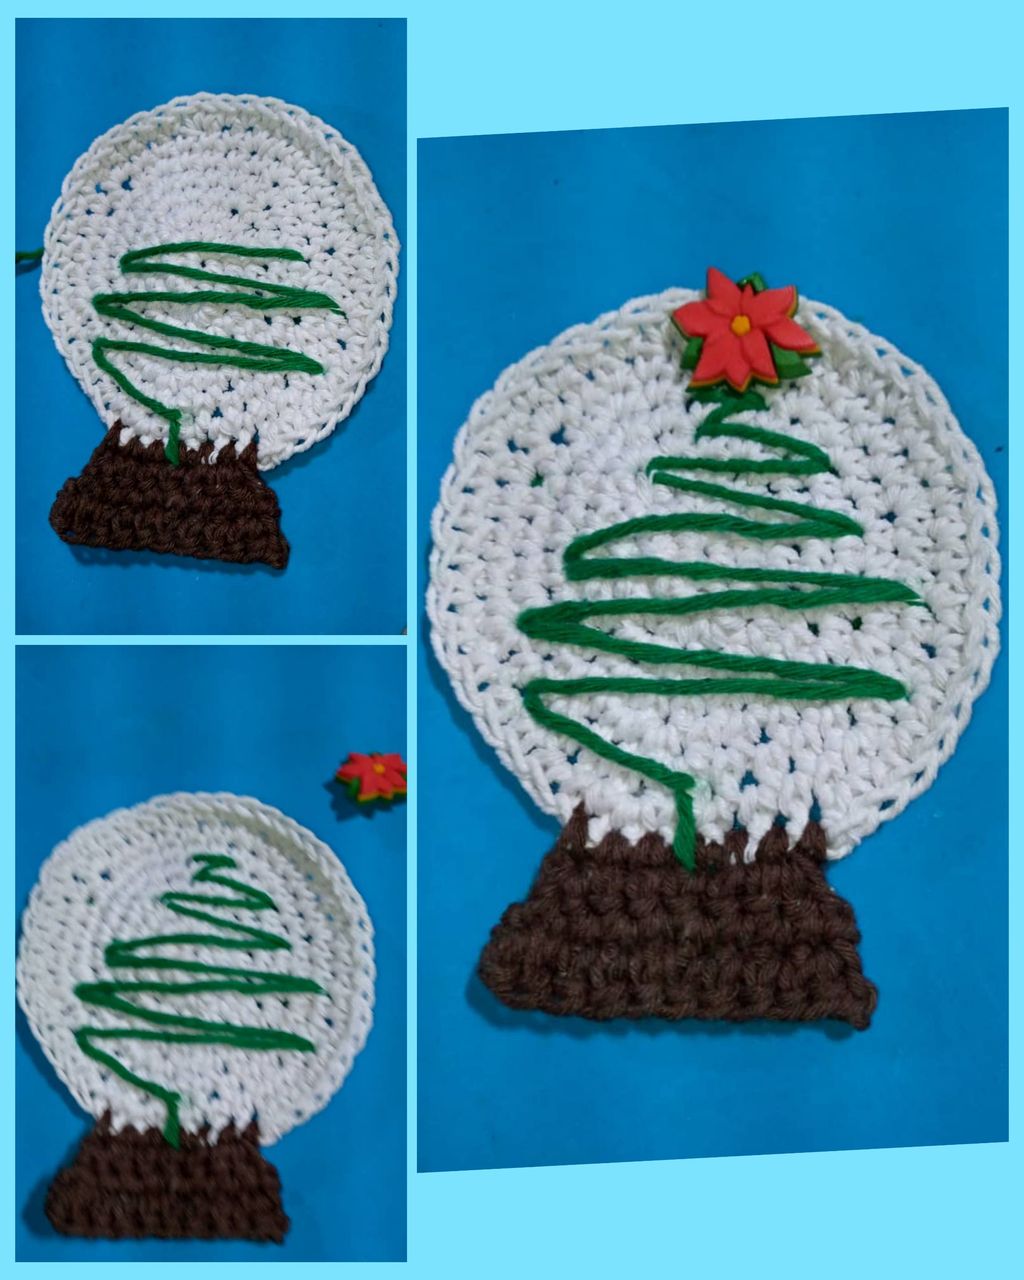
Aquí podemos observar el resultado final del lindo posavaso de árbol de navidad, tejido a crochet, espero sea de su agrado
Here we can see the final result of the cute crocheted Christmas tree coaster. I hope you like it.


Gracias por leer y comentar mi post , las fotos son mías ,tomadas con teléfono Infinix, editadas con incollage y traducidas con Deepl.
Thank you for reading and commenting on my post. The photos are mine, taken with an Infinix phone, edited with InCollage, and translated with Deepl.
