


Hello, my dear readers. I hope you are having or have had a wonderful day. Women are naturally flirtatious; we always want to look beautiful and well-groomed, and accessories help us complement that beauty.
Girls are no exception. Even from a young age, they also like to add accessories, whether on their hands, clothes, or hair. One of the things girls always wear to school or when going out anywhere is headbands. Here I bring you a step-by-step guide on how to make a headband with hanging strips, which add a touch of beauty and elegance to that schoolgirl style. Without further ado, I'll show you how I did it.
Hola mis queridos lectores. Espero que tengan o hayan tenido un excelente día. Las mujeres por naturaleza somos coquetas, queremos vernos siempre bien bonitas, arregladas y los accesorios nos ayudan a complementar esa belleza.
Las niñas no se quedan atrás, ya desde pequeñas también buscan agregar accesorios, bien sea en las manos, en la ropa o en sus cabellos. Una de las cosas que siempre usan las niñas para ir al colegio o salir a cualquier parte, son las diademas. Aquí les traigo un paso a paso de como realice una diadema con unas tiras colgantes, que le dan un toque de belleza y elegancia a ese estilo colegial. Sin más preámbulos, les enseño como lo hice.

PASO A PASO:
PASO A PASO:
The thread I will use is leftover thread that I have had for a long time. I don't know what size it is, only that it is very fine.
I want to start my work, not with a common chain stitch as is usually done. There is a way to do it so that the chain stitches are neat and not so rigid, leaving them a little elastic.
As I mentioned, the thread I'm going to use is very fine, and so that you can see how the chain stitch is done, I'll do it with fabric yarn. I want to clarify something before I start. To make this type of chain stitch, I need the length of what I'm going to make. For example, if I need to make chain stitches that cover about 20 cm, I'll need twice as much thread or a little more to be able to make the first loop. I mention this because I'll need two strands of thread to make the chain stitches.
El hilo que usaré, son resto que me han ido quedando, fueron comprados hace mucho tiempo y no sé qué número es, solo sé que es un hilo muy fino.
Quiero empezar a realizar mi trabajo, no con una cadeneta común y corriente y como se suele hacer. Hay una manera de hacerlo para que quede prolijo las cadenetas y para que no quede tan rígido, queda un poco elástico.
Bien como le comente el hilo que usaré es muy finito y para que puedan apreciar bien el paso de como se hace la cadeneta, lo haré con trapillo. Quiero aclarar algo antes de empezar, para hacer este tipo de cadeneta, necesito el largo de lo que voy a realizar, por ejemplo, si necesitó hacer unas cadenetas que me abarquen unos 20 cm, voy a necesitar el doble de hilo o un poco más para poder hacer la primera lazada. Lo digo porque necesitaré dos hebras de hilo para poder realizar las cadenetas.

Once the loop is made, I take it with my fingers, insert the needle, and pass it over the needle from front to back, using the strand of thread that is not from the ball (the shorter strand). I leave the strand from the ball at the back and pass it over the needle from behind, then pull it through the loop I made with the first strand and the main loop.
Una vez realizada la lazada la tomo con los dedos, introduzco la aguja y voy a pasar por encima de la aguja desde adelante hacia atrás, la hebra del hilo que no sea la del ovillo (la hebra más corta). La hebra del ovillo la dejo en la parte de atrás y la voy a pasar por encima de aguja desde atrás y luego la saco por la lazada que hice con la primera hebra y la lazada principal.
 |  |  |
|---|
I repeat the same process, passing the shorter strand over the needle from front to back and passing the strand from the ball forward over the needle and pulling it through the loops. That's the whole process. It's easy to do and, as you can see, it's a little thicker than a normal chain stitch. In my opinion, it looks better, but everyone does it the way that's easiest for them. Anyway, here's how I do it, in case you like it this way.
Y repito el mismo proceso, la hebra más corta la paso por encima de la aguja de adelante para atrás y la hebra del ovillo la paso hacia adelante por encima de la aguja y saco por las lazadas. Eso es todo el proceso, es fácil de hacer y como pueden ver, queda un poco más gruesa que la cadeneta normal, desde mi punto de vista se ve mejor, pero cada quien la hace de la manera que se le haga más fácil de todos modos aquí les dejo esta manera de hacerlo por si les gusta así.
 |  |  |
|---|
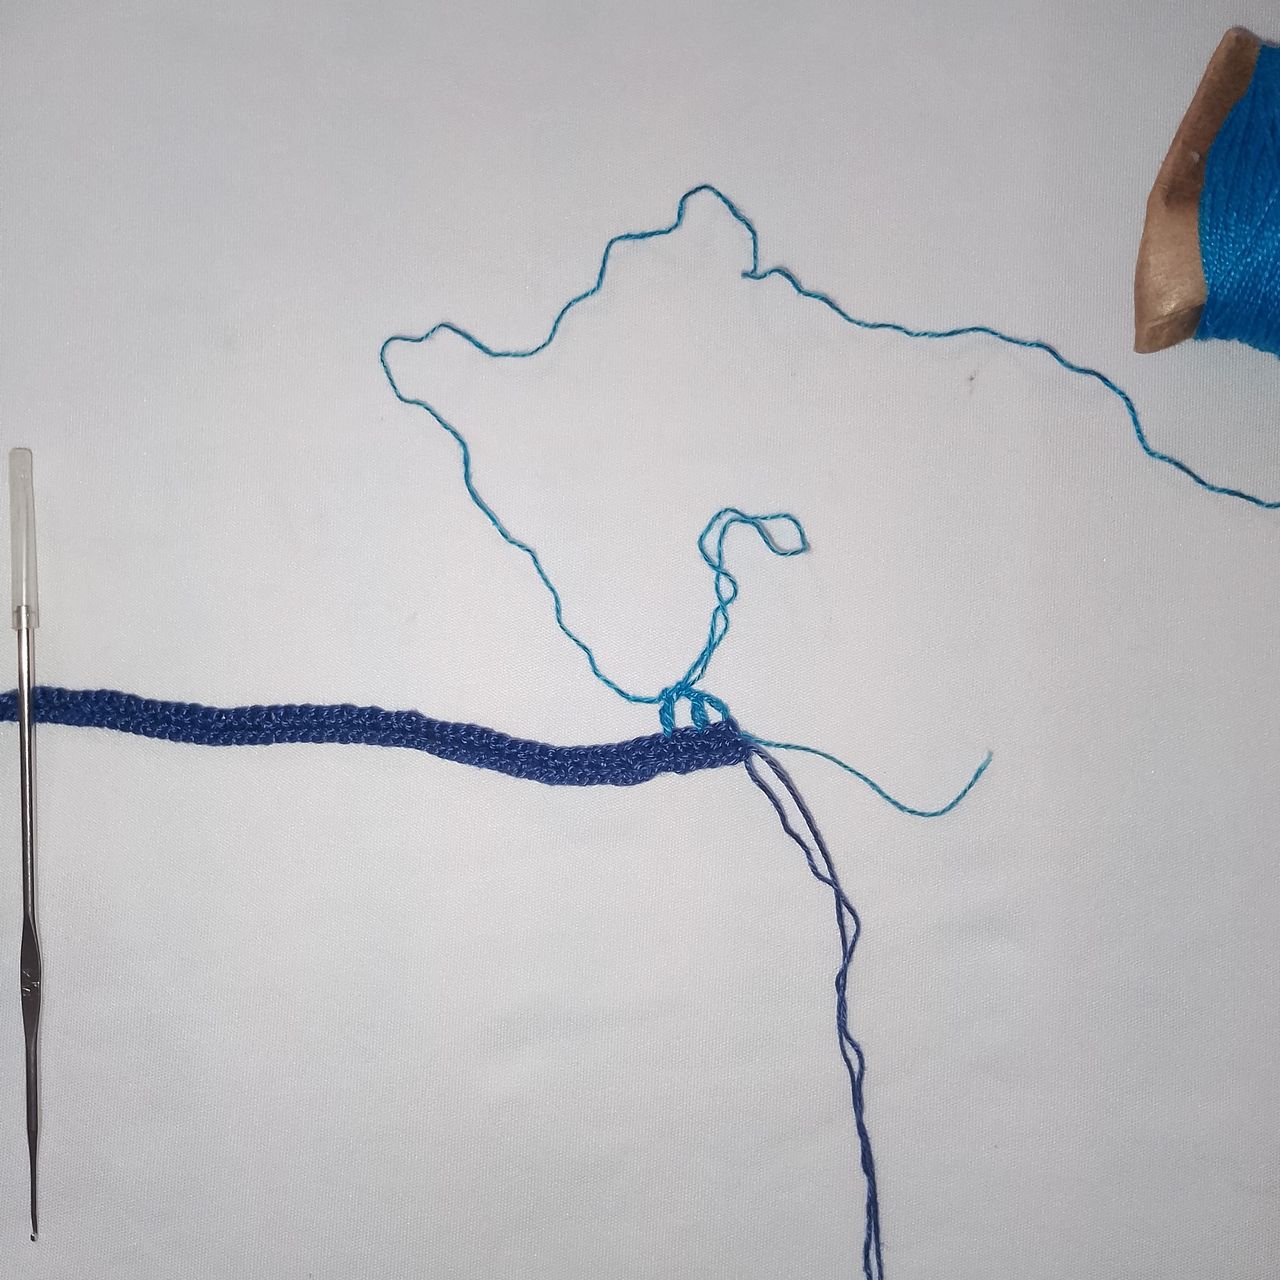
Here I have my chains ready with the yarn I will be working with. As you can see, the fabric is thicker than a normal chain. Here I made 70 chains, as I showed you in the previous steps.
Aquí ya tengo lista mis cadenetas con el hilo que trabajaré, como pueden observar el tejido es más grueso que una cadeneta normal. Aquí realice 70 cadenetas, tal como les enseñe en los pasos anteriores.

The stitches I will use for this project are basic stitches, nothing complicated, single crochet and double crochet. For the second round, I made single crochet stitches in the chain stitches and when I finished the round, I changed colors.
I start the third round with three chain stitches, followed by a double crochet that I will insert, the third single crochet of round 2, then I crochet a chain stitch and continue with a double crochet that I insert 5 single crochets. I continue like this until the end of the round.
Los puntos que usaré para esa labor son puntos básicos, nada de complicaciones, puntos bajos y puntos altos. Para la segunda vuelta realice puntos bajos en los puntos de la cadeneta y cuando finalice la vuelta, introduje un cambio de color.
Comienzo la tercera vuelta con tres cadenetas al aire, seguido de un punto alto que introduciré, el tercer punto bajo de la vuelta 2, luego tejo una cadeneta y continuo con un punto alto que introduzco 5 puntos bajos. Y continuo así hasta finalizar la vuelta.

To finish the round, with three single crochets left to complete it, I make my double crochet and continue with a double crochet that I insert into the final stitch, leaving me with a kind of triangle in the fabric.
Para finalizar la vuelta, ya faltando tres puntos bajos para terminar, hago mi punto alto y continuo con un punto alto que introduzco en el punto final, me va a quedar una especie de triángulo, el tejido.

Basically, the knitting involves repeating all of this on every row. As you can see in the images, the knitting shrinks at the sides.
Básicamente, el tejido es repetir todo esto en cada vuelta, como pueden observar en las imágenes, el tejido se va encogiendo por los laterales.


I keep knitting until I get the desired length. Here I am measuring to see if it's okay like this or if I should keep knitting a little more.
Sigo tejiendo hasta obtener el largo deseado, aquí estoy midiendo para ver si está bien así o continuo tejiendo un poco más.

Once I have the desired length, I finish the row and change to the other color to make the decorative strips. I chain 70 stitches, then start crocheting three single crochets in each chain stitch 15 times.
Una vez que ya tengo el largo deseado, termino la vuelta y cambio el hilo del otro color para hacer las tiras decorativas. Comiendo realizando 70 cadenetas, luego empiezo a tejer tres puntos bajos en cada cadeneta por 15 veces.
 |  |  |
|---|
I finish the rest of the chains with single crochet stitches. This stitching will make the ends look curled like a spring. Once I finish crocheting the chain, I continue with slip stitches through the double crochet stitches, leaving a gap of 6 empty spaces to repeat the same process of making 70 chains followed by single crochet stitches.
Termino el resto de las cadenetas con puntos bajos. Ese tejido hará que las puntas se vean enrolladas como un resorte. Una vez que termine de tejer la cadeneta, continuo con puntos deslizados por los puntos altos, dejando una separación de 6 espacios vacíos para volver a repetir el mismo proceso de realizar las 70 cadenetas seguido de los puntos bajos.

And that's how it would look. I repeated the process until I had completed 9 strips. When finished, I crocheted single crochet stitches along the sides, two single crochet stitches in each empty space, and finished by crocheting about 50 chain stitches. Then I went back and crocheted single crochet stitches until I reached the beginning again, cut the thread, and finished off the end.
Y así es como quedaría, repetí el proceso hasta completar 9 tiras. Al finalizar tejo puntos bajos por los laterales, dos puntos bajos en cada espacio vacío y termino, tejiendo unas 50 cadenetas, y me regreso tejiendo puntos bajos hasta llegar de nuevo al principio y cortar el hilo y hacer el remate.
 |  |  |
|---|
I do the same on the other side and now I've finished knitting the headband. All that's left is to make a flower to decorate it.
Hago lo mismo del otro lado y ya tengo terminado el tejido de la diadema, solo falta hacer una flor para decorar.

For the flower, I will use double crochet stitches. In a magic ring, I will start with 4 chain stitches and continue with 3 double crochet stitches, then I will crochet 4 chain stitches to close the petal with a single crochet stitch, and then repeat the same process until I have completed 6 petals and cut the yarn.
Para la flor usaré el punto alto doble, en un anillo mágico comenzaré con 4 cadenetas y continuo con 3 puntos altos dobles, luego tejo 4 cadenetas para cerrar el pétalo con un punto bajo, y luego repetir el mismo proceso hasta completar 6 pétalos y cortar el hilo.
 |  |  |
|---|
With the other color, continuing to make the flower, I chain 8 stitches and continue with a double crochet that I will insert into each empty space of the previous petal, as shown in the image. I crochet 4 double crochets, finish with 8 chain stitches that I join with a single crochet, and continue until I finish the petals.
Con el otro color continuo haciendo la flor, tejo 8 cadenetas y continuo con un punto alto que introduciré en cada espacio vacío del pétalo anterior, tal como se muestra en la imagen. Tejo 4 puntos altos, termino con 8 cadenetas que las uno con un punto bajo y así continuo hasta terminar los pétalos.


I will use a strand of thread to join all the strips together and insert it according to the pattern shown here. I insert the thread into the 16th chain stitch and continue in the same way with all the others. I tie them securely and use the excess thread from the flower to tie the strips together at the join.
Usaré una hebra de hilo para poner unir todas las tiras y la introduciré según el patrón que les muestro aquí, en la cadeneta 16 introduzco el hilo y así continuo con todas las demás. Las amarro bien y con el hilo que sobra de la flor lo amarro en la unión de las tiras.


I hope you enjoyed this tutorial, which I was happy to prepare for you. I bid you farewell as always, but not before thanking you for taking the time to visit my blog and support me. And as the saying goes: “Do good, without looking at whom.”
Espero que hayan disfrutado de este tutorial, que con mucho gusto les preparé. Me despido como siempre, no sin antes agradecerles por tomarse el tiempo de visitar mi blog y apoyarme. Y como dice el dicho: “Haz bien, sin mirar a quién”.


