

Hola a todos estimados amigos amantes del arte de esta gran comunidad, espero que estén bien, el día de hoy les presentó una manualidad de Halloween con la elaboración de una máscara con todo lo aterrador que mi imaginación pudo para este momento.
Siempre me ha parecido interesante estas fiestas y sus disfraces, pero hay algo que me llama la atención y me da curiosidad y terror, son las máscaras porque uno nunca sabe quién está detrás de ellas, y da como de pensar, que tal sea un monstruo real.
Así que me parece que una buena opción de crear terror es utilizando una buena mascara para estas fiestas donde la creatividad para asustar está en cada esquina.
Hice este divertido trabajo con materiales de reciclaje que siempre son una buena opción para crear muchas ideas.
Así que compartiré con ustedes un tutorial para hacer esta máscara de miedo.
Las fotografías que verán a continuación, fueron tomadas con mi teléfono modelo TECNO SPARK GO 2023.

Hello to all dear friends art lovers of this great community, I hope you are well, today I present a Halloween craft with the development of a mask with all the scary that my imagination could for this moment.
I have always found interesting these holidays and their costumes, but there is something that catches my attention and gives me curiosity and terror, are the masks because you never know who is behind them, and gives me the idea that maybe it's a real monster.
So it seems to me that a good option to create terror is using a good mask for these holidays where creativity to scare is in every corner.
I made this fun work with recycled materials that are always a good option to create many ideas.
So I will share with you a tutorial to make this scary mask.
The pictures you will see below were taken with my phone model TECNO SPARK GO 2023.


Los materiales que vamos a necesitar son:
- Retazos de fomi, negro, naranja y rojo.
- Retazo de tela de franela de 50 cm de ancho por 37 cm de largo.
- Pintura roja, negro, marrón y blanco.
- 1 barra de silicona.
- 2 vasos plásticos pequeños.
- Calcomanía estampada.
- Hilo y aguja.
- Tijera.
- 1 Lápiz.
- 1 Marcador.
- 1 Pincel
- 1 Luffa de cedazo.
The materials we will need are:
- Fomi scraps, black, orange and red.
- Piece of flannel cloth 50 cm wide by 37 cm long.
- Red, black, brown and white paint.
- 1 silicone stick.
- 2 small plastic cups.
- Printed sticker.
- Thread and needle.
- Scissors.
- 1 pencil.
- 1 marker.
- 1 Paintbrush.
- 1 Luffa of sieve.
 |  |
|---|
 |  |
|---|
Comenzaremos utilizando el retazo de tela de franela blanca de 50cm de ancho por 37 de largo, a esta tela la vamos a doblar y cortar por la mitad a 25 cm cada pieza.
Después vamos a cortar los laterales superiores dejando una forma ovalada, luego vamos a posicionar los vasos plásticos para marcar el lugar donde irán pegados cada uno de lo que va a ser los ojos de esta monstruosa mascara.
We will start by using a piece of white flannel fabric 50 cm wide by 37 cm long, we will fold this fabric and cut it in half at 25 cm each piece.
Then we will cut the upper sides leaving an oval shape, then we will position the plastic cups to mark the place where they will be glued each one of what will be the eyes of this monstrous mask.
 |  |
|---|
 |  |
|---|
Una vez tengamos marcada la forma de los ojos sobre la tela, con la tijera vamos a hacer unos orificios para poder ver al momento de utilizarla.
Después vamos a retirar la parte del fondo del vaso con la tijera, para que queden unas aberturas, seguido con el uso de la pintura blanca y roja, vamos a decorar los vasos que serán los ojos de nuestra mascar, dejamos secar la pintura y procedemos a pegar con la silicona caliente en cada uno de los círculos que marcamos en el paso anterior, aquí colocaremos la silicona por todo el borde del vaso y lo fijaremos en la tela.
Once we have marked the shape of the eyes on the fabric, with the scissors we are going to make some holes to be able to see when using it.
Then we will remove the bottom of the glass with the scissors, so that there are some openings, followed with the use of white and red paint, we will decorate the glasses that will be the eyes of our chewing, let the paint dry and proceed to paste with hot silicone in each of the circles that we marked in the previous step, here we will place the silicone around the edge of the glass and fix it on the fabric.
 |  |
|---|
 |  |
|---|
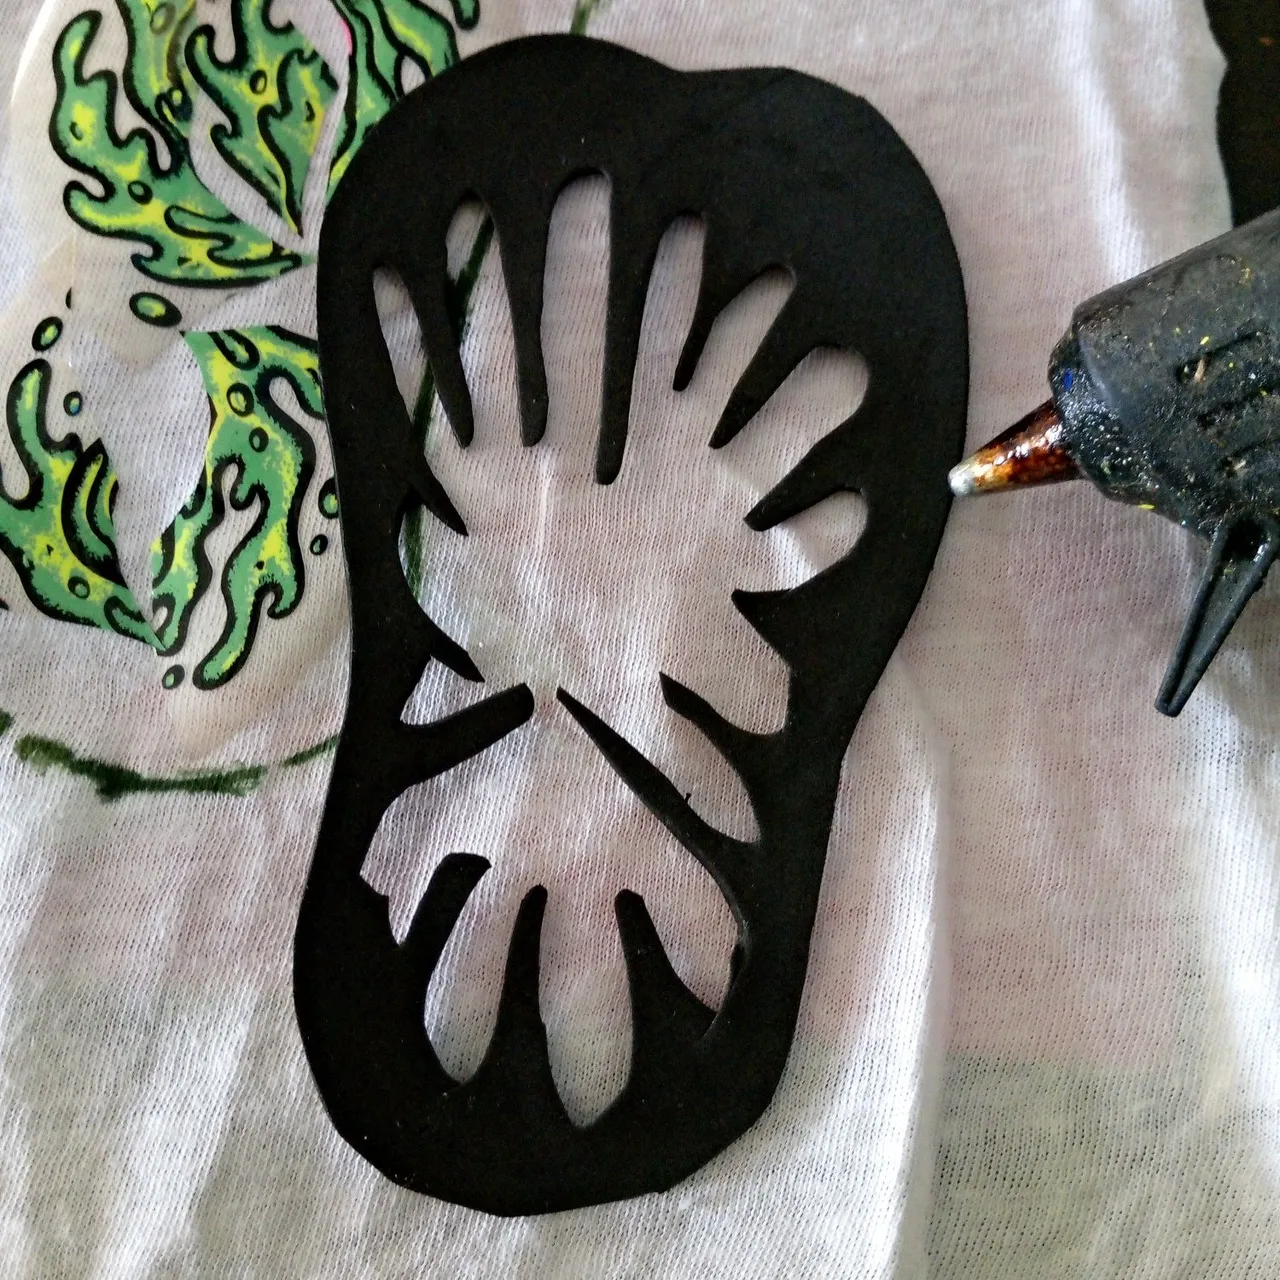
Siguiente paso, con la ayuda de un lápiz, vamos a marcar sobre el fomi negro, una forma ovalada, que será un poco más ancha en el lado superior que en el lado inferior, dentro de esta figura vamos a hacer unos dientes como de pirañas, estos los vamos a recortar con la tijera para darle más estilo aterrador.
Las formas que salgan como resultado del corte, lo vamos a utilizar más adelante.
Next step, with the help of a pencil, we will mark on the black fomi, an oval shape, which will be a little wider on the top side than on the bottom side, inside this figure we will make some teeth like piranhas, these we will cut with the scissors to give it more scary style.
The shapes that come out as a result of the cut, we will use them later.
 |  |
|---|
 |  |
|---|
Luego que tengamos la forma de la boca con dientes horribles, la vamos a colocar sobre la tela de lo que será nuestra máscara, la marcaremos con un marcador del color que tengamos al momento, esto para guiarnos donde queremos que vaya cada pieza.
En este punto vamos a recortar en varios trozos nuestra etiqueta adhesiva, y la vamos a pegar dentro de la forma de lo que será la boca que dibujamos con el marcador, teniendo todas las etiquetas pegadas vamos a colocar silicona caliente por todo el borde de la boca de color negro de fomi y la vamos a pegar a la tela donde colocamos las etiquetas.
After we have the shape of the mouth with horrible teeth, we are going to place it on the fabric of what will be our mask, we will mark it with a marker of the color we have at the moment, this to guide us where we want each piece to go.
At this point we will cut into several pieces our sticker, and we will paste it inside the shape of what will be the mouth that we drew with the marker, having all the labels attached we will place hot silicone around the edge of the mouth of black fomi and we will stick it to the fabric where we place the labels.
 |  |
|---|
 |  |
|---|
Seguido de haber colocado la forma de la boca, le vamos a pintar con un pincel y la pintura al frío de color marrón, unos labios gruesos.
También vamos a aprovechar de ir pegando las formas que teníamos reservadas que nos quedó de la boca, estas las vamos a utilizar para unas pestañas.
Luego cortaremos con la tijera unos cuadros de la luffa de cedazo para hacer el cabello y la barba de la máscara.
After having placed the shape of the mouth, we are going to paint with a brush and cold brown paint, some thick lips.
We are also going to take the opportunity to glue the shapes we had reserved from the mouth, we are going to use them for eyelashes.
Then we will cut with the scissors some squares of the sieve luffa to make the hair and the beard of the mask.
 |  |
|---|
 |  |
|---|
Estos cuadros ya recortados los vamos a pegar con la silicona caliente en la parte de la barba y parte frontal de la cabeza.
Estos cuadros los vamos a pintar con un pincel bien empapado de pintura al frío de color marrón y negro para dar un aspecto de melena maltratada.
Lavamos el pincel para retirar la pintura negra y vamos a utilizar pintura roja para aplicar en las pestañas y dientes.
También recortaremos unos trozos de fomi en forma de triángulo y de color rojo y anaranjado, para decorar un poco más la barba y los ojos de esta máscara de Halloween.
We are going to glue these already cut squares with the hot silicone on the part of the beard and the front part of the head.
We are going to paint these squares with a brush well soaked in brown and black cold paint to give a look of battered hair.
We wash the brush to remove the black paint and we will use red paint to apply on the eyelashes and teeth.
We will also cut some red and orange triangle-shaped pieces of fomi to decorate a little more the beard and the eyes of this Halloween mask.
 |  |
|---|
 |  |
|---|
Cuando terminemos todo el proceso de pintura y fijación de los accesorios, vamos a coser con hilo del color que tengamos, colocaremos derecho con derecho y con la aguja e hilo vamos a coser el semi óvalo, dejando la parte inferior sin costura porque por allí es que vamos a voltearla para utilizarla y salir a dar unos buenos sustos de terror.
Este ha sido mi primer comienzo para poner a volar la imaginación para Halloween y seguir creando grandes ideas, espero que les pueda gustar y sean aún más creativos.
Gracias por estar siempre acompañándome en mis publicaciones, y mi deseo para todos ustedes, mis estimados amigos, es que donde quieran que se encuentren gocen de mucho bienestar al lado de sus seres amados, yo también los quiero mucho, nos seguiremos viendo en otra de mis publicaciones abrazos muy grandes para ti que me visitas hoy por aquí.
When we finish the whole process of painting and fixing the accessories, we are going to sew with thread of the color we have, we will place right to right and with the needle and thread we are going to sew the semi oval, leaving the lower part without sewing because that is where we are going to turn it over to use it and go out to give some good scares of terror.
This has been my first start to let my imagination fly for Halloween and continue creating great ideas, I hope you like it and be even more creative.
Thank you for always being with me in my publications, and my wish for all of you, my dear friends, is that wherever you are you enjoy a lot of well-being with your loved ones, I also love you very much, we will continue to see each other in another of my publications, big hugs to you who visit me here today.
social networks / redes sociales
![]()
![]()
Traductor Deepl
Translated Deepl
Ediciones Canva
Editions Canva

