✨Bienvenidos. // Welcome. ✨

Hello everyone dear colleagues a pleasure to greet you. Today I want to share with you one of my creative activities that I like to do with much affection for you a step by step of a cute Mario Bros themed candy box for children where they can keep their candy besides that this candy box can be used in birthdays with Mario Bros theme makes a perfect combination for cotillions or souvenirs. And it is not very expensive we use plastic bottles that we can get anywhere here I leave you its elaboration.
Hola a todos queridos compañeros un gusto en saludarlos. Hoy les quiero compartir una de mis actividades creativas que me gusta hacer con mucho cariño para ustedes un paso a paso de un lindo dulceros para niños con temática de Mario Bros dónde pueden guardar sus golosinas además de eso este dulceros lo podemos usar en los cumpleaños con temática de Mario Bros hace una conbinación perfecta para los cotillones o recuerdos. Y no es muy costosa utilizamos botellas de plástico que podemos conseguir en cualquier lugar acá les dejos su elaboración.

Materials.
Materiales.
- Plastic bottle.
- Red frosted or normal eva rubber, white, black, beige and seleste.
- Ruler.
- Pencil.
- Scissors.
- White paint.
- Silicone gun.
- Botella de plástico.
- Goma Eva rojo escarchado o normal, blanco, negro, beis y seleste.
- Regla.
- Lápiz.
- Tijera.
- Pintura blanca.
- Pistola de silicón.

Step by step.
Paso a paso.
Paso 1. // Step 1.
First take the plastic bottle and cut the bottom to about 4 centimeters high we can guide us with the first line that brings the bottle takes that part is the one we will use. Now draw the circle of the bottle on the red Eva rubber. Lower the bottle that we took for the candy box and draw there is the same half circle already drawn it will look like the image number three of this step and cut it out.
Coge primero la botella de plástico y corta el fondo hasta unos 4 centímetros de alto nos podemos guíar con la primera línea que traer la botella toma esa parte es la que usaremos. Ahora dibuja el círculo de la botella en la goma Eva roja. Baja la botella que tomamos para el dulcero y dibuja hay mismo medio círculo ya dibujado se verá como la imagen número tres de este paso y recórtalo.

Paso 2. // Step 2
Once our mold is obtained, make an opening in the center with the help of the scissors to make way for the candies and glue with silicone the plastic bottle that we previously cut in the circle leaving the space of the half circle upwards.
Ya obtenido nuestro molde haz en el centro con la ayuda de la tijera una abertura para darle paso a las golosinas y pega con silicón la botella de plástico que cortamos anteriormente en el círculo dejando el espacio del medio circulo haci arriba.

Paso 3. // Step 3.
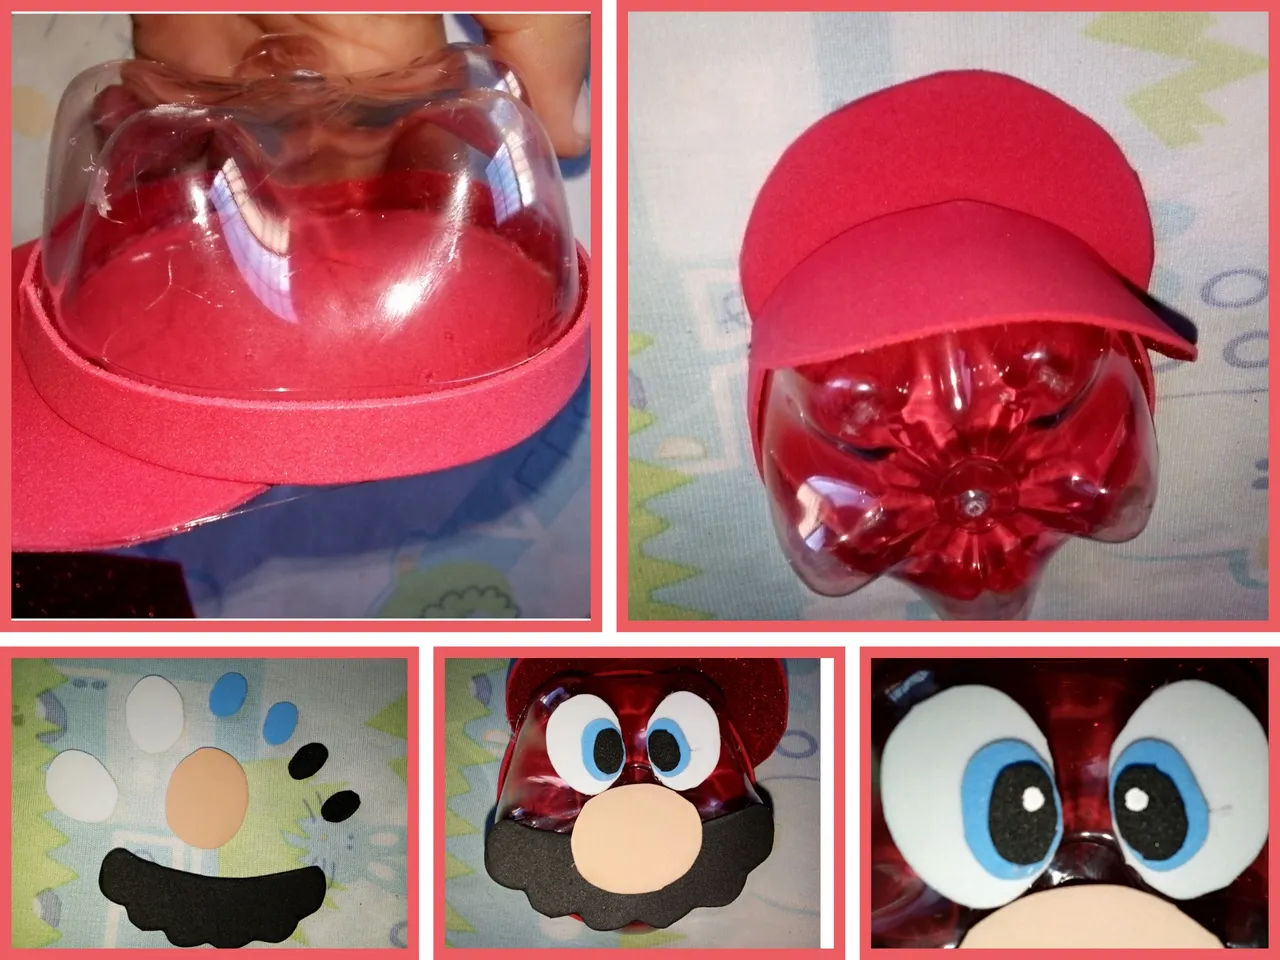
Next step, make a strip of 1 x 25 centimeters and half circles glue the strip around the candy box and glue the half circle for the cap of Mario Bros. Then draw the parts of the face of the respective color as the eyes, nose and the billote glue everything in place and finish the eyes by making a white dot in the black color of the Eva glue.
Siguiente paso, haz una tira de 1 x 25 centímetros y medio círculos pega la tira alrededor del dulceros y pega el medio circulo para la gorra de Mario Bros. Después dibuja las parte de la cara del respectivo color como los ojos, la nariz y el billote pega todo en su lugar y finaliza los ojos haciendo un punto blanco en el color negro de la goma Eva.
Paso 4. // Step 4.
We are almost finished with the candy box, make the initial of Mario Bros, the M in red and the circle in white and glue it on the surface of the cap and so on the front and back.
Ya casi terminamos el dulcero haz la inicial de Mario Bros la M de rojo y el círculo de blanco y pega en la superficie de la gorra y así como queda por detras y por delante.


