¡Saludos Comunidad Creativa! | ¡Greetings Creative Community!
¡Feliz día! Espero que se encuentren muy bien, he estado preparando algunos detalles para obsequiar en navidad, especialmente para los niños, así que en esta oportunidad les quiero mostrar como he elaborado un lindo dulcero de reno con una botella plástica de refresco, me pareció una idea perfecta para reciclar esas botellas que tengo en casa a la vez que estoy creando algo lindo para los niños, si les interesa saber cómo lo hice los invito a leer hasta el final, espero como siempre que les guste, sin más, ¡vamos a crear!
¡Happy day! I hope you are very well, I have been preparing some gifts for Christmas, especially for children, so this time I want to show you how I have made a cute reindeer candy box with a plastic soda bottle, I thought it was a perfect idea to recycle those bottles that I have at home while I am creating something nice for the children, if you are interested in knowing how I did it, I invite you to read until the end, I hope as always that you like it, without further ado, ¡let's create!


🦌 1 Botella plástica de refresco.
🦌 Foami escarchado marrón, rojo, blanco y negro.
🦌 Foami marrón claro o color piel sin escarcha.
🦌 Papel de seda con estampado navideño.
🦌 Silicón caliente.
🦌Tijera.
🦌 Cutter.
🦌 Lápiz.
🦌 1 Plastic Bottle of soda.
🦌 Brown, red, white and black frosty foami.
🦌 Light brown foami or skin color without frost.
🦌 Christmas print silk paper.
🦌 Hot silicone.
🦌 Scissors.
🦌 Cutter.
🦌 Pencil.


🦌 PASO 1. Comenzamos cortando la botella de refresco con el cutter, vamos a necesitar la parte superior de esta, es decir, la que tiene forma de embudo y contiene la tapa, luego de obtener la pieza corregimos el borde con la tijera para dejarlo lo más recto posible.
🦌 STEP 1. We begin by cutting the soda bottle with the cutter, we are going to need the upper part of it, that is, the one that has the shape of a funnel and contains the lid, after obtaining the piece we correct the edge with the scissors to leave it as straight as possible.


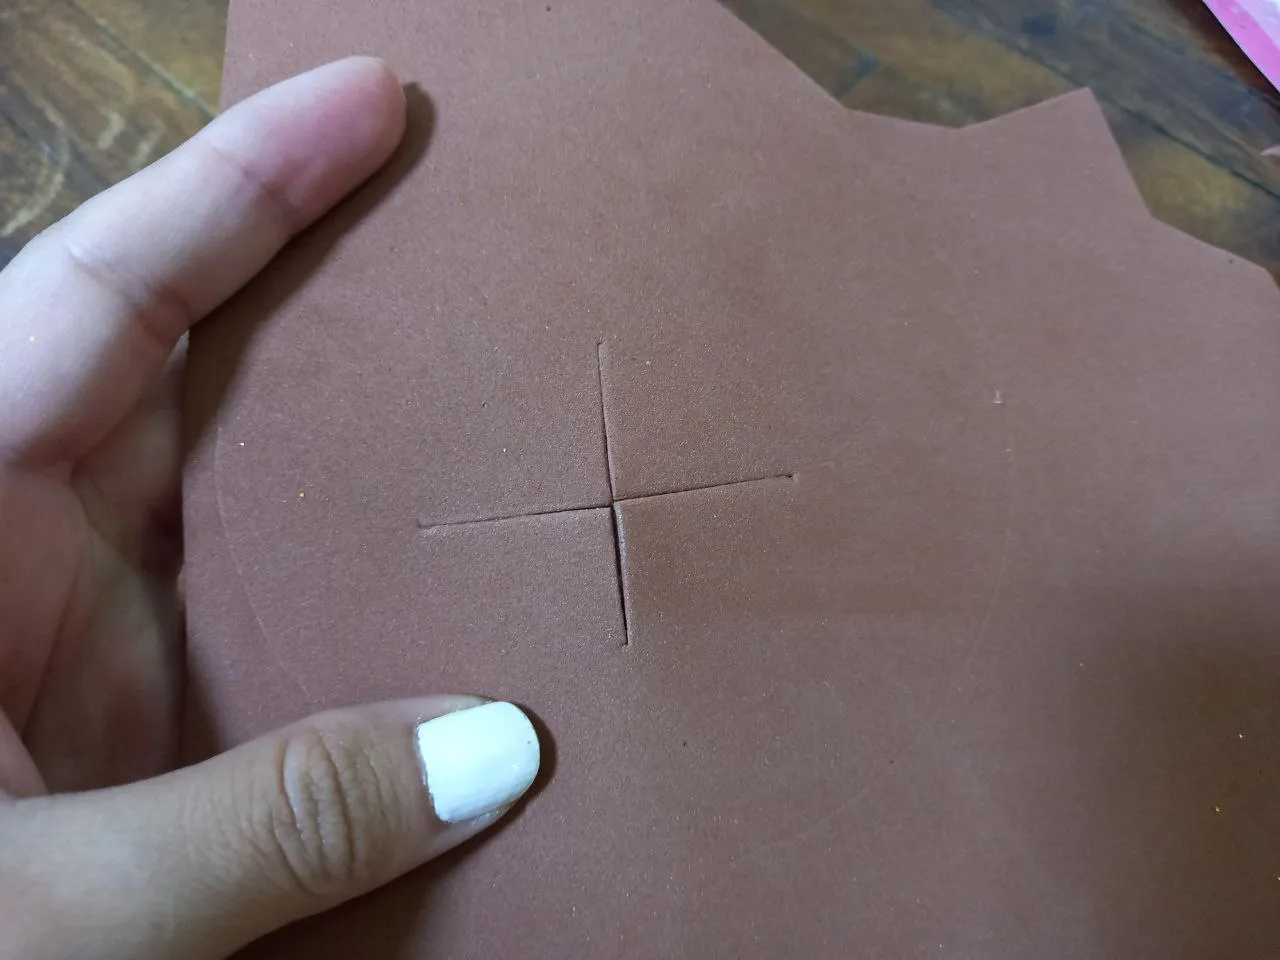
🦌 PASO 2. Colocamos la pieza de la botella sobre el foami marrón por la parte sin escarcha y hacemos una marca presionando, luego en el centro del foami dentro de la marca hacemos un corte en X, seguidamente aplicamos silicón caliente en todo el borde de la botella y la pegamos sobre el foami que marcamos dejando la X en el centro ya que ese será nuestro dispensador de dulces.
🦌 STEP 2. We place the piece of the bottle on the brown foam on the part without frost and make a mark by pressing, then in the center of the foam inside the mark we make an X cut, then we apply hot silicone on around the edge of the bottle and paste it on the foami that we marked, leaving the X in the center since that will be our candy dispenser.


🦌 PASO 3. Recortamos el borde del foami sobrante dejándolo al ras con la botella, luego recortamos una tira de foami escarchado marrón de unos 2 cm de ancho y la pegamos alrededor del borde de la botella para cubrir esa parte.
🦌 STEP 3. We trim the edge of the excess foam leaving it flush with the bottle, then we cut a strip of brown frosted foam about 2 cm wide and glue it around the edge of the bottle to cover that part.


🦌 PASO 4. Procedemos a cubrir la tapa de la botella recortando una tira de foami marrón escarchado del ancho y largo de esta y luego pegamos otra pieza en la parte superior y recortamos el borde dejándolo al ras.
🦌 STEP 4. We proceed to cover the bottle cap by cutting a strip of frosty brown foam as wide and long as it is and then we glue another piece on top and cut the edge leaving it flush.


🦌 PASO 5. Hacemos un pequeño lazo de foami escarchado rojo y lo pegamos en la parte frontal de la tapa de la botella que acabamos de cubrir con foami, aquí les comparto el tutorial donde les muestro como hacer ese lazo.
🦌 STEP 5. We make a small red frosty foam bow and glue it to the front of the bottle cap that we just covered with foam, here I share the tutorial where I show you how to make that bow.


🦌 PASO 6. Hacemos los cuernos y las orejas en foami escarchado marrón y la parte interna de las orejas en foami marrón claro o color piel sin escarcha, unimos las piezas de las orejas y pegamos primero los cuernos en la parte superior lateral de la botella, un cuerno de cada lado justo debajo de la tapa y debajo de los cuernos pegamos las orejas, luego hacemos los ojos y la nariz y las pegamos en la parte frontal de la botella para formar el rostro.
🦌 STEP 6. Make the horns and ears in brown frosted foam and the inner part of the ears in light brown or skin-colored foam without frost, join the pieces of the ears and first glue the horns on top side of the bottle, one horn on each side just below the lid and below the horns glue the ears, then make the eyes and nose and glue them to the front of the bottle to form the face.


🦌 PASO 7. Como último paso vamos a recortar varias tiras de papel de seda y las vamos a arrugar un poco, luego las introducimos dentro del dulcero por la parte inferior donde hicimos 3l corte en X, por allí mismo vamos a introducir los dulces.
🦌 STEP 7. As the last step we are going to cut several strips of tissue paper and we are going to wrinkle them a bit, then we introduce them inside the candy box at the bottom where we made 3l cut in X, right there we are going to introduce sweets.


¡Y listo! De esta manera tan sencilla fue como elaboré este lindo dulcero de reno utilizando una botella plástica de refresco como base, la verdad resulta bastante bien, todo está en la decoración y así como yo lo hice con temática de reno también se puede hacer con otras temáticas navideñas o las que más les gusten, solo hay que jugar un poco con la imaginación, además, podemos utilizar la botella completa para hacer dulceros de diferentes diseños, este ha sido el primero y luego les muestro los demás con las otras partes de la botella, espero que les haya gustado este tutorial y que esta idea les pueda servir para hacerle un detalle a los niños en navidad o en cualquier otra ocasión, nos vemos pronto con un nuevo tutorial navideño.
And ready! In this simple way, it was how I made this cute reindeer candy box using a plastic soda bottle as a base, the truth is quite good, everything is in the decoration and just as I did it with a reindeer theme, it can also be done with other themes Christmas or the ones you like the most, you just have to play a little with your imagination, in addition, we can use the complete bottle to make sweets with different designs, this has been the first and then I will show you the others with the other parts of the bottle I hope you liked this tutorial and that this idea can be used to give children a gift at Christmas or any other occasion, see you soon with a new Christmas tutorial.


Todas las fotografías son de mi propiedad.
Fotografías capturadas con mi Samsung Galaxy A12
Separador de texto elaborado en Canva.
Nos vemos en mi próxima publicación.
¡Tengan un feliz día!
All photographs are my property.
Photos captured with my Samsung Galaxy A12
Text separator made in Canva.
See you in my next post.
¡Have a happy day!