¡Saludos Comunidad Creativa! ✨ | ¡Greetings Creative Community! ✨
A pocos días de finalizar el año les comparto otra de mis creaciones para esta navidad, a fin de decorar cada espacio posible en mi casa realicé un lindo juego de velas navideñas que utilicé como centro de mesa junto a los cascanueces que les compartí anteriormente, hoy les mostraré como elaboré estas velas, lo fáciles que son de hacer y lo lindas que quedaron, espero que les gusten, sin más, ¡vamos a crear!
A few days after the end of the year I share another of my creations for this Christmas, in order to decorate every possible space in my house I made a nice set of Christmas candles that I used as a centerpiece along with the nutcrackers that I shared with you earlier, today I will show you how I made these candles, how easy they are to make and how beautiful they turned out, I hope you like them, without further ado, ¡let's create!


🕯 Cartulina escolar blanca y roja.
🕯 Foami escarchado dorado.
🕯 Foami amarillo sin escarcha.
🕯 Silicón caliente.
🕯 Flores de pascua.
🕯 Sombras para ojos.
🕯 Cartón.
🕯Tijera.
🕯 Lápiz.
🕯 White and red school cardboard.
🕯 Golden frosty foami.
🕯 Yellow foami without frost.
🕯 Hot silicone.
🕯 Easter flowers.
🕯 Eyeshadows.
🕯 Cardboard.
🕯 Scissors.
🕯 Pencil.


🕯 PASO 1. Comenzamos dividiendo uno de los tubos de cartón en 2 partes, una grande y una pequeña, es decir, no lo vamos a cortar justo a la mitad sino que deben tener tamaños distintos, luego vamos a pegar cada una de esas partes sobre 2 de los otros tubos de cartón para que de esta manera podamos tener 3 velas de diferentes tamaños.
🕯 STEP 1. We begin by dividing one of the cardboard tubes into 2 parts, one large and one small, that is, we are not going to cut it exactly in half but they must have different sizes, then we are going to glue each one of those parts over 2 of the other cardboard tubes so that in this way we can have 3 candles of different sizes.


🕯PASO 2. Hacemos 3 círculos de cartón y los pegamos en uno de los extremos de cada cilindro, siendo esa la parte superior y la descubierta será la inferior, seguidamente vamos a medir cada cilindro y vamos a recortar una pieza de cartulina blanca del tamaño de cada uno.
🕯 STEP 2. We make 3 cardboard circles and glue them to one of the ends of each cylinder, this being the upper part and the uncovered part will be the lower part, then we are going to measure each cylinder and we are going to cut a piece of white cardboard the size of each one.


🕯 PASO 3. Ahora vamos a forrar los tubos de cartón con su respectiva cartulina blanca de su tamaño hasta cubrirlas por completo, luego pegamos cartulina blanca en la parte que cubrimos con cartón, le hacemos cortes a la cartulina sobrante y los doblamos y pegamos hacia abajo.
🕯 STEP 3. Now we are going to line the cardboard tubes with their respective white cardboard of their size until they are completely covered, then we glue white cardboard on the part that we covered with cardboard, we make cuts to the excess cardboard and the fold and glue down.


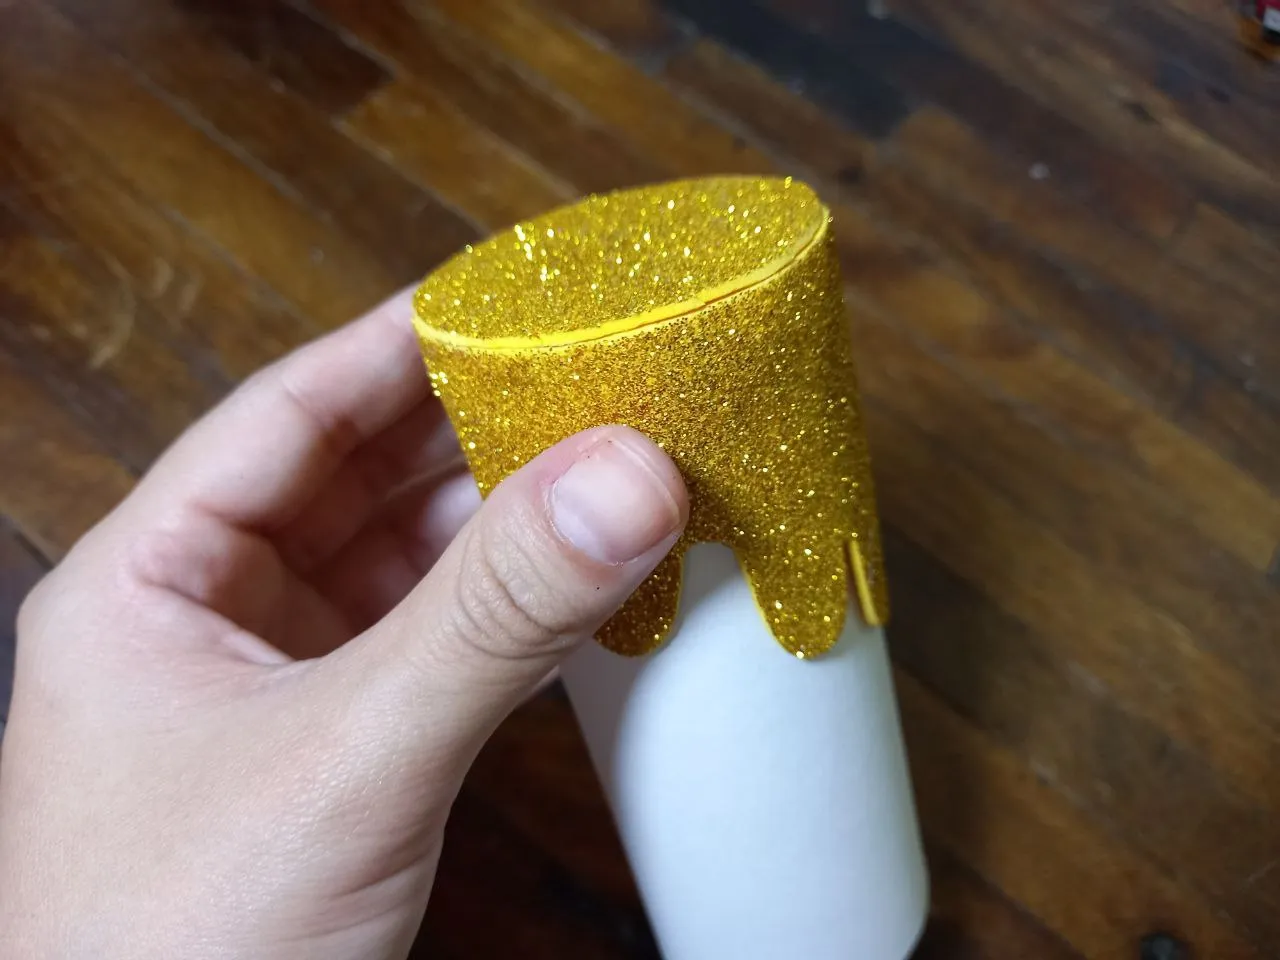
🕯 PASO 4. Ahora haremos la parte del borde de las velas en foami escarchado dorado, hacemos una pieza larga a fin de que podamos cubrir cada cilindro con una sola pieza, luego vamos estos bordes dorados en la parte superior de cada cilindro cubriendo la cartulina blanca que doblamos, luego de eso vamos a pegar foami escarchado dorado en la parte superior y recortamos el exceso dejando al ras con el cilindro.
🕯 STEP 4. Now we will make the edge part of the candles in golden frosted foami, we make a long piece so that we can cover each cylinder with a single piece, then we go these golden edges on the top of each cylinder covering the white cardboard that we folded, after that we are going to glue golden frosted foam on top and trim the excess leaving it flush with the cylinder.


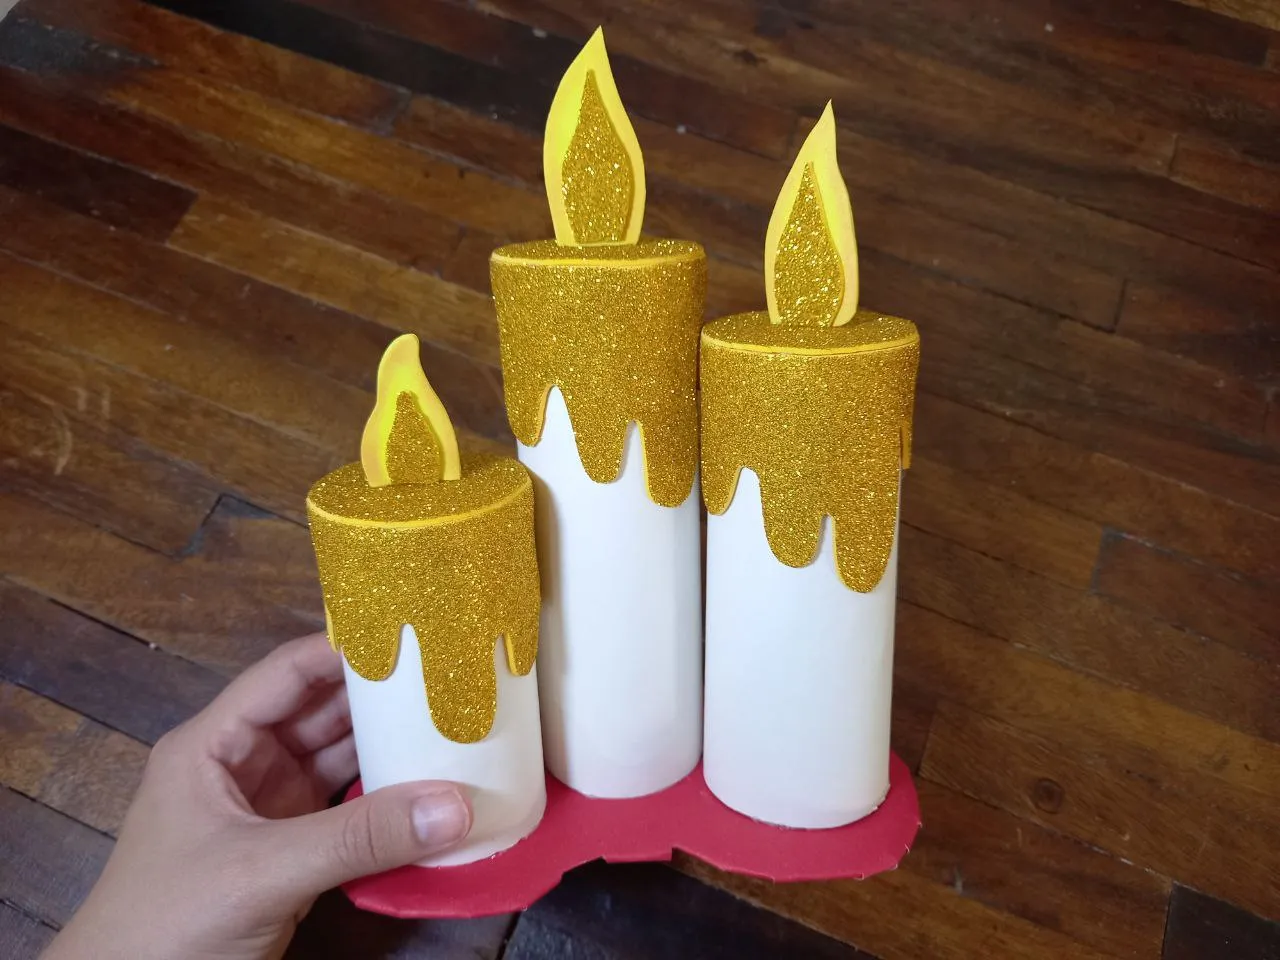
🕯 PASO 5. Hacemos la forma de la llama en foami amarrillo sin escarcha (una para cada vela) y luego hacemos 3 más pero más pequeñas en foami escarchado dorado, tomamos un poco de sombra naranja o algún color oscuro y le aplicamos un poco a cada una de las llamas en todo su borde, luego pegamos las partes doradas sobre las amarillas, finalmente pegamos cada una de las llamas en el centro de la parte superior de las velas.
🕯 STEP 5. We make the shape of the flame in yellow foam without frost (one for each candle) and then we make 3 more but smaller ones in golden frosted foam, we take a little orange shade or some dark color and we apply a little to each of the flames around its edge, then we glue the golden parts on the yellow ones, finally we glue each of the flames in the center of the upper part of the candles.


🕯 PASO 6. Hacemos una base para las velas con cartón teniendo en cuenta la posición como las vamos a colocar y que debe quedar un pequeño sobrante para colocar las flores, luego de tener la pieza de cartón la forramos con cartulina roja, le hacemos cortes a los sobrantes de cartulina y los pegamos por debajo del cartón.
🕯 STEP 6. We make a base for the candles with cardboard taking into account the position as we are going to place them and that there should be a little left over to place the flowers, after having the piece of cardboard we cover it with red cardboard , we make cuts to the remaining cardboard and glue them under the cardboard.


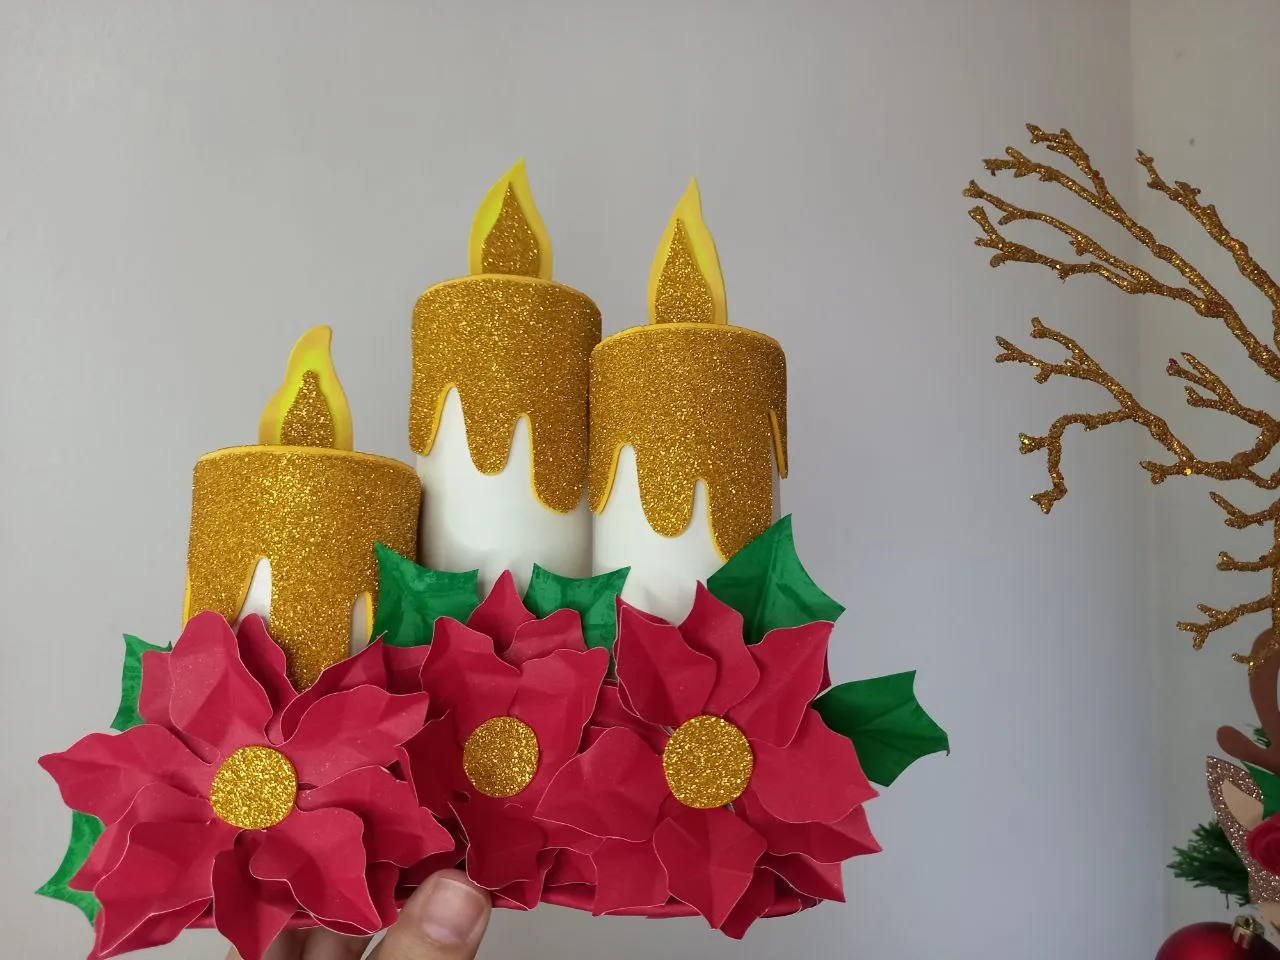
🕯 PASO 7. Aplicamos silicón en el borde inferior de la velas y las vamos a pegar una a una sobre la base que hicimos, las colocamos en el orden de nuestra preferencia y las vamos pegando entre sí para que queden bien fijadas, por ultimo vamos a pegar las flores de pascua en la parte frontal como más nos guste y listo.
🕯 STEP 7. We apply silicone to the lower edge of the candles and we are going to glue them one by one on the base we made, we place them in the order of our preference and we glue them together so that they are well fixed Finally, we are going to paste the poinsettia flowers on the front as we like and that's it.


De esta manera fue como elaboré ese lindo set de velas navideñas decorativas, fueron muy fáciles de hacer y el resultado es hermoso, fue mejor de lo que me imaginé y aunque al principio no me decidía en donde colocarlas opté por hacerlo en el centro de la mesa con los cascanueces a los lados y todo esto en conjunto hace una gran decoración, espero que les hay gustado y mi tutorial les pueda servir de guía para hacer estas lindas velas en casa, nos vemos pronto con un nuevo tutorial navideño.
This is how I made this beautiful set of decorative Christmas candles, they were very easy to make and the result is beautiful, it was better than I imagined and although at first I couldn't decide where to place them, I decided to do it in the center of the room. table with nutcrackers on the sides and all this together makes a great decoration, I hope you liked it and my tutorial can serve as a guide to make these beautiful candles at home, see you soon with a new Christmas tutorial.


Todas las fotografías son de mi propiedad.
Fotografías capturadas con mi Samsung Galaxy A12
Separador de texto elaborado en Canva.
Nos vemos en mi próxima publicación.
¡Tengan un feliz día!
All photographs are my property.
Photos captured with my Samsung Galaxy A12
Text separator made in Canva.
See you in my next post.
¡Have a happy day!