▀▄▀▄▀▄▀▄▀▄▀▄▀▄▀▄▀▄▀▄▀▄▀▄▀▄▀▄▀▄▀▄▀▄▀▄▀▄▀▄▀▄▀▄▀▄▀▄
💓 Hello Hivers of the DIYhub community! 💓

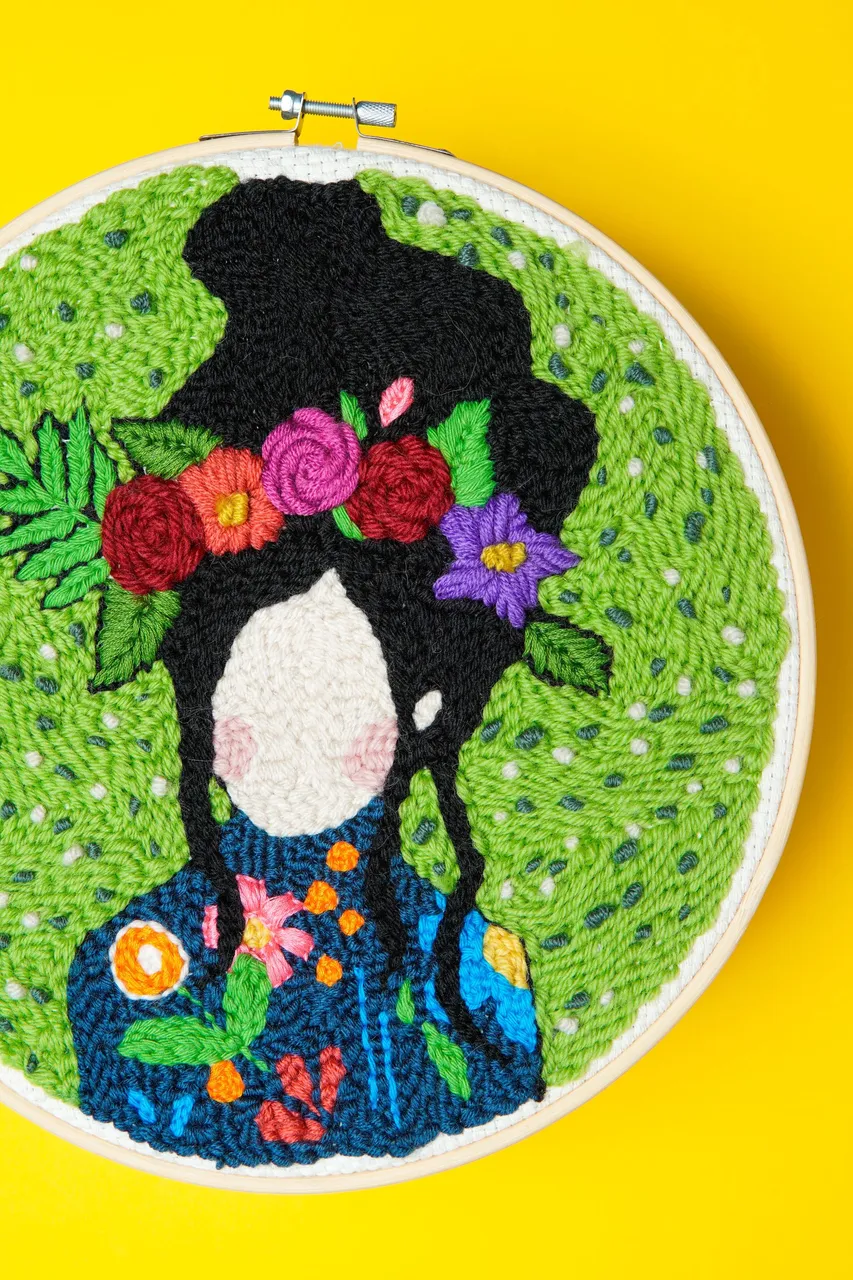
There are many types and forms of embroidery, but the one I handle is hand embroidery and it's the one I'd like to tell you about. It's a hobby that brings me a lot of calm, plus you can get some very nice results with practice, and its end uses are endless.
With the final embroidery you can make patches, also leave them framed in a frame or frame. You can make badges, which is almost the same as the patch, but with a safety pin. You can also embroider directly on the fabric you want to decorate and give it a detail to highlight the garment, curtain, tablecloth...

To start embroidering the first thing you need is a frame or embroidery frame, this will help to keep your fabric stretched so the final result is neat. There are many types: wood, plastic, silicone... The one I have is made of metal, it is the one they had available at the stationery store in the neighborhood where I live, and it has been very good for me to start, going to downtown Lima can be crazy, if I had waited to go to buy the necessary things, most likely I would not have done my first embroidery yet.
However, I already see the need to change it, as it is made of metal, it stains the fabrics with which I work because of the rust and that is not necessary, since with other material that would not happen. Also different sizes, the one I have is medium, its size is versatile and I like that a lot.

As for the threads and needles you could use any, the important thing is that the needle has a large enough buttonhole for your thread to fit through. I prefer the short fat ones, with a large eyelet. Now, as for threads, you could embroider with school wool or even sewing thread, but I highly recommend special embroidery thread. There are many brands, this is crucial because some of bad quality fade and that can be a big problem if it is a patch that you sew to a garment, for example, so it is always good to go to a place where they know the qualities and not be embarrassed to ask.

As I mentioned above, you can embroider on any fabric, I would recommend embroidery fabric which is a cotton with wide fibers between them. I have embroidered on jeans and I did not like it very much, its fibers are multiple and you have to be very careful when stuffing. Although a friend of mine embroiders mostly on denim, she does flowers and as they are different "filling" stitches the finish is very nice, so I could say that it depends on the design you have in mind, I really like the patches of filled designs :)
You will also need a good scissors to cut your threads and fabrics, I use one I have that is exclusively for fabric. I also use a light that is on my forehead, that helps me to have more lighting and be more precise, that is very important for the final finish to look professional.
With this information you can prepare your materials, because soon I will be uploading tutorials explaining some contour and filling stitches to go to the most fun: practice! If you are very anxious like me and want to start now, I leave you the link to an embroidery post I have in this same community. 💞 Hugs, kisses, drink water and brush your teeth! 💞
~ 💓 See you next post! 💓 ~
💓 ¡Hola Hivers de la comunidad DIYhub! 💓

Hay muchos tipos y formas de bordar, pero el que yo manejo es el bordado a mano y es del que quisiera platicarles. Es un hobby que me produce mucha calma, además de que pueden conseguirse unos resultados muy lindos con la práctica, y sus usos finales son infinitos.
Con el bordado final puedes hacer parches, también dejarlos enmarcados en un bastidor o marco. Puedes hacer tipo chapas, que es casi igual al parche, pero colocándole un imperdible. También puedes bordar directamente sobre la tela que quieras decorar y darle un detalle para resaltar la prenda, cortina, mantel...

Para comenzar a bordar lo primero que necesitas es un bastidor o marco para bordar, este ayudara a mantener tu tela estirada y así el resultado final sea prolijo. Los hay de muchos tipos: madera, plástico, silicona… El que yo tengo es de metal, es el que tenían disponible en la papelería del barrio donde vivo, y me ha venido muy bien para comenzar, ir al centro de Lima puede ser una locura, si hubiera esperado a ir para comprar las cosas necesarias, lo más seguro es que aún no hubiera hecho mi primer bordado.
Sin embargo, ya me veo en la necesidad de cambiarlo, al ser de metal mancha por el óxido las telas con las que trabajo y eso no es necesario, ya que de otro material eso no pasaria. También diferentes tamaños, el que yo tengo es mediano, su tamaño es versátil y eso me gusta mucho.
En cuanto a los hilos y agujas podrías usar cualquiera, lo importante es que la aguja tenga un ojal suficientemente grande como para que entre tu hilo. Yo prefiero las gordas y cortas, con el ojal grande. Ahora, en cuanto a los hilos, podrías bordar con lana escolar o hasta con hilo de coser, pero yo recomiendo ampliamente el hilo especial para bordar. Hay muchas marcas, esto es crucial porque algunos de mala calidad destiñen y eso puede ser un gran problema si es un parche que cosiste a una prenda de ropa, por ejemplo, así que siempre es bueno ir a un lugar donde sepan de las calidades y no tener pena de preguntar.
Como les comente más arriba pueden bordar sobre cualquier tela, yo les recomendaría la tela para bordar que es un algodón de fibras anchas entre sí. He bordado sobre jean y no me ha gustado mucho, sus fibras son múltiples y hay que tener muchísima atención al momento de rellenar. Aunque una amiga borda más que nada sobre jean, ella hace flores y al ser puntadas de “relleno” diferentes el acabado es muy bonito, entonces podría decir que depende del diseño que tengan en mente, a mí me gustan mucho los parches de diseños rellenos :)
También necesitarán una buena tijera para cortar sus hilos y telas, yo uso una que tengo que es exclusiva para tela. También utilizo una luz que queda en mi frente, eso me ayuda a tener más iluminación y ser más precisa, eso es muy importante para que el acabado final se vea profesional.
Con esta información ya pueden ir preparando sus materiales, ya que próximamente estaré subiendo tutoriales explicándoles algunas puntadas de contorno y relleno para ir a lo más divertido: ¡La practica! Si son muy ansiosos como yo y quieren comenzar ya, les dejo el link a un post de bordado que tengo en esta misma comunidad. 💞 Abrazos, besitos, tomen agüita y cepillense los dientes! 💞
~ 💓 ¡Hasta el próximo post! 💓 ~
▀▄▀▄▀▄▀▄▀▄▀▄▀▄▀▄▀▄▀▄▀▄▀▄▀▄▀▄▀▄▀▄▀▄▀▄▀▄▀▄▀▄▀▄▀▄▀▄
Resource/Fuentes
The images come from Unsplash.
IMAGE1
IMAGE2
IMAGE3
IMAGE4
IMAGE5
IMAGE6
IMAGE7
▀▄▀▄▀▄▀▄▀▄▀▄▀▄▀▄▀▄▀▄▀▄▀▄▀▄▀▄▀▄▀▄▀▄▀▄▀▄▀▄▀▄▀▄▀▄▀▄