
Hello dear friends of this great community of #DIYHub.Today there are many ideas when it comes to interior decoration. For this reason, I want to show you a step by step on how to reuse those glass jars that are left after using them and we are saving. The technique that I will put into practice today is called decoupage, which is an inexpensive craft and is excellent for decorating different objects using fabric or napkins with beautiful motifs. Then I present the following step by step. I hope you like it, let's get started!
Hola queridos amigos de esta gran comunidad de #DIYHub. Hoy en día existen muchas ideas en cuanto a decoración de interiores se trata. Por tal motivo, quiero mostrarles un paso a paso de como reutilizar esos frascos de vidrio que van quedado después de usarlos y vamos guardando. La técnica que hoy pondré en práctica es llamada decoupage, la cual es una manualidad económica y es excelente para decorar diferentes objetos utilizando tela o servilletas con hermosos motivos. A continuación, les presento el siguiente paso a paso ¡Espero les guste, vamos a comenzar!

Materials:
• Napkin decorated with flowers
•white glue
• Glue silicone
• 2 small and medium glass jars
• Brush
• Sponge
• Oyster white paint
• Varnish
• Jute twine
• 2 pink satin ribbon bows
• Flowers to decorate
• Cotton
• Alcohol
• Scissors
Materiales:
• Servilleta decorada con flores
• Pega blanca
• Pega silicon
• 2 francos de vidrio pequeño y mediano
• Pincel
• Esponja
• Pintura blanco ostra
• Barniz
• Hilo de yute
• 2 lazos de cinta de raso rosado
• Flores para decorar
• Algodón
• Alcohol
• Tijera
Step 1
First clean the jars with rubbing alcohol. Then, take the sponge and paint the jars with the oyster white paint, applying several coats until the paint is even.
Paso 1
Primero limpia los frascos con alcohol. Luego, toma la esponja y pinta los frascos con la pintura de color blanco ostra, aplicando varias capas hasta que la pintura quede uniforme.

Step 2
Once the paint is dry, spread out the napkin and remove the bottom layer. Then, cut out the images that you will use to decorate the jars, in this case I have cut out two large flowers and 4 small ones.
Paso 2
Una vez la pintura esté seca, extiende la servilleta y retira la capa de abajo. Luego, recorta las imágenes que utilizarás para adornar los frascos, en este caso he recortado dos flores grandes y 4 pequeñas.

Step 3
Take the glue-filled brush and go over the entire surface where you will place the images. Now glue the image a little at a time to prevent it from wrinkling. Next, apply a thin layer of glue on the pattern, in this way you will give it shine. It is important to use a brush that does not loose strands to achieve a good finish.
Paso 3
Toma el pincel lleno de pegamento y pásalo por toda la superficie donde colocarás las imágenes. Ahora, pega la imagen poco a poco para evitar que se arrugue. Seguidamente, aplica una capa fina de pegamento sobre el estampado, de esta forma le darás brillo. Es importante utilizar un pincel que no suelte hebras para lograr un buen acabado.

Step 4
Once the glue is dry, proceed to repeat the same process, but this time, apply varnish to the entire jar for better protection.
Paso 4
Una vez que esté seco el pegamento, procede a repetir el mismo proceso, pero esta vez, aplícale barniz a todo el frasco para una mejor protección.

Step 5
Place a little glue silicone on the top of the jar and go sticking the jute twine. Finally, glue the bow and decorate with the flowers to make them look even prettier.
Paso 5
Coloca un poco de pega en la parte superior del frasco y ve pegando el hilo de yute. Por último, pega el lazo y decora con las flores para que se vean aún más lindos.


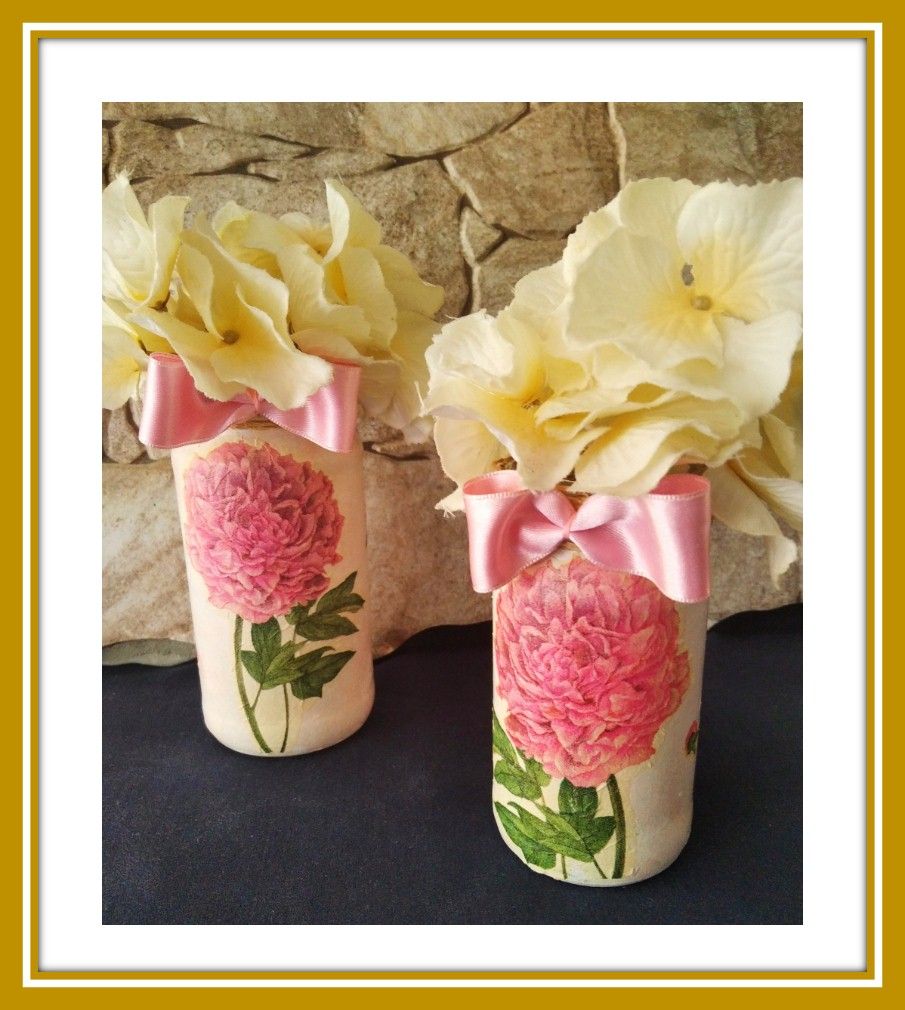

The jars are finished and they have been very beautiful, perfect for decorating a space in my home. With this technique you have the possibility to customize everything you want to change or create for a specific place. The crafts made with this technique are quite durable, so I hope you will be encouraged to put it into practice. See you soon!
Los frascos están terminados y han quedado muy hermosos, perfectos para decorar un espacio de mi hogar. Con esta técnica tienes la posibilidad de personalizar todo aquello que desees cambiar o crear para un lugar en específico. Las manualidades hechas con esta técnica son bastante duraderas por lo que espero te animes a ponerla en práctica. ¡Hasta una próxima oportunidad!
The images were taken by myself with my Redmi Note 8 cell phone.
Translation: Google Translation
I used the program Microsoft Power point
Las fotografías fueron tomadas por mí con mi teléfono celular Redmi Note 8.
Utilicé el programa Microsoft Power point
Traducción: Google Translation
