Buenos días amanteS del arte hoy le voy a mostrar el paso a paso de la elaboración de un paisaje realizada con técnica mixta en donde se utilizo: acuarela, acrílicos, espátulas, pinceles Nº 02, 04 de punta fina, plana y punta redonda, sobre un soporte de lienzo.

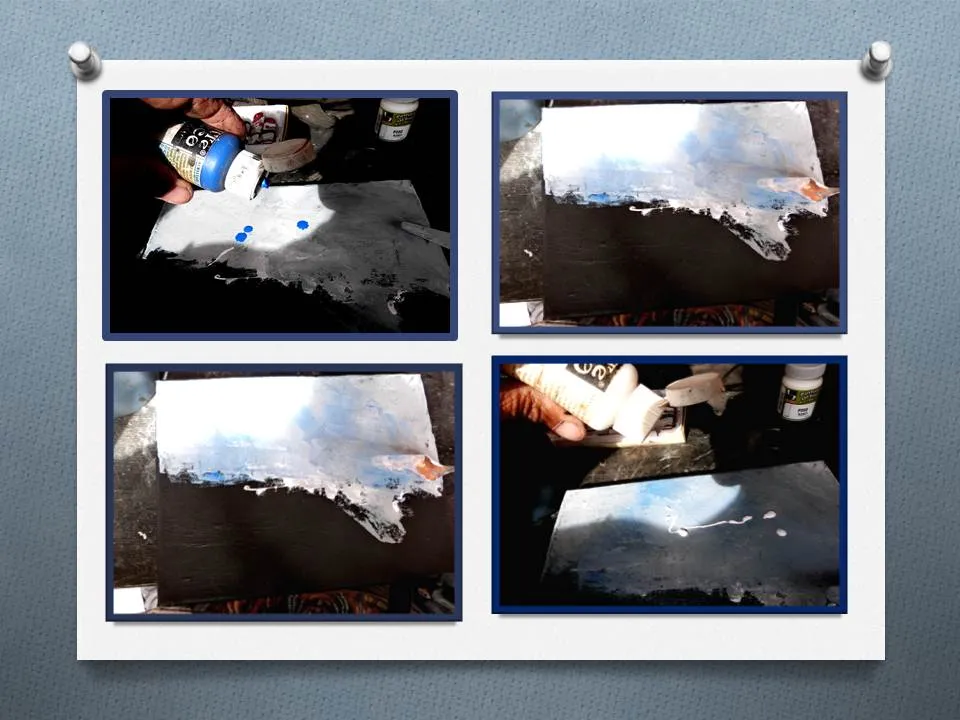
Comencé aplicando aplicando al lienzo una capa de acrílico de color negro (ojo: se puede utilizar cual quier color para fondear la tela), después una vez secado el fondo agregué pintura blanca la cual expandí con la ayuda de la espátula como lo muestran las imágenes.

Una vez aplicando el color blanco agregué el el color azul y lo apliqué con la espátula para hacer el cielo.

Utilicé el pincel y la espátulas para la formación de las nubes, darles formas y textura, siempre en las nube predomina mas el color blanco y las escalas de los azules de la composición tonal, se utilizó el color rojo y el color azul para mezclar los y obtener un color violeta para comenzar a hacer los cerros.

Seguí con dos primarios y un color neutral o sea, blanco, rojo y azul para formar las montañas y para obtener el color anaranjado mezcle los colores rojo y amarillo al que le aplique algo de blanco para lograr un tono de color piel para darle cuerpo a los cerros.

Con la ayuda del pincel numero 2 de punta plana utilicé para tratar los detalles del cerro, además usé los colores azul ultramar y blanco de zinc para realizar el horizonte de la mar.

El color blanco es de gran ayuda para degradar los pigmentos, además con el color blanco voy definiendo las manchas para formar las olas del mar.

Utilizando la espátulas y color blanco y el color anaranjado y color piel se realizo la orilla de la playa

Amarillo y banco para hacer la arena.

Sabia usted que la acuarela se pueden mezclar con los acrílicos sin ningún problema, además se pueden logran texturas y pigmentos son más fuerte por esta razón a la técnica aplicada se le llama mixta que quiere decir mezcla de variedad de materiales compatibles que conforman una obra de arte de calidad.

Estos son mis tubos de acuarelas, si lo usas muy puros puedes obtener texturas con espátulas, pero si lo haces con la aplicación de agua abundante pasa hacer una acuarela con una técnica en aguada.

Observemos ya la atmósfera del paisaje en general, las nubes, las manchas blancas que le dan formas de olas, el brillo del la arena de la playa y la profundidad del mismo.

Empecé con los detalles en la arena de la orilla de la playa.

Detallando los cerro para darle un poco de luz a los cerros.

Con la espátula y el color blanco para darle textura.

Como lo dije antes aquí les muestro como van quedando las olas, los cerros, la arena y el cielo.

Blanco son los colores de luces que le dan carácter, textura y volumen con las manchas en espátula en la formación del cielo y a la mar.

Al cielo y su atmósfera se le agregó color blanco, azul y negro para el efecto nublado y los colores ocre,marrón claro oscuro para realizar las rocas que están en la orilla de la playa.

Se utilizo pincel de punta fina y espátula para la formación de la rocas y se aplico verde manzana para las aguas del mar y manchamos para realizar una roca dentro del mar.

El color verde grama para detalles y definir los movimientos de las aguas del mar.

Nota: Los detalles son fundamentales en una pintura.

Se le agregaron unas gaviotas que nunca deberían faltar en un paisaje playero.

Detalles de las 4 personasbañandose en la playa, las rocas y el agua.

Para darle un efecto de alejamiento a la mar le coloque una rama seca para equilibrar.

Cerros,un velero en la lejanía.

Aquí podremos apreciar la marina, el cielo, las olas, las personas, las gaviotas en la marina completamente terminada.

Espero que mis amigos de Hive y todos los amantes del arte hayan apreciado esta explicación del paso a paso para hacer el paisaje marino de una playa remota de mi imaginación.
¡Muchas gracias por su apoyo!

Good morning art lovers, today I am going to show you the step by step of the elaboration of a landscape made with mixed media where I used: watercolor, acrylics, spatulas, brushes Nº 02, 04 fine point, flat, and bullet point, on a canvas backing.

I started by applying a layer of black acrylic to the canvas (note: you can use any color to base the canvas), then once the background was dry I added white paint which I expanded with the help of the spatula as shown in the images.

Once applying the white color I added the blue color and applied it with the spatula to make the sky.
I used the brush and the spatulas for the formation of the clouds, giving them shapes and texture, the white color and the blue scales of the tonal composition always predominate in the clouds, the red color and the blue color were used to mix them and obtain a violet color to start making the hills.

I continued with two primary colors and a neutral color, that is, white, red and blue to form the mountains and to obtain the orange color mix the red and yellow colors to which I apply some white to achieve a skin tone to give body to the hills.

With the help of the flat tip brush number 2 I used to treat the details of the hill, I also used the colors ultramarine blue and zinc white to make the horizon of the sea.

The white color is of great help to degrade the pigments, also with the white color I define the spots to form the waves of the sea.

Using the spatulas and white color and the orange color and skin color, the shore of the beach was made

Yellow and bench to make the sand.

Did you know that watercolors can be mixed with acrylics without any problem, also textures can be achieved and pigments are stronger for this reason the applied technique is called mixed that you want say mixture of variety of compatible materials that make up a quality work of art.

These are my tubes of watercolors, if you use it very pure you can get textures with spatulas, but if you do it with the application of abundant water, you can make a watercolor with a gouache technique.

Look at the atmosphere of the landscape in general, the clouds, the white spots that give it the shape of waves, the brightness of the sand on the beach and its depth.

I started with the details in the sand on the beach shore.

Detailing the hills to give the hills some light.

Using the spatula and the color white to give it texture.

As I said before, here I show you how the waves, the hills, the sand and the sky are looking.

White are the colors of lights that give it character, texture and volume with spatula spots in the formation of the sky and the sea.

White, blue and black were added to the sky and its atmosphere for the cloudy effect and ocher, light brown and dark colors to make the rocks that are on the shore of the beach.

A fine-tipped brush and a spatula were used to form the rocks and apple green was applied to the sea waters and we stained to make a rock in the sea.

The green color is used for details and to define the movements of the sea waters.

Note: Details are essential in a painting.

Seagulls have been added that should never be missing in a beach landscape.

Details of the 4 people bathing in the beach, the rocks and the water.
To give the sea a receding effect, place a dry branch on it to balance it.

Hills, a sailboat in the distance.
Here we can appreciate the marina, the sky, the waves, the people, the seagulls in the completely finished marina.

I hope my friends at Hive and all art lovers have appreciated this step-by-step explanation of how to make a remote beach seascape of my imagination.
Thank you very much for your support!