Introduction
In this post I want to offer people an easy alternative to the main stream computer user who doesn't think anything of using Windows for all of their computer needs. I'm a little unsure how to target this post as I'm sure my audience varies vastly in terms of computer literacy so I'll try to keep things basic and those who are in the know can simply power through it.
infoworld.com

Motivation
I'm going to talk a little about liberty and freedom when describing my motivation for this post. I like liberty and freedom and you should too. We should all strive every day to keep our data and personal information private. Computer usage is one of the quickest ways to leak information about yourself. This can happen via viruses but it can also happen in a more sinister and nefarious way via software vendors and governments.
Talk about the NSA and more broadly the US Government's largely unknown capabilities and associations with software vendors is firmly part of the zeitgeist. The implications of data collection derived from computer usage, let's face it, are worrying. I don't want to turn this into a privacy and anti-big-brother rant, but I do want to set the tone a little and justify some of the motivations for seeking an alternative to Windows as a major operating system.
What's Ubuntu?
I'm glad you asked! Ubuntu is a flavour of Linux. Linux will do everything that the majority of computer users desire including browsing the net, word processing and office usage, storing photos, playing music, interfacing with peripherals and so on. At the end of the day, there are only a few basic categories of activities that we use computers for in a domestic environment. One thing I'm going to be using my Ubuntu installation for is to interact with my KeepKey hardware wallet when it arrives.
Can I Try It Out First?
Absolutely! In fact you don't even need to ditch your Windows installation. You can easily setup both Windows and Linux on the same computer and simply select which operating system you want to run when the computer boots. I'll be running you through how to do exactly that on my demo Dell laptop. You can actually boot Ubuntu from a USB stick and run it from RAM only as a live system just as a trial. In this mode, none of your changes will be saved and it's a great way to get a feel for it.
Walk Through
First of all I'd like to give credit to this site for the instructions that I'll be running you through. I take pictures and provide screen shots as I go, as I said, on my Dell Precision running Windows 7.
1. Prepare Windows System For Dual Boot
First you'll want to make space on your hard drive for the installation. To do this, we use the Windows Disk Management utility as described here. We'll want to aim to shrink the C:\ drive by about 20000MB. I went for 40000MB.
Open a command prompt as administrator and start the utility as follows
Login to your Windows machine with an administrative account and right click on the Start Menu -> Command Prompt (Admin) in order to enter Windows Command Line. Once in CLI, type diskmgmt.msc on prompt and the Disk Management utility should open. From here, right click on C: partition and select Shrink Volume in order to resize the partition.

Select the shrink operation and after waiting for the system to determine what you can shrink your drive by, apply the shrink.

Once the space has been resized you will see a new unallocated space on the hard drive. Leave it as default and reboot the computer in order to proceed with Ubuntu 16.04 installation.

2. Create A Bootable USB Stick With Ubuntu 16.04
Now it’s time to install Ubuntu 16.04. Go here and grab Ubuntu Desktop 16.04 ISO image. I grabbed the 64 bit ISO for my laptop so you'll need the appropriate image.
Create a bootable USB stick using Rufus. Select the options as I have below to create your USB stick. This stick will be totally erased so make sure there's nothing on it you haven't backed up.

3. Reboot To Start The Ubuntu Installation
Reboot the machine and instruct the BIOS/UEFI to boot-up from the DVD/USB by pressing a special function key (usually F12, F10 or F2 depending on the vendor specifications).
The USB stick will launch the Ubuntu installation which is fairly self explanatory and should look familiar to Windows users. It's fast too. A few options are provided such as setting up a wireless network, selecting your name and password, configuring your time zone and the like. I'll the photos of the process I went through tonight do the talking.

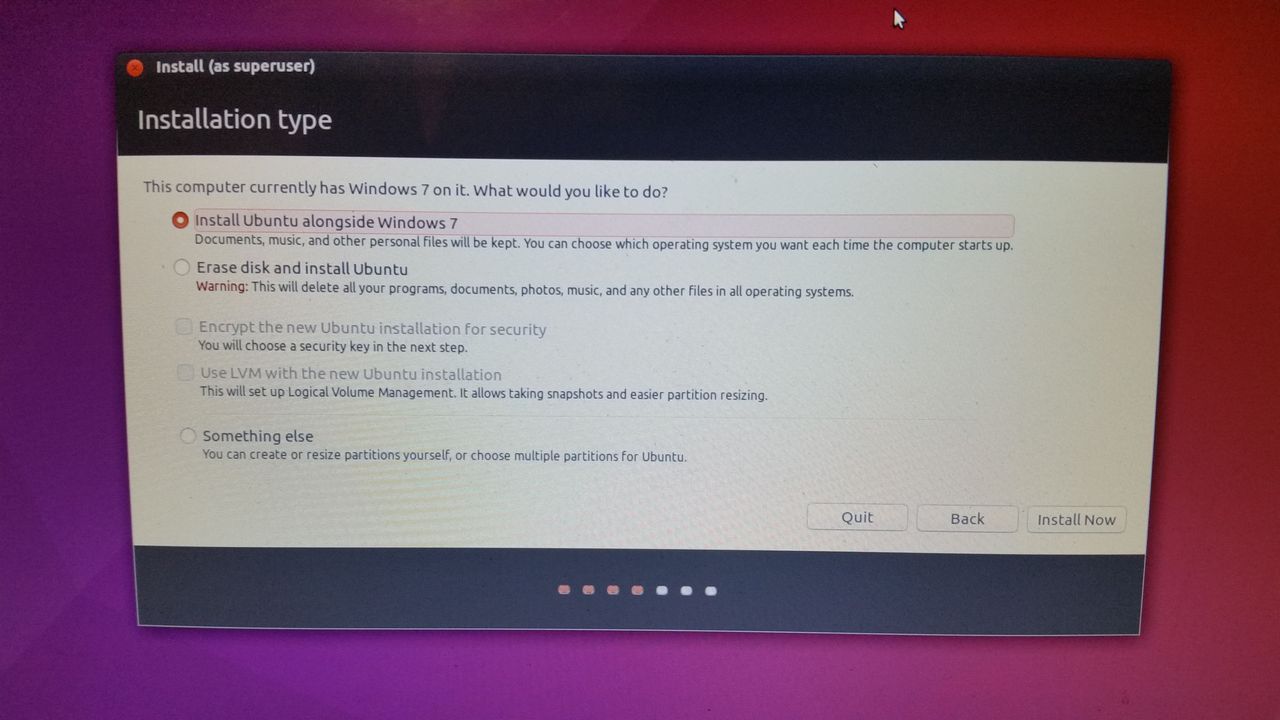
This is the step where you can opt to simply try Ubuntu as I mentioned above or install it. Don't worry, selecting install wont erase your Windows installation, you'll be asked about that a bit later on.


... yes banks are evil ...


... time to reboot and enjoy! ...

... I can now select whether I want to start Windows or Ubuntu when I start the computer ...

... A nice desktop ...

... and of course the first order of business is to get onto Steemit to create this post!...

Conclusion
This has been a very brief run through of how to setup a current Windows machine with an alternative operating system, Ubuntu. I recommend learning how to do this in order to put one more barricade in front of those entities who would snoop on your computing behaviour via the mechanisms available in Windows. It is also a neat way to learn more about computing by using a different operating system.