Happy #NeedleWorkMonday everyone!

When I first bought some skeins of yarn online, I was confused when they did not appear in the form of a ball 😄. Yarns, when bought in skeins, need to be winded into a ball for ease of use, else you will end up with skeins of mess.
At that time, I did not really understand that a skein was different from a ball of yarn and it served me right for not doing my homework (i.e. reading) before I ventured into this world of yarns. That was when I started reading about how to wind a skein of yarn into a ball.
I came across this video tutorial from Expression Fiber Arts. At first I tried using the thumb method since I do not have a yarn ball winder and a swift but it took too long and it was too tiring to do so. For some long time, I did not touch the skeins of yarns I bought.
Then I started browsing the internet and found out that there are ball winders available for sale. But I didn't know that the ball winder and the umbrella swift are sold separately. Initially, I bought just the ball winder and then later, I had to get the umbrella swift to complete the set. All in all, I spent about 20USD for the whole set.
Here are how these guys look like, which can be found on Amazon or probably your local online shopping websites:


There are very nice wooden ones like the one used in the video tutorial but they are too expensive for me. So, I ended up getting these ones which are far cheaper. Maybe someday, I might invest in a wooden one 😍.
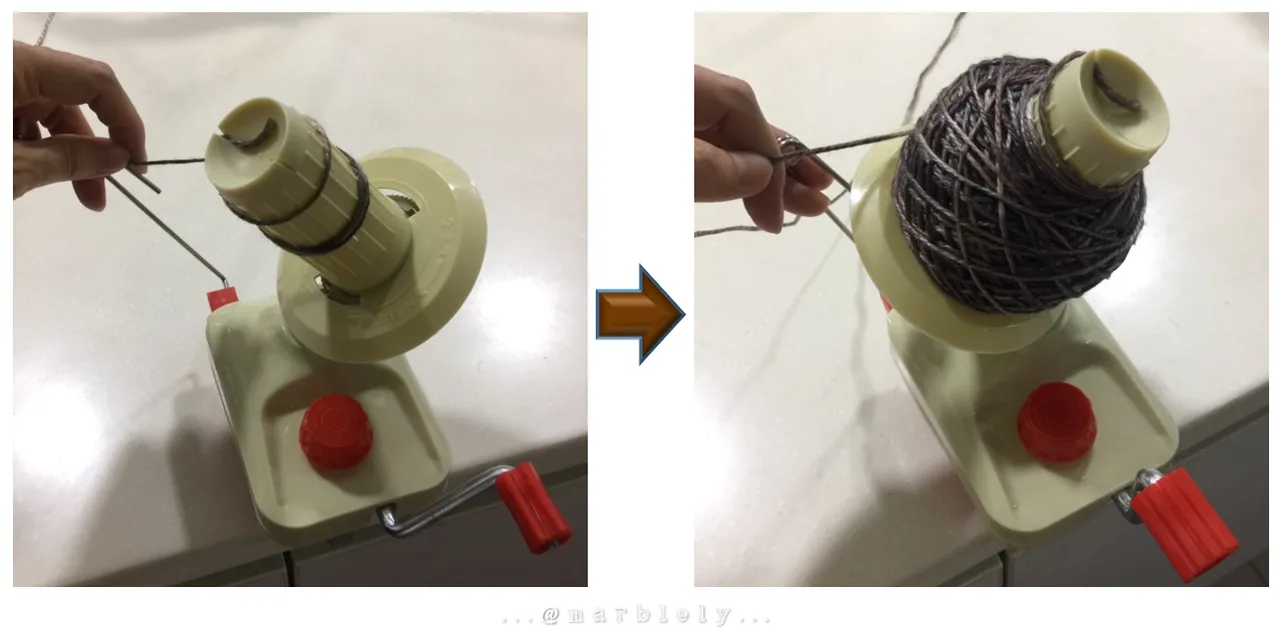
Let me just share with you some photos of the yarn ball winding process.
On the left picture is the carefully unwind skein placed onto the umbrella swift. The umbrella swift is mainly metal, just like an umbrella with the soft plastic rubber green pieces which is where we place the skein and is clamped to your table. The swift's width is adjusted by moving a lever on the swift, which opens and closes the swift just like an umbrella, to make sure the skein fits snugly on the swift.

On the right picture, we place the loose end of the yarn through a metal loop at the ball winder (also clamped to a table) and insert the end into an opening (or a crack) at the top the yarn ball winder to keep the yarn in place when winding.
Then, we slowly wind the knob to turn the ball winder with one hand while the other hand anchors the yarn that has been passed through the metail loop earlier.

The anchoring is important to keep the winding of the ball consistent. Else, the yarn will end up being winded all over the place.
While we wind the yarn, the umbrella swift will keep turning. But we should do this slowly as we tend to want to wind it fast. If we wind the ball winder too fast, we might lose control with the turning of the umbrella swift and the winding of the ball.
The truth is, this ball winding process is very therapeutic 🧘🏻♀️💆🏻.
After some time, you will have your ball of yarn 😁. Then, we will need to carefully remove the ball of yarn from the ball winder to make sure the ball of yarn do not become loose.


And you can start using it for your projects 😊. The loose end that we inserted into the ball winder earlier to keep the yarn in place should be sticking out from the inside of the ball after we remove it from the ball winder. The loose yarn will be the yarn we use to begin our project.

Sorry, I probably have confused you further with my explanation 😅. But the video tutorials will help explain things better. Here is another video you can watch on how to use a ball winder:

How do you wind your skein of yarn into a ball?
 for starting this wonderful community and to the awesomely supportive #NeedleWorkMonday community!
If you love any craft that uses needles, come and join the fun with us here every Monday! You can also join us every other day at #NeedleWork.


This is an Invitation to join #ccc for Guaranteed 👍 Daily Income 💵 and Payout 💸 for Newbies (2.0) 🐟 🐜 🐛 in #ccc 👣 and Follow 👣 the Honor Code 🏅 - the Creed (Conditions and Limits Inside)
AND
the latest update <<< please click to read.