
The other day I was talking to 
This Is My First Attempt
I thought I would share my learning experience with you. Maybe some of the mistakes and lessons I learned can benefit you. First we must think about what we want to achieve. Obviously we cannot have shapes outside of the shot, we must MAKE them LOOK outside, thus we need a "FRAME" or border for them to violate. Thus we will make an artificial frame much like an old Polaroid would have. Then we will make a selection, transform the selection outside of the frame then add a background.
Step One
Choose a photo that you think has an element we can pop out of the shot. Here I thought my silly hat might work.
PS If you want a good final product, it advised NOT to use a shot of the Old Guy!
Bring in pic and make 2 copies by hitting ctrl J twice

Step 2
We need a new layer so hit the icon on the bottom and drag it below the top layer like so.

Step 3
We need a black background. Make sure black is your selected color on the left panel. Click on the paint bucket tool, click on background then hit ALT + DEL.

Step 4
Lets rename "LAYER 2" as "BORDER" This is where we will create a faux frame or border. Think of those old time Polaroid instant photos with the white border. Click on the title "LAYER 2" and retype the new name. TURN OFF top layer by clicking on the eye.

Step 5
Grab the rectangle marquee tool. We are making the white border we are going to pop out of. I used 15px but should have went much bigger. My white frame, I felt, was too thin in the end.

Step 6
Hot EDIT > STROKE > 15px or more. Make sure you are set on white and "inside" is checked. CTRL D to deselect.

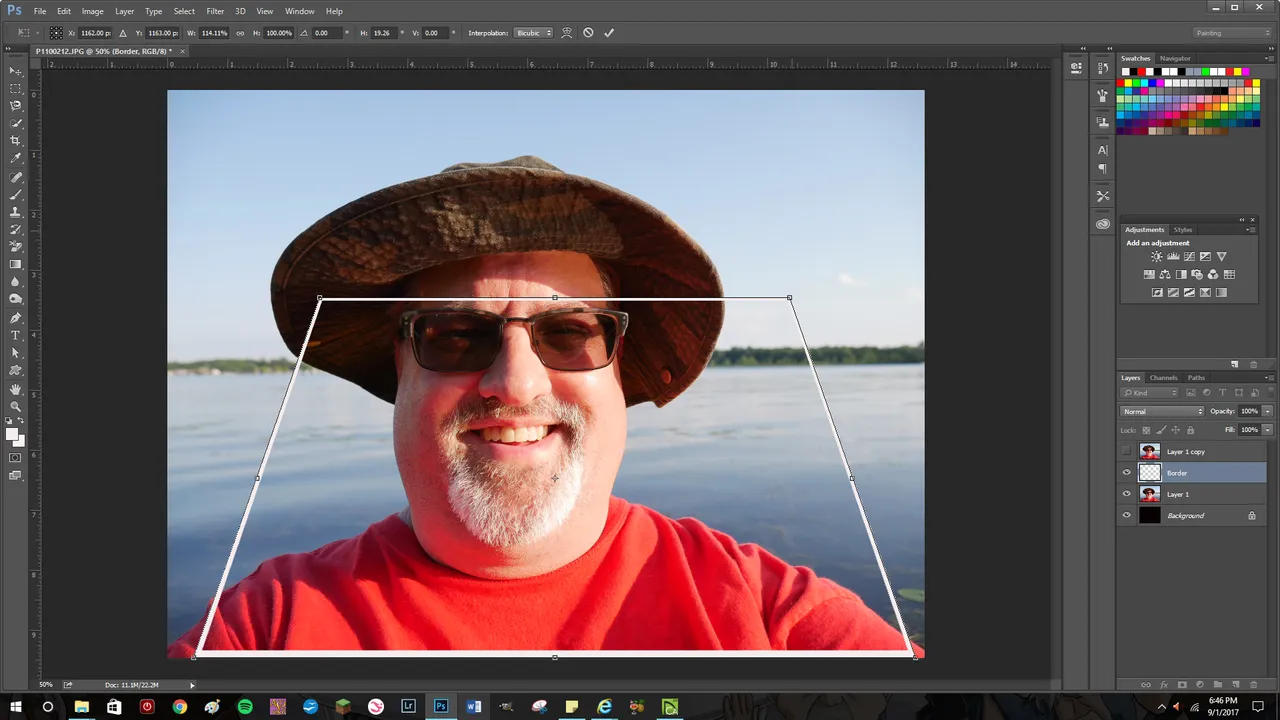
Step 7
Hit EDIT > Transform > Perspective
See the tiny squares along the border, we will use those to manipulate the background photo. Pull the top corners inward toward each other and the bottom corners outward to give a bit of a depth effect. Then ENTER
Step 8
Go to the border and hit ctrl as you click. Ok now to invert hit CTRL + SHIFT + I. Then Q for a quick mask.


Step 9
Grab paint bucket tool and click outside of mask, then hit Q

Step 10
Click on Layer 1 and then add layer mask. Turn layer 1 on by clicking eye and make it active. Use a selection tool of choice ( I used the quick select tool). Click layer mask icon to make the selection.

Step 11
We are almost done. Now we just will shade the black so its not so stark. Click on the background, then grab gradient tool (its in the group that has the paint bucket tool). Hit shift and drag a line from top to bottom of page.

Step 12
Refer to this really helpful video if you get confused.
This is the tutorial I used to learn this technique.

Thanks for stopping by!
All words and images are mine (except the YouTube tutorial) and can be also found on my various social media sites.
Twitter
YouTube Main channel
YouTube Photography
YouTube ASMR/Mukbang
Twenty20