A personal survival kit should change depending upon risks, skills, climate and activity. This article outlines how I recently changed my personal survival kit to suit my changed circumstances. This particular kit is the basic gear what I carry for all outdoors activities. Depending upon the length of trip or other risks, then I would add other gear as needed. This article is not intended for you to copy my items and think you're covered; you should know how to use the gear you carry and have thought through your own needs. Articles like this are useful because they show the thinking behind the choices that one particular person made to suit their needs. Don't copy, think, because this kit could very well be the death of you if you are in conditions different to mine.
I found that I would often arrive at a day-walk and then spend too much time messing about getting my gear sorted before I hit the trail. I am also still nursing a leg injury and so my walks are within an hour or two from my car. For these reasons my philosophy has changed; I have a tool bag in my car with more gear and so my car is my base camp. The Personal Survival Kit is designed to get me back to the car, and in a pinch, help me live until help arrives.
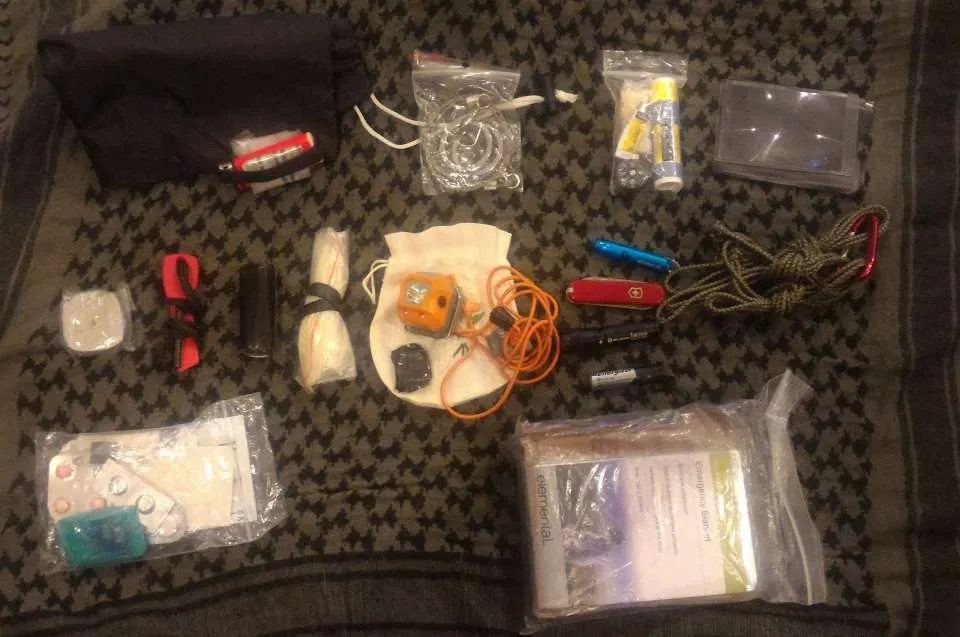
This is the contents of my present kit. It fits into the black ditty bag at the top-left but does flop about quite a bit. If I put it inside a utility pouch (i.e. such as the one in my Light Belt Setup) then it doesn't leave much room for other things.
The contents, going from top-left to bottom-right are: The drawstring bag that contains the kit, a Bic mini lighter with an MRE beverage bag wrapped around and secured with a ranger band, a wire saw, two tinderquicks, 2ml or super glue, a button compass and a chap-stick, a credit card style magnifying glass, a tea-light candle, ferro rod and striker, roll of duct tape, latex gloves in a bag held down with a ranger band, a small bag containing my backup headlamp and spare batteries with terminals taped, a whistle on a type 4 paracord lanyard, a mini-swiss army knife on a lanyard, a bright LED light on a lanyard, a spare battery with terminal taped for the LED lightm a mini-carabiner (non-load bearing) to hold the lanyards, my first aid kit and a bag containing a foil survival blanket, a trash bin liner and a sachet of drink mix from an MRE. That's a big list of items but all of these have some use.

I would like to add my PLB and a metal container for cooking and boiling. The cup I selected is the cup from the Swiss Army M84 canteen. It is 9cm H x 9.5cm W x 6.5cm D and weighs about 100 grams. The Personal Locator Beacon is the PLB1 from RescueME. A PLB basically sends a distress/location signal via satellite and works almost anywhere on the planet. It also has a short-range radio pinger to help rescuers zero in on your location. These things aren't cheap, but what value a life (it might not be yours that you're saving).

This is the current contents of the mini-first aid kit. I have a more comprehensive kit in the car. From top-left to bottom-right: A mini-sewing kit, 2x Diarrhea pills, 2x 500mg Paracetomol, 3x 12.5mg sodium diclofenac, 3x Omeprazole, an electrolite sachet, 3 band-aids in 2 sizes and a sachet of blood clotting agent (Celox). The mini sewing kit contains small safety pins and needles in a drinking straw that has one end closed with hot pliers and the other end secured with duct tape. I have mono-filament thread wound around a flat card and a medium-sized safety pin for extra. The contents of the medical kit deal with likely problems on the trail; pain, stomach issues, dehydration and minor cuts. Remember this isn't a trauma kit - it's a kit for a quick patch up and get back to help. My first order of business was to minify the first-aid kit.

I kept the sewing kit, and all the medicines except I reduced the sodium diclofenac and omeprazole to a single tablet/capsule each. I kept just one band-aid and added two sachets of sugar I lifted from a cafe. The sugar is so that I can remove the sachet or drink mix. It might seem stupid, but I often see people morribund or refusing to move and a bit of a kick in the blood sugar sees them on their way. It doesn't take much sugar either and in this form it's easier to eat if there's limited water available - because the drink mix is way too powdery. Some people prefer to carry hard candy or chocolate.

And, here's everything removed from the kit and why it was removed:
MRE beverage bag: the kit contains ample plastic bags and a cup. Also, I have carried water in latex gloves before. No need for this bag.
Credit Card style magnifying device: yes, it's another way to start a fire and useful for removing things stuck in the skin. Most likely, if I need fire urgently then there'll be no sun and I can wait to remove things from the skin when I'm back to the car.
The neoprene cover for the PLB: In New Zealand, PLBs must float and so the neoprene cover both protects the PLB and helps it float. I'm not doing deep water stuff and the kit will be packed to protect the PLB. Not heavy, but very bulky.
The striker for the ferro rod: Any rough/sharp edge will do. The Swiss Army knife has a file that works just fine for striking sparks. In a pinch I could use the blade or the scissors.
The LED torch and its Batter: I like to carry two light sources. But, this light, while bright, doesn't last long. One battery is about 30mins and I'm banking on at least an hour. More than likely I'll have another light source on me (my phone, the candle) anyway. Don't get me wrong - this is a great little torch and I'll probably carry it elsewhere in my gear but not in my PSK.
Omeprazole in a case: One capsule is enough. I protected the capsule by placing it inside the safety pin in the sewing kit.
Tinder-quick: It's good stuff and really light, but not really necessary given the other things I carry.
Super glue: I have enough repair options and there's not really enough glue to consider this a first aid item. Yes, you heard correctly: super glue was developed as a method to gluing together wounds.
Head lamp bag: I got this cute bag from a Cantonese speaking woman in Ho Chi Minh City when I bought some small bottle of mint oil from her company. You'll see how I manage the elastic head bands from that lamp later and so this little bag is not needed. I should tell you about that woman one day - I met her again about five years later.
Card board: This cardboard wrapped the survival blanket. I kept the blanket in its tough plastic bag to protect it, but ditched this unnecessary cardboard
Wire saw: Not useful for a short trip. Hunker down with what you have and wait for help. Snap branches if needed.
Trash bag: I couldn't make this fit. However, I am carrying a survival blanket and my kit always include a poncho. If there was one item I could add back into the kit then the trash bag would be it. I've made shelters, sleeping mats and all sorts of these.
Mini carabiner: not needed to manage lanyards and I have other ways to attach things
MRE drink mix: Originally carried for the glucose hit - but this is too bulky and powdery for what I need. A couple of teaspoons of raw sugar in two sachets from a cafe will do instead
Band aids: honestly - except for a blister - anything that a band aid fixes can wait until the car. I have other items for bandaging (a shemagh/scarf) and have been known to use duct tape in a first aid role.
Sodium diclofenac: One tablet is sufficient. These tablets are brutal on the stomach so you don't want a higher dose than necessary anyway. By the time one does wears off I should be back to the vehicle or rescue won't be too far away. It's only pain.

And, here are the items that remain. I've introduced them elsewhere, so I won't go through the list again. The bic lighter has moved into a ziploc to help protect and manage it. Just to the left of the headlamp are its spare batteries all taped up. I've kept the chapstick because of its myriad of uses; sunblock, chaffing and blisters, flame extender, candle, and ... chapping. I also forgot to mention that the pocket knife has a blade, file, scissors, tweezers and a tooth pick.

This is what the kit looks like packed. The main part of packing this is that the mylar blanket goes in first, with the first aid kit going on the opposite edge. Then the PLB goes in between and everything else stuffed in where it fits. The headlamp bands help contain everything within the cup. I can hold this cup upside down, give it a shake and nothing falls out. The kit then slides into a drawstring bag.
I have carried this kit on a few excursions. It fits easily into a US Army MOLLE II buttpack with amble room for other gear. The kit fits into a British Army MOLLE Utility Pouch with plenty of room for a light lunch and some other kit.
How does this perform; well, if I'm honest, a PSK is a carry and forget item so I never paid it much thought. However, a couple of days ago I went out for a walk in a storm with my light belt kit. I tried to erect a poncho shelter on a storm-swept point overlooking the ocean and was having trouble; the ground was too hard to drive in improvised stakes from the softwood trees and there honestly wasn't much in the kit that could've helped that. While I wasn't in any danger due to my clothing and acclimatisation to such conditions, it did make me wonder if the kit really was that useful. In the kit's defense, my leg injury kept my off the gnarlier terrain where better wood was available for making pegs, and there's no way I would've erected a survival shelter in that spot - it was much too open - and so I wouldn't have had the same trouble. The reason for me picking that spot was because I wanted shelter while I pondering some things while enjoying the view. And, the ground being that hard and harder woods being too risky to harvest are not usual conditions for me. Even still, I might want to consider the shelter options a bit more.
PSKs should be reviewed as needs change. So, look for a future update. I hope you found this useful in the way you think about your own kit.