Welcome Steemians! This is the seventh part of our documentation of the vermifiltration toilet in East Lombok
We are creating an off grid flush toilet that is also a composting toilet using locally available materials and skills.
This project is intended to build and test this system of building toilet/washrooms using reusable formwork for Ferro-cement water tanks, vermifiltration and integrated wastewater gardens
If you're new please check out our previous instalments at the bottom of this article
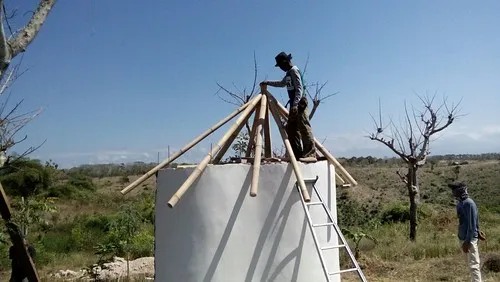
Making the Roof
Cleaning up the edges
Using a grinder we level off the sill at the top of the toilet block

and patch up the edges

and cement in place the exit pipe for the greywater

This will lead out to the trench. After the sloping floor is set and tested, we will immediately begin digging the greywater trench across contour
Building the roof supports
We use a minimum amount of local sawn timber, and the rest using local bamboo. Ideally, we would have soaked this bamboo in seawater for one month prior to use. This reduces the activity of pin-hole borers and fungi
However, our plan is for these supports for last from 3 to 4 years and then we will have an abundance of pole wood from pruning of the regrowth of trees.
The FMNR method for reforestation results in a lot of pole-wood. We prune regrowth on stumps to 3 to 5 main stems, as these grow these are thinned further until there only one main trunk. As these are removed sequentially the prunings become pole-wood useful for in site activities

We will use either the Kentujur (Sesbania grandiflora) trees as they mature, or polewood prunings from the Neem trees (Azadirachta indica). Kentujur poles are soaked in seawater for a month, as it is a softwood otherwise susceptible to borers. However, if we use the Neem wood this requires no treatment and it is naturally immune to most insect damage


By the time the roof bamboo need replacing, we will have a better design, on-site materials that have been treated appropriately and we will be able to reuse the thatch
I also have a plan to grow some bamboo on the wastewater gardens edge so that the materials to rebuild this and other structures are grown on-site
Digging the Hole
Now I can say from the outstart, the location for this toilet isn't ideal for this simple design.
We need the Toilet inflow to enter the top of the vermifiltration chamber, so it's all about getting the levels right.
The hard thing here is that the soil is thin and below it is a bedrock of limestone, which means a lot of hard work in digging it out. If we did this again id spend more time checking levels however things were busy at the office and fast decisions had to be made about location
The other option would have been to build up the toilet block so it is higher. Next time we will rethink this.
As it is we have dug a hole to install the vermifiltration tank , we will also need to dig a trench to run the outlet pipes
I'm sure the guys are not looking forward to this but now we have started we must finish however long it takes
If we had an excavator this work could be done in half an hour
What we can do perhaps is shift the building method to the one we learnt from BATI for underground tanks. this will mean fewer materials and less work.

I will assess when I'm back on site in a few days. we can use a water level to determine how far we need to dig for the outlet pipe. The spoil from the hole is topsoil and broken limestone rubble. We will keep the limestone as aggregate for future projects while the topsoil will go into the wastewater gardens mounds

I'm sure few experimental builds ever went without some problems to be solved, and we've been lucky so far
Propagating the plants for the wastewater garden
Vetiver grass
- Dig up a mature clum of vetiver grass and cut the top back to 6 inches/15cm
- Trim the roots the same way (keep the roots for their fragrance when dry)
- divide into slips and place in a bucket of water until planting
a vetiver slip

If in the dry season plant vetiver into polybags, any soil is suitable. They can also be planted in gutters filled with soil so that they lift out as a continuous strip after the roots bind together after 6 weeks

In the rainy season you can plant immediately. plant 3 slips per hole, or linearly at 10cm spacings for a continuous hedge

dip the slips in a cow manure and mud slurry before planting, and keep them watered for 2 weeks, and clean weeded for 3 months and they will establish permamently. After 3 months you can begin cutting the plant to 30cm in height for mulch and fodder
http://www.vetiver.org/TVN-Handbook%20series/TVN-series1-2-vetiver-propagation.htm
a demonstration to music...

Elephant grass and Sugar cane
- Cut the mature canes into pieces with at least 2 nodes

For Sugar cane
- plant these directly into a shallow trench, laying horizontally, or in a pot
- use a mix of soil and composted cow or goat manure
- water sparingly until shoots emerge after a few weeks
For Elephant grass and Napier hybrids
- Plant directly at a 45 degree angle with 2/3 buried and 1/3 above the surface
the correct method to plant elephant grass and Napier grass hybrid grass cuttings - Or in a pot with the same method
- water sparingly until shoots emerge after 1 week
- use a mix of soil and composted cow or goat manure

Canna
Canna is so easy to propagate.
- Just find an established clump and dig it up, its root system sis shallow so this is easy
- Pull it apart into separate plants
- cut off the stem at 15 cm above the root
- replant the root in the soil and water sparingly until it grows new shoots that emerge from the root below
a heathy Canna rhizome ready to plant


Papaya
Here is how to collect and prepare Papaya seeds for planting
- Take one tasty Papaya
- eat it, setting aside the seeds
- burn some waste leaves, sticks or paper to ash. let it cool
- Mix the Ash and seeds together until thoroughly coated
- set the seed ash mix in the sun to dry
- these seeds can be planted immediately or stored in a paper bag until needed

This is an excellent short video by Jagganath K showing us how to make Papaya circles and how to prepare seed for storage

These seeds can now be stored and won't go rotten and mouldy.
Papaya is best direct seeded where it is to grow, in a small depression with compost and fertiliser buried underneath
- plant 3-6 seeds per position, lightly covering with soil
- water sparingly till seeds emerge, and then pull out excess plants, leaving only one plant per planting hole
- the excess seedlings can be used as a vegetable

Some Papaya will be female, some male and some bisexual.

While the Males do not produce fruit they do produce lots of delicious flowers. So we needn't worry about which sex we get
Having a supply of vegetables on site to serve guests is an important part of this demonstration site.
I will show you in future articles how to prepare Green Papaya fruit, flowers, leaves and seeds for various uses
Papaya leaves and male flowers are a functional food.
http://en.malayalamemagazine.com/benefits-of-eating-papaya-leaves-and-flowers/
they are delicious
Next
We will install the thatching, and move forward in building the vermifilters with explanation of why vermifiltration of toilet wastes is the premier solution to sanitation in this area, and a discussion of the various types of compost worms
This project is fully funded by

This build is funded by Ecoregions Indonesia, as part of their ongoing support for the people of Sekaroh forest, with a 9 million Indonesian rupiah for research and to build the budget, along with the use of Ecoregions staff hours to make and test the prototype. After some months testing, we hope to also gather some Steem community support to continue prototype and business model development for job creation.
We hope you follow our progress towards a workable solution to these problems that is socially acceptable, economically sound and environmentally beneficial.
Previous instalments
https://steemit.com/permaculture/@reville/evolving-the-tiger-toilet-part-1
https://steemit.com/permaculture/@reville/evolving-the-tiger-toilet-part-2
https://steemit.com/permaculture/@reville/evolving-the-tiger-toilet-part-3
https://steemit.com/permaculture/@reville/evolving-the-tiger-toilet-part-4
https://steemit.com/permaculture/@reville/evolving-the-tiger-toilet-part-5
https://steemit.com/permaculture/@reville/evolving-the-tiger-toilet-part-6


please Comment, Upvote, Share or Resteem!