

Hello guys! Today I made some basic tutorial in After Effects: Flame Text.
You can also make it too just follow the step by step tutorial below:
- 1st open your After Effects application.
- Then, click File.
- After that, chose New Composition.

- Name your composition with any name you want.
- Then follow these settings:
Preset: HDV/HDTV 720 25
Width: 1280px
Height: 720px
Pixel Aspect Ratio: Square Pixels
set frame rate to 25
Full resolution
Duration = 0:00:10:00
Background anything you want.

- At the lower left panel, Right click and click New then Text. Put anything you want there. I created 3 texts but it's up to you to decide how many you want, even just 1.

- Select all 3 texts then Right click > Pre-composed.

- You can then add a name to your composition, I named it "Fire text". Then select "Move all attribute into the new composition" then click ok.

- At the bottom left side double click Fire Text.

- Then go to the menu bar across the top click the composition tab.

- Set your composition settings like this:

- From the bottom-left part again select all 3 texts (if you create only 1 text just right click on it) and choose pre-compose again and name it anything you want.


- Now go to menu bar at the top then click file > import > file.

- Import a 'fire' image (any fire image you have will do). Here's what I used in this turorial (credits to owner):


- In the project panel is where you will see your imported files, drag it down to composition panel at the bottom left.

- Go to effects then preset and search for motion tile.

- Drag the motion tile effects and drop it to your fire image then change the output width to 600 then press enter:

- It should look like this:

- Now click the clock named tile center and at the bottom-right part set the time like this::

- I set mine at 8 seconds:

- Then go back to tile center change it to 2000:

- Right-click the fire image and then click pre-composed:

- Add a name to your composition then click the move all attributes in new composition then click ok:

- Now drag the fire image and drop it at the bottom of your text

- It should look like this:

- Now select the fire image composition make sure it's selected then go to menu option click layer >track matte > alpha matte:

- And now the surface of the text are now the fire image composition.

- After than go to effects and presets and search for cc blobbylize. Drag the the blobbylize effect:

- Then drop it here:

- Follow these settings:**

- Go to effects and presets search for cc glass:

- Drag and drop to cc panel then follow these settings:

- Right click on the arrow New > click adjustment layer:

- Select the adjustment layer then on the menu bar click effects > color correction > canvas:

- Just set it when you're satisfied in the colors:

- Select all of them then right click > pre composed:

Go to file> export> add to render Queue:
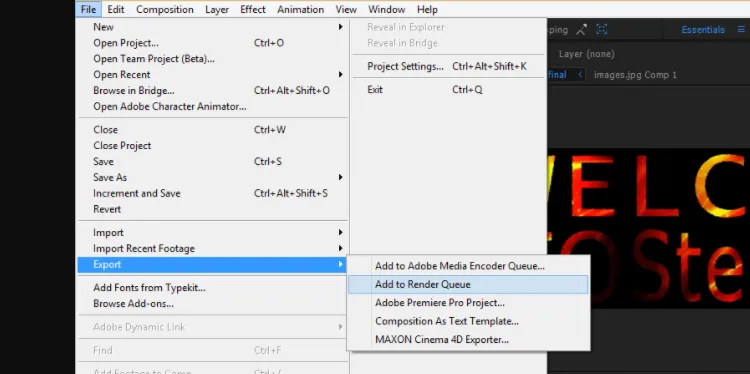
- Set your file's destination then click save:

- You are now done making your Flaming Text!

Bonus!
First Open the menu bar then click File > Import > Video Frames to Layer.

Go to video file you want to convert then select it then click load after:

Follow these settings then click ok:

On menu bar again click file > save for Web & Devices:

Click save and now you are done converting a short video to GIF:

Thanks for visiting this page if you want me to make more videos please comment down and don't forget to follow upvote and resteem this blog if you like my work. It will help in encouraging me to make more tutorials!
