Hey bella comunidad!
En esta ocasión quiero compartir con ustedes el paso a paso para realizar a este bello Pokémon con goma Eva para darle el uso que mas les sirva. Espero les guste!
Hey beautiful community!On this occasion I want to share with you the step by step to make this beautiful Pokémon with Eva rubber to give it the use that best suits you. I hope you like it!


Hey mis queridos amigos, me encuentro aquí hoy para enseñarles a hacer esta bella figura en goma Eva, especial para adornar tortas, suvenires o lo que mas les guste.
Estuve en la casa de mi madrina, quien se dedica a hacer diversas manualidades. Ella estaba haciendo de estas figuras para decorar una torta de cumpleaños y quise hacer uno yo también, de modo que me fue explicando el paso a paso, y aquí se los quiero compartir porque es un trabajo muy entretenido de hacer.
Hey my dear friends, I am here today to teach you how to make this beautiful figure in Eva rubber, special to decorate cakes, souvenirs or whatever you like best.I was at my godmother's house, who is dedicated to making various crafts. She was making these figures to decorate a birthday cake and I wanted to make one myself, so she explained to me step by step, and here I want to share them because it is a very entertaining job to do.

Bien. Lo primero que debemos realizar es un dibujo en una hoja blanca, sobre el diseño que queramos crear. En mi caso escogí a Bulbasaur ya que es uno de mis Pokémon preferidos.
la verdad es que yo me doy bastante maña con el dibujo, por lo que simplemente busqué una imagen de referencia en Pinterest y lo plasmé en el papel. pero si quieres hacer algo un poco mas difícil y te cuesta un poco mas, puedes hacer como mi madrina. ella busca sus referencias en la computadora, agranda o achica la imagen dependiendo el tamaño que desee realizar, le sube todo el brillo a la pantalla, coloca la hoja y simplemente lo calca. de hecho, el proceso es bastante mas rápido.
Good. The first thing we must do is a drawing on a white sheet, on the design that we want to create. In my case I chose Bulbasaur since it is one of my favorite Pokémon.The truth is that I am quite good at drawing, so I simply looked for a reference image on Pinterest and put it on paper. but if you want to do something a little more difficult and it costs you a little more, you can do like my godmother. She looks for her references on the computer, enlarges or shrinks the image depending on the size she wants to make, turns the brightness up on the screen, places the sheet and simply traces it. in fact, the process is much faster.
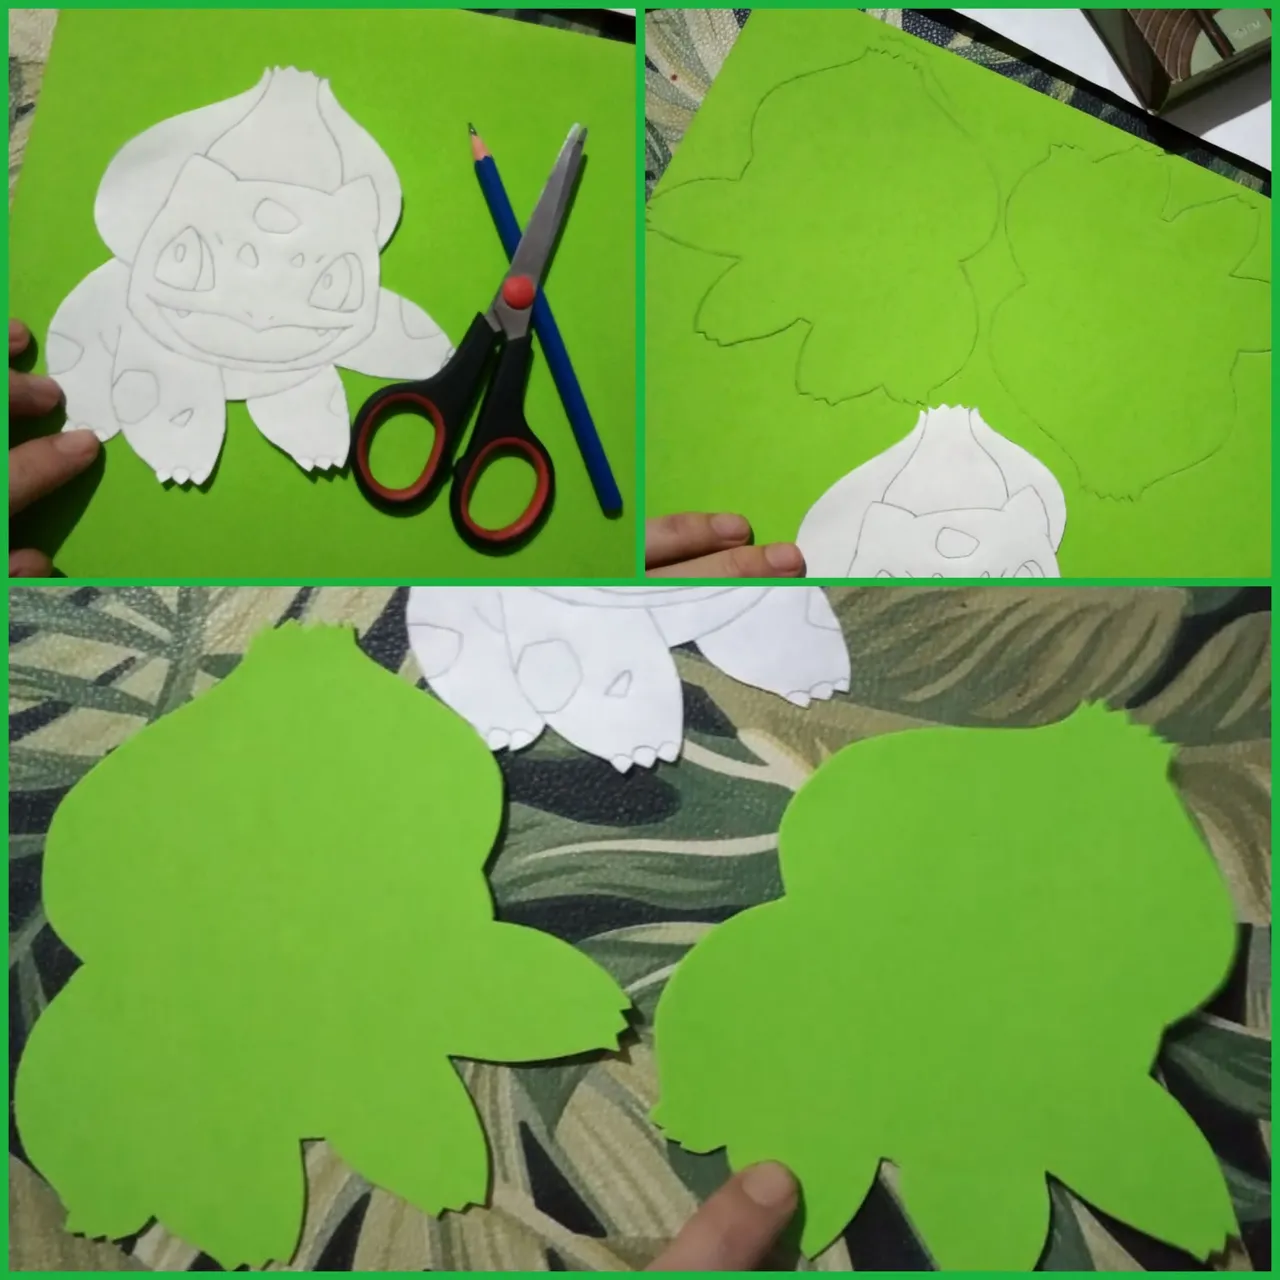
A continuación, recortaremos todo el contorno del dibujo, ya que éste lo utilizaremos como molde. una vez tengamos recortada nuestra figura, escogeremos la goma Eva del color que utilizaremos de base, para esto nos guiaremos por el color predominante de nuestro personaje. en el caso de bulbasour, todo su cuerpo es verde, de modo que iniciaremos con ese color.
Apoyamos nuestro molde sobre la goma Eva seleccionada y marcaremos toda la silueta del mismo con un lápiz. Una vez listo, recortaremos la silueta.
Les aconsejo que a la hora de marcar nuestros moldes, lo hagamos de forma inversa, es decir, con el frente del molde mirando hacia abajo. Ésto es para que luego, cuando armemos toda la figura, no queden marcas de lápiz a la vista, y así tener un acabado mucho mas prolijo.
Next, we will cut out the entire contour of the drawing, since we will use it as a mold. once we have cut out our figure, we will choose the Eva rubber of the color that we will use as a base, for this we will be guided by the predominant color of our character. in the case of bulbasour, its entire body is green, so we'll start with that color.We support our mold on the selected Eva rubber and we will mark the entire silhouette of it with a pencil. Once ready, we will cut out the silhouette.
I recommend that when marking our moulds, we do it in the opposite way, that is, with the front of the mold facing down. This is so that later, when we assemble the whole figure, there are no pencil marks in sight, and thus have a much neater finish.

luego comenzaremos a desarmar el molde, recortando las partes mas grandes de la figura. y repetiré el proceso anterior en goma Eva, respetando el color de cada parte del personaje.
En el caso de bulbasaur, decidí dividirlo en tres partes, que son las mas predominantes o que sobresalen mas del dibujo. el cuerpo (que sería la base que recortamos anteriormente), la semilla (la cúpula que presenta sobre su lomo), y la cabeza.
Otra recomendación que les dejo, es ir haciendo este procedimiento por partes. pues no queremos tener todo el molde desarmado y que luego se nos pierdan las piezas o nos olvidemos donde va cada una.
then we will begin to disassemble the mold, cutting out the largest parts of the figure. and I will repeat the previous process in Eva rubber, respecting the color of each part of the character.In the case of bulbasaur, I decided to divide it into three parts, which are the most predominant or stand out from the drawing. the body (which would be the base that we cut out previously), the seed (the dome that it presents on its back), and the head.
Another recommendation that I leave you, is to go through this procedure in parts. Well, we don't want to have the entire mold disassembled and then lose the pieces or forget where each one goes.

Teniendo recortadas todas las piezas, las pegaremos a la base con cola blanca o silicona liquida. (definitivamente la silicona liquida es mejor, ya que casi no tarda en secar y así ahorras tiempo para continuar con los pasos siguientes, pero a mi me quedaba muy poca y preferí usarla en el final).
También decidí hacer las manchas del bulbasaur con goma Eva, pero lo dejé para luego de tener la pieza armada, ya que estas manchas son muy pequeñas y muy fáciles de perder 😅😅.
Having cut out all the pieces, we will glue them to the base with white glue or liquid silicone. (Liquid silicone is definitely better, since it takes almost no time to dry and thus saves time to continue with the following steps, but I had very little left and I preferred to use it at the end).I also decided to make the bulbasaur spots with Eva rubber, but I left it until after the piece was assembled, since these spots are very small and very easy to lose 😅😅.

Una vez que tengamos toda la pieza ensamblada, ya podemos comenzar a pintar los detalles. en mi caso, el rostro.
para es paso utilicé pintura acrílica pero también pueden usar temperas.
y luego delinearemos todo el contorno y los detalles utilizando una fibra o micro fibra de color negro. es muy importante que la fibra sea permanente para evitar que se nos manche todo el trabajo.
Once we have the whole piece assembled, we can start painting the details. in my case, the face.For this step I used acrylic paint but you can also use tempera.
and then we will outline all the outline and details using a black fiber or micro fiber. It is very important that the fiber is permanent to avoid staining all our work.

Por ultimo, pegaremos con cola blanca, nuestra figura sobre un carton fino para darle mas rigidez, recortaremos todo el contorno y para finalizar, por la parte de atras le pegaremos un palillo de brochette para luego poder pincharlo sobre alguna torta, centros de mesa o algun souvenir.
y listo! así quedó el resultado final. Espero les haya gustado tanto como a mi 💚.
Finally, we will paste our figure on a thin cardboard with white glue to give it more rigidity, we will cut the entire contour and to finish, on the back we will glue a skewer toothpick to later be able to prick it on a cake, centerpieces or some souvenirand ready! This is how the final result was. I hope you liked it as much as I did 💚.

Todas las fotografías son de mi autoría./ All pictures are by me.
La imagen de portada está editada con la aplicación PicsArt./ The cover image is edited with the PicsArt app.
