
¡Buenas comunidad HIVE!
Continuando con las ideas que me inspira la iniciativa #lovinghive 💖, para esté nuevos post realicé un arte para un fondo 3D en Illustrator, método que me parece muy interesante, por lo que, a través de este contenido, les enseñaré el paso a paso. Les confieso que es la primera vez que realizo este tipo de efecto con este programa, ya que suelo utilizar cinema 4D, para salir de mi estado de confort, decidí realizarlo en illustrador y me siento muy complacido con el resultado, esperando que sea de su agrado 😊.
Bueno mis amig@s de HIVERS, con mucho placer y cariño compartiré con ustedes el proceso de creación del arte y sin más preámbulo comencemos.
English
English
Good
HIVEcommunity!Continuing with the ideas that inspire me the #lovinghive 💖 initiative, for this new post I made an art for a 3D background in Illustrator, method that I find very interesting, so through this content, I will show you the step by step. I confess that this is the first time I make this kind of effect with this program, since I usually use 4D cinema, to get out of my comfort state, I decided to make it in Illustrator and I feel very pleased with the result, hoping it will be to your liking 😊.
Well my friends of HIVERS, with great pleasure and love I will share with you the process of creating art and without further ado let's begin.


Bueno ya saben que me encanta mucho este proceso, que es el bocetado, debo confesarle que esta idea ya tiene un tiempo en mi mente, si mas no recuerdo fue como el 4 día de conocer esta gran plataforma, cuando escuché de #loveringhive. Bueno empecé hacer muchos bocetos que poco a poco estoy diseñándolos, son muchos, así que hay diseño para rato. Para este diseño al igual que los anteriores publicados, no se utilizará muchos recursos, solo tener: papel, lápiz y muchísima imaginación 😊. Miren como me quedó la idea en el boceto que realice.


English
English
Well you know I love this process, which is the sketch, I must confess that this idea has a time in my mind, if I do not remember was like the 4 day of meeting this great platform, when I heard of #loveringhive. Well I started to make many sketches that little by little I am designing them, there are many, so there is design for a while. For this design, as well as the previous ones published, I will not use many resources, just have: paper, pencil and a lot of imagination 😊. Look how I got the idea in the sketch I made.
Español
|
English
|
|---|---|
|
Programa utilizado:
Illustrator cc2019
Colores:
Rojo 1 #ff0333Rojo 2 #cc0228Rojo 3 #99021fAzul oscuro 1 #14252eAzul oscuro 2 #111f26Azul oscuro 3 #0e1a20
Dimensiones:
1440px x 900px
|
|
Definición términos | Definition of terms
Definición términos | Definition of terms

Paso 1/ Step 1
Creamos una nueva composición de dimensiones de 1440px x 900px, colocaremos el imagotipo de Hive (img 1), seleccionamos el isotipo y nos dirigimos a el menú de navegación seleccionamos Efectos/ 3d/Extrusión y biselado (img 2) continuamos en las opciones de extrusión y biselado colocaremos los siguientes valores en el eje X 44°, en el eje Y -29°, en el eje Z 30°, perspectiva 0°(img 3). Seleccionamos el logotipo le damos también Extrusión y en las opciones de extrusión y biselado colocaremos los siguientes valores en el eje X 44°, en el eje Y -29°, en el eje Z 30°, perspectiva 0° (img 4). nos dirigimos a el menú de navegación seleccionamos Objeto/ Expandir apariencia(img 4).
English
English
We create a new composition of dimensions of 1440px x 900px, we will place the image of Hive (img 1), we select the isotype and we go to the navigation menu selecting Effects/ 3d/Extrusion and Bevel (img 2) we continue in the options of extrusion and bevel we will place the following values in the X axis 44°, in the Y axis -29°, in the Z axis 30°, perspective 0° (img 3). We select the logo and we also give it Extrusion and in the options of extrusion and beveling we will place the following values in the X axis 44°, in the Y axis -29°, in the Z axis 30°, perspective 0° (img 4). We go to the navigation menu and select Object/Expand appearance (img 5).


Paso 2/ Step 2
¡A divertirnos coloreando!, empezamos por el isotipo colocándole los colores, dependiendo de la luz vamos variando de la gama roja (img 6). Terminamos de darle color (img 7), a continuación, le colocamos una capa de degradado negro, en modo multiplicar y vamos generando sombras las que creamos convenientes (img 8) terminamos de añadir las sombras (img 9).
English
English
Let's have fun coloring!, we start with the isotype placing the colors, depending on the light we vary from the red range (img 6). We finish giving it color (img 7), then, we put a black gradient layer, in multiply mode and we generate shadows that we think are convenient (img 8) we finish adding the shadows(img 9).


Paso 3/ Step 3
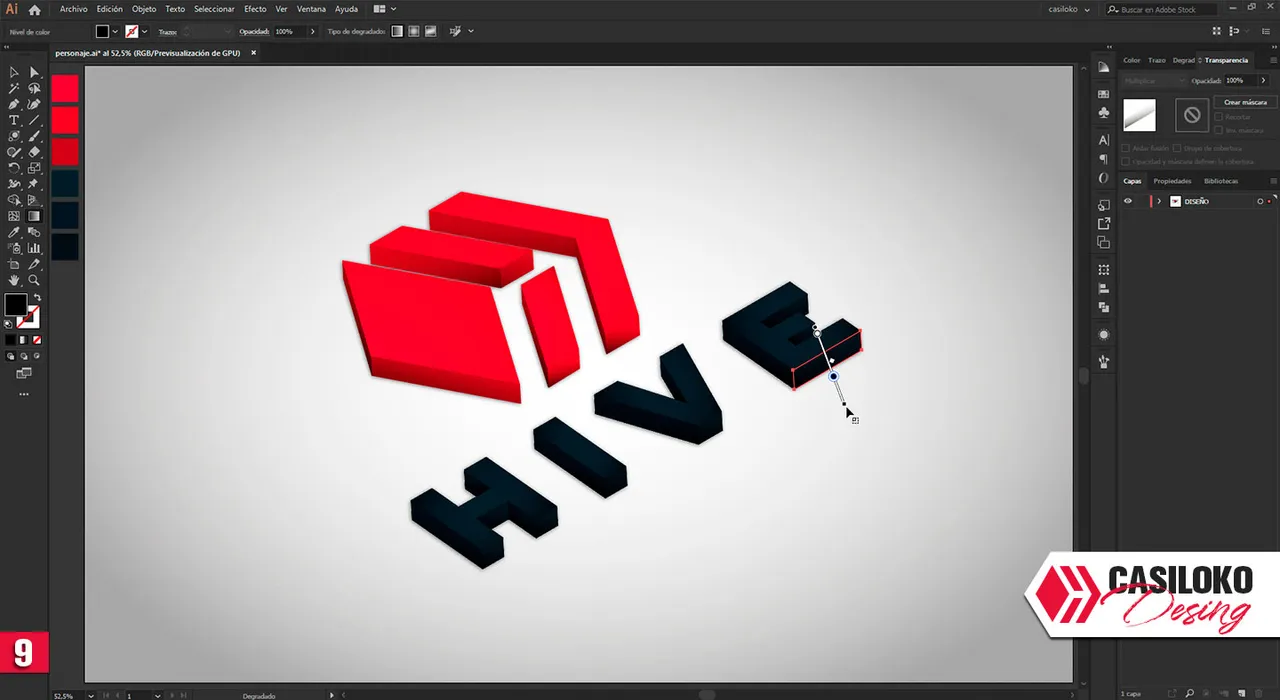
Con la herramienta pluma (P) vamos colocando en las esquinas líneas para generar brillo (img 10), le colocamos una opacidad de 51% (img 11), luego continuamos con el logotipo colocándolas en cada esquina (img 12) Ahora con un degradado blanco con trasparente vamos creando unos brillos extras (img 13) colocamos un color de fondo y listo, ya tendríamos el diseño =) 😉 (img 14).
English
English
With the pen tool (P) we are placing lines in the corners to generate brightness (img 10), we put a 51% opacity (img 11), then continue with the logo placing them at each corner (img 12) Now with a white gradient with transparent we are creating some extra brightness (img 13) we put a background color and ready, we would have the design 😉 (img 14).


Ejemplo fondo de pantalla | Example of wallpaper
Ejemplo fondo de pantalla | Example of wallpaper


Agradecido cada una de las personas que me votó, para mí es muy valiosa su votación. GRACIAS AMIGOS MIOS, por el voto de confianza en el post anterior y por tomar un tiempo para leer mis locuras.
También, quiero mandar un saludo a todos los amigos que me comentaron el post anterior, aprecio cada una de sus comentarios y bueno día a día iré mejorando mis post para traerles contenido de calidad.
GRACIAS HIVE
por esta aventura.
English
English
I am grateful to each and every one of the people who voted for me, for me their vote is very valuable. THANK YOU MY FRIENDS, for the vote of confidence in the previous post and for taking some time to read my crazy stuff. Also, I want to send a greeting to all the friends who commented on the previous post, I appreciate each of your comments and good day by day I will improve my posts to bring you quality content. THANK YOU HIVE for this adventure.

Bueno, ante los problemas y las adversidades solo les puedo aconsejar con todo mi corazón ❤️:

|
English

|
|---|