Buenos días mis apreciados amigos de # Hive diy, excelente jueves lleno de esperanzas y muchas bendiciones para todos, espero se encuentren bien en unión familiar y haciendo los que más nos gusta crear e innovar, les deseo el mejor de los días y que hoy se desborden de creatividad.

El día de hoy les compartiré como realizar un hermoso Cotillón para las fiestas o reuniones de nuestras princesas a partir de un frasco de vidrio, la inspiración para esta manualidad es mi pequeña que aunque no es su cumpleaños se ésta iniciando en el mundo del ballet y me pareció una excelente idea para decorar su habitación ya que también podemos darle otra nueva utilidad luego de reutilizarlo, a mi gusta y me llena mucho crear cositas para mi nena y ver su carita de felicidad, disfrutó haciendo este arte de crear, a continuación les comparto el paso a paso para también lo hagas tú mismo, espero les agrade.
Good morning my dear friends of # Hive diy, excellent Thursday full of hope and many blessings for all, I hope you are well in family togetherness and doing what we most like to create and innovate, I wish you the best of days and that today you overflow with creativity.
Today I will share with you how to make a beautiful Cotillion for parties or meetings of our princesses from a glass jar, the inspiration for this craft is my little girl that although it is not her birthday is starting in the world of ballet and I thought it was an excellent idea to decorate her room because we can also give another new use after reusing it, I like and it fills me a lot to create little things for my baby and see her happy face, she enjoyed doing this art of creating, then I share with you the step by step so you can also do it yourself, I hope you like it.
Materiales
Materials
✓ Un frasco de vidrio de mayonesa.
✓ Tull de color rosado
✓ Foami diamantado de color rosado
✓ Palo de altura
✓ Silicón liquido
✓ Tijera
✓ Golosinas
✓ icopor
✓ Listón color lila
✓ Piedras decorativas
✓ Molde de bailarina

✓ A glass jar of mayonnaise.
✓ Tull of pink color.
✓ Pink colored diamond foami.
✓ High stick
✓ Liquid silicone
✓ Scissors
✓ Candy
✓ Styrofoam
✓ Lilac-colored ribbon
✓ Decorative stones
✓ Ballerina mold
Paso a Paso
Step by Step
1- Recorta una tira de 22x5 cm y pega en la parte inferior del frasco, luego pega y recorta el fondo de la misma.

1- Cut out a 22x5 cm strip and glue on the bottom of the jar, then glue and cut out the bottom of it.
2- Pega un pequeño circulo de icopor en el centro del frasco en la parte interior, recorta también un pequeño circulo del foami diamantado y cubre el icopor con él.

2- Glue a small circle of the icopor in the center of the jar on the inside, also cut out a small circle of the diamond foami and cover the icopor with it.
3- Recorta una tira del foami diamantado de medio cm de ancho y forra el palo de altura dejando 2 cm sin cubrir en la parte inferior.

3- Cut a strip of the diamond foami half a cm wide and cover the stick, leaving 2 cm uncovered at the bottom.
4- Sobre un base de 15 cm de ancho colocamos el tull dando 10 vueltas, ata a la mitad, estira los extremos con los dedos y corta cada lado de igual manera, luego abre el tull y dale forma circular.

4- On a 15 cm wide base, place the tull 10 times, tie in half, stretch the ends with your fingers and cut each side in the same way, then open the tull and give it a circular shape.
5- Copia y recorta el molde de la bailarina sobre el foami diamantado.

5- Copy and cut out the mold of the ballerina on the diamond foami.
6- Con las piezas ya listas procedemos a armar, introduce el palo de altura en el centro del frasco, luego pega en la parte superior del mismo el tull y seguidamente pegamos la bailarina.

6- With the pieces ready we proceed to assemble, insert the height stick in the center of the jar, then glue the tull on top of it and then glue the ballerina.
7- Con el listón haremos un lindo lazo, decoramos con una piedra y pegamos a la cintura de la silueta de la bailarina.

7- With the ribbon we will make a nice bow, decorate it with a stone and glue it to the waist of the ballerina's silhouette.
8- Para finalizar coloca las golosinas dentro del frasco y así de lindo a quedado nuestro cotillón.
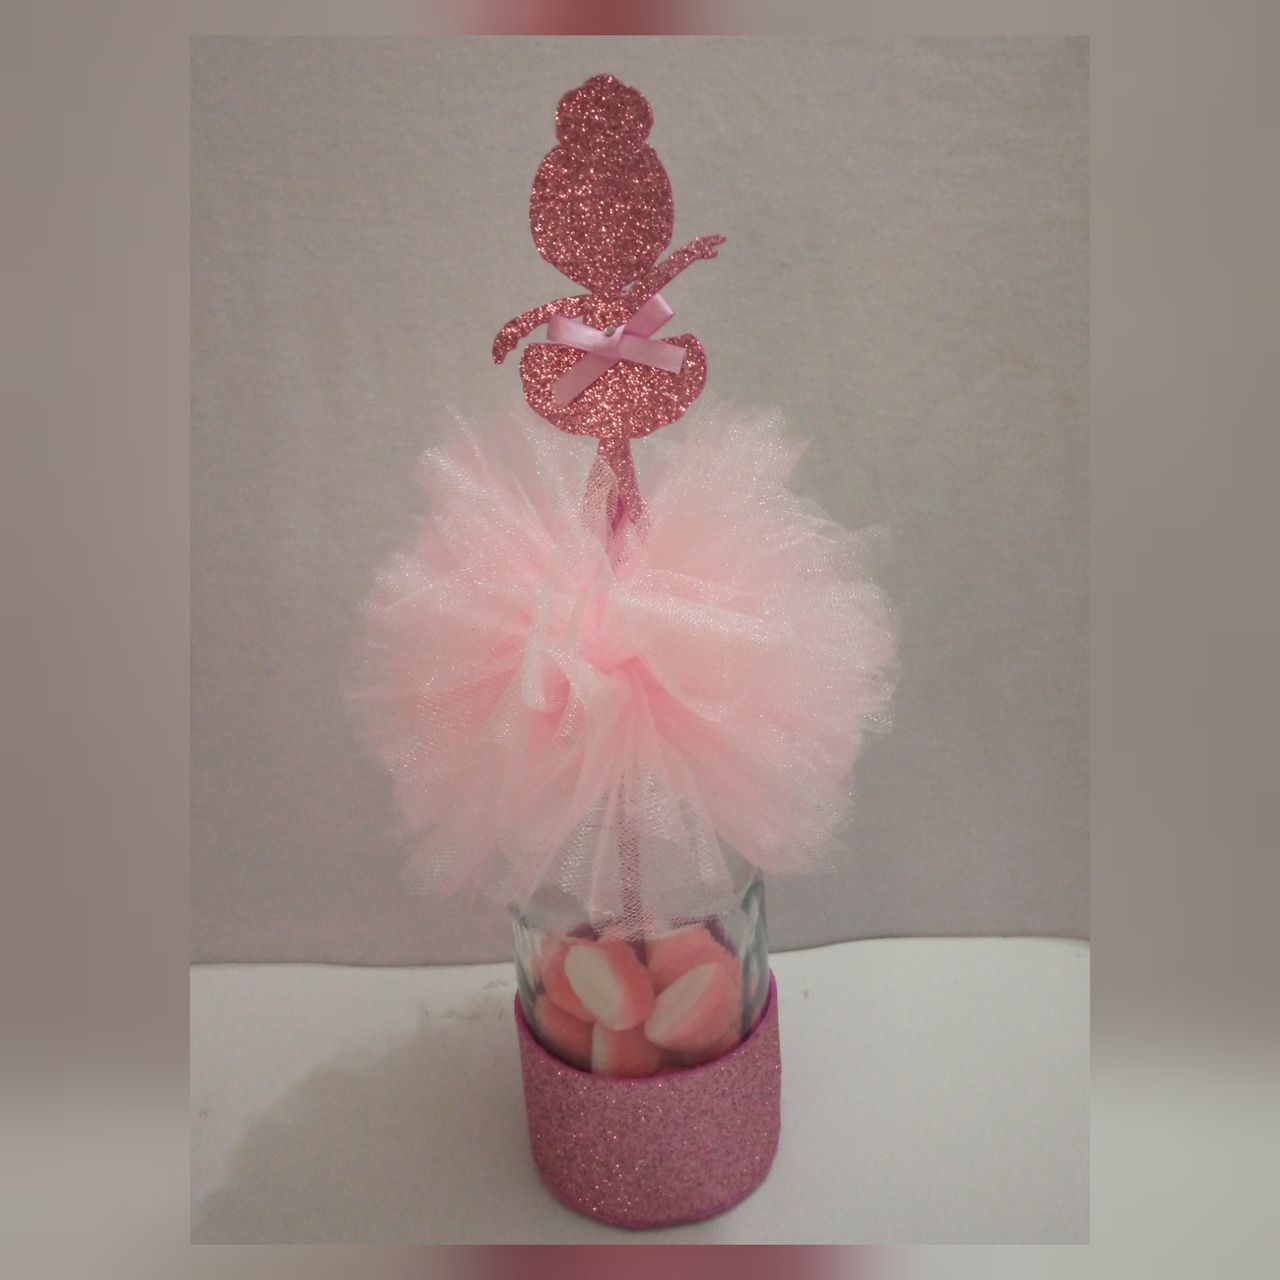
8- To finish, place the candies inside the jar and that's how pretty our cotillion has turned out.
Espero les haya gustado mis estimados amigos, es una manualidad sin dificultad para realizar, lleva poco tiempo, a mi pequeña le encantó mucho, y comerse las golosinas también, jajaja, estoy segura de que a sus princesas también les gustará, anímense a hacerlo.
I hope you liked it my dear friends, it is an easy craft to make, it takes little time, my little girl loved it, and she loved eating the candy too, hahaha, I am sure your princesses will also like it, so come on and do it.
Muchas gracias por visitar mi blog, nos vemos en una próxima oportunidad, Dios les cuide siempre, Bendiciónes!
Thank you very much for visiting my blog, see you next time, God take care of you always, Blessings!
 💓
💓
Todas las fotografías son de mi propiedad, captadas con mi teléfono móvil Tecno Spark 6 go.
Editadas con inShop.
Traducido con Deepl traductor.
All photos are my own, taken with my Tecno Spark 6 go cell phone.
Edited with inShop.
Translated with Deepl translator.