
WELCOME TO MY BLOG
Hellooooo, hellooooo! Receive a huge hug from me. Today I want to share with you some beautiful earrings that I made to use them on a special day, soon we will be celebrating the 20th birthday of my youngest daughter, and as always when we have a celebration nearby, we also have in mind not only what we will prepare to celebrate, but also what we will wear Well, it turns out that while looking for the wardrobe, I found a blouse that I haven't worn for a long time and when I looked for the accessories, I didn't find anything suitable to combine. So I decided to make myself a set of accessories, consisting of earrings, bracelet and choker. Today I will only share the tendrils, because in my desire to finish quickly, I only documented a part. In addition to the fact that I had a small accident with my home printer and that is why I see my hands and fingers somewhat stained with printer ink, sadly it is very difficult to remove, so I apologize in advance if I caused you some visual inconvenience.
Now without further ado let's start with this step by step, simple, practical and economical, and as always with a spectacular result. let's get started.
BIENVENIDOS A MI BLOG
¡Holaaaaa, holaaaaa! Reciban un inmenso abrazo de mi parte. Hoy quiero compartirles unos lindos zarcillos que hice para usarlos en un día especial, próximamente estaremos celebrando los 20 años de mi hija menor, y como siempre que tenemos cerca alguna celebración, ya también tenemos en mente no sólo lo que prepararemos para festejar, sino también lo que luciremos. Pues, resulta que en la búsqueda del vestuario, encontré una blusa que tengo mucho tiempo sin usar y cuando busqué los accesorios, no encontré nada adecuado para combinar. Así que decidí hacerme un juego de accesorios, que consta de zarcillos, pulsera y choquer. Hoy sólo les compartiré los zarcillos, porque en mi afán de terminar rápido, sólo documenté una parte. Además de el hecho que tuve un pequeñito accidente con la impresora de mi hogar y es por ello que luzco mis manos y dedos algo manchados de tinta para impresora, Tristemente es muy difícil de quitar, así que de antemano, les pido disculpa si les ocasionare algún inconveniente visual.
Ahora sin más comencemos con este paso a paso, sencillo, práctico y económico, y como siempre con un resultado espectacular. Comencemos.

MATERIALS
- 8 cm of Wire #18
- Rigid Nylon thread
- 12 red crystals
- Golden beads
- 02 hoops 4 mm
- Cutting clamp
- Conical clamp
- Curved clamp
- Round chuck
- metal file
- Measuring tape
MATERIALES
- 8 cm de Alambre #18
- Hilo Nylon rígido
- 12 cristales rojos
- Mostacillas doradas
- Pinza de corte
- Pinza cónica
- Pinza curva
- Mandril redondo
- Lima de metal
- Cinta métrica
STEP BY STEP // PASO A PASO
We take a strand of approximately 60 cm and thread it on the bead needle.
Tomamos una hebra de 60 cm aproximadamente y ensartamos en la aguja para mostacilla.

We will begin by making the center of the flower. We will take 6 beads and make a tight double knot to form a circle.
Comenzaremos realizando el centro de la flor. Tomaremos 6 mostacillas y haremos un nudo doble ajustado hasta formar un círculo.

We pass the needle through two beads, cut the excess thread and lightly burn with the lighter.
Pasamos la aguja por dos mostacillas, cortamos el hilo sobrante y quemamos ligeramente con el encendedor.

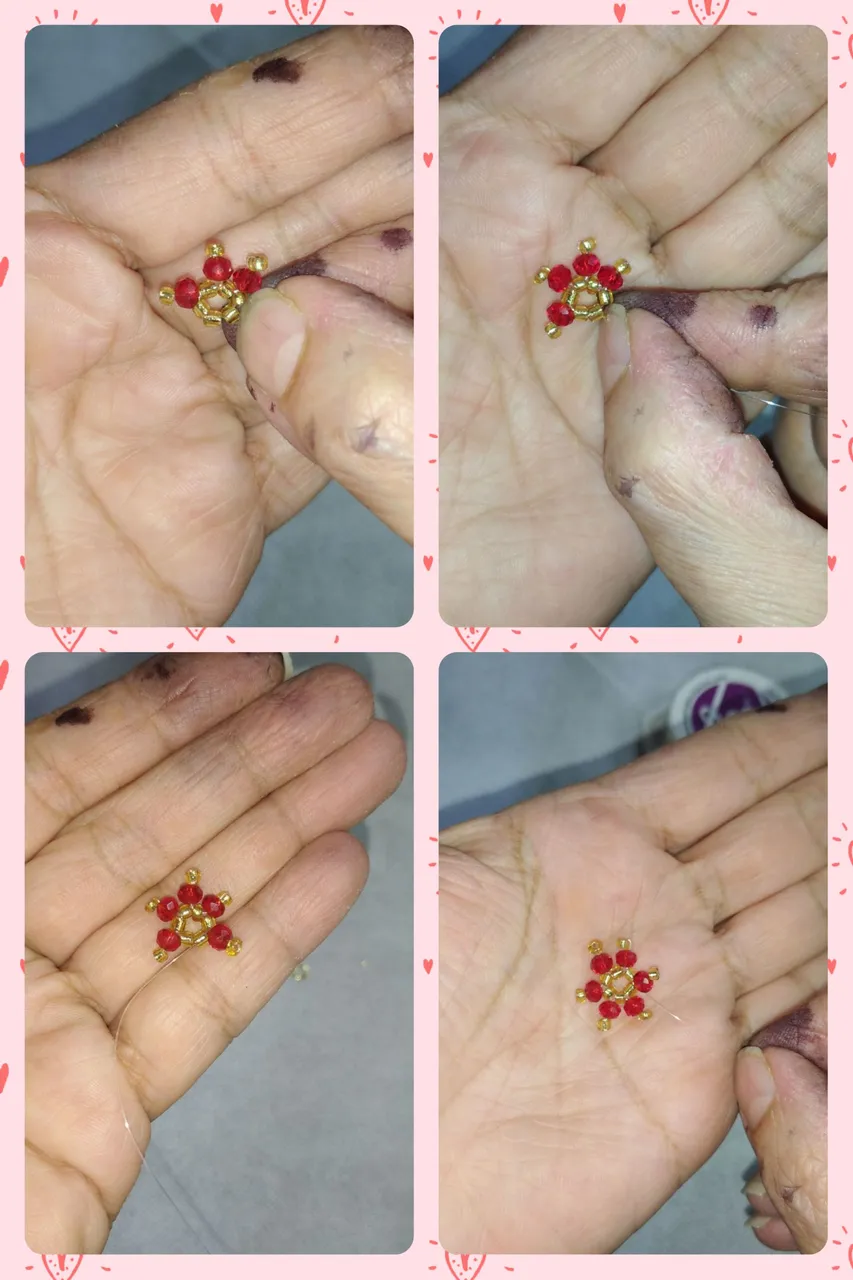
Now we will take a glass and a bead with the needle. Then we will pass the needle again only through the glass to form a beak with the beads. Now we will pass the needle through the next bead in the circle, forming the first petal of the flower. At each separation of the beads in the initial circle, a petal will be forming.
Ahora tomaremos con la aguja un cristal y una mostacilla. Luego pasaremos la aguja nuevamente sólo por e cristal para formar un pico con la mostacilla. Ahora pasaremos la aguja por la mostacilla siguiente en el círculo formando el primer pétalo de la flor. En cada separación de las mostacillas en el circulo inicial, se estará formando un pétalo.

In the same way we form the second petal, we take a crystal and a bead with the needle, then we return the needle only through the crystal to form a beak and then we introduce the adjacent bead in the circle.
De igual forma formamos el segundo pétalo, tomamos con la aguja un cristal y una mostacilla, luego regresamos la aguja sólo por el cristal para formar pico y luego introducimos por la mostacilla contigua en el círculo.

This is how we make the following petals until completing 6 petals.
Así realizamos los siguientes pétalos hasta completar 6 pétalos.
Once the petals are made, we will introduce the needle with the nylon through all the beads of the circle, this in order to strengthen the flower and give it a little more rigidity. At the end of the turn we make the sewing knot, cut and seal with the lighter, being very careful not to burn more than necessary.
We will make two flowers, one for each tendril.
Una vez realizados los pétalos introduciremos la aguja con el nylon por todas las mostacillas del círculo, ésto con la finalidad de fortalecer la flor y darle un poco más de rigidez. Al finalizar la vuelta realizamos el nudo de costura, cortamos y sellamos con el encendedor, con mucho cuidado de no quemar más de la cuenta.
Realizaremos dos flores, una para cada zarcillo.


It is time to place the 4 mm earrings. We open a little with the curved tweezers and introduce through one of the tips of any of the petals, that is, inside the mostacilla of the tip.
Es momento de colocar los aros de 4 mm. Abrimos un poco con la pinza curva e introducimos por una de las puntas de cualquiera de los pétalos, o sea, por dentro de la mostacilla de la punta.

Now we make the hook to hold the flower and form the tendril. Cut 4 cm of #18 wire. With the conical clamp we make a circle without closing completely to place the flower.
Ahora realizamos el anzuelo para sujetar la flor y formar el zarcillo. Cortamos 4 cm de alambre #18. Con la pinza cónica realizamos un círculo sin cerrar totalmente para colocar la flor.

Next, with the rest of the wire and the help of the mandrel, we make the hook, making a small fold at the end of it and sanding.
A continuación, con el resto del alambre y la ayuda del mandril realizamos el anzuelo, realizando un pequeño doblez al final del mismo y lijamos.


Once the hooks are ready, we place the flower in the corresponding one and close with the curved clamp.
Listos los anzuelos, colocamos la flor en el que corresponda y cerramos con la pinza curva.

Some elegant tendrils to combine and wear on any occasion. Without being exaggerated but very striking for its colors. I hope you liked it. See you next time.
Unos zarcillos elegantes para combinar y lucir en cualquier ocasión. Sin ser exagerados pero muy llamativos por sus colores. Espero les haya gustado. Nos vemos en la próxima.

Todas las fotos son de mi autoría, tomadas con mi teléfono POCO M3
Para la edición de las fotos y separadores utilicé Polish
Utilicé https://translate.google.com para la traducción
