Español
Saludos comunidad 🙋🌹
Un bonito e inspirador día para todos.
Hoy, les quiero compartir el tutorial de un hermoso bolso tejido, que confeccioné asesorada por mi madre, para lucir y portar mi teléfono en este mes impregnado de amor.¡Comencemos su paso a paso!.

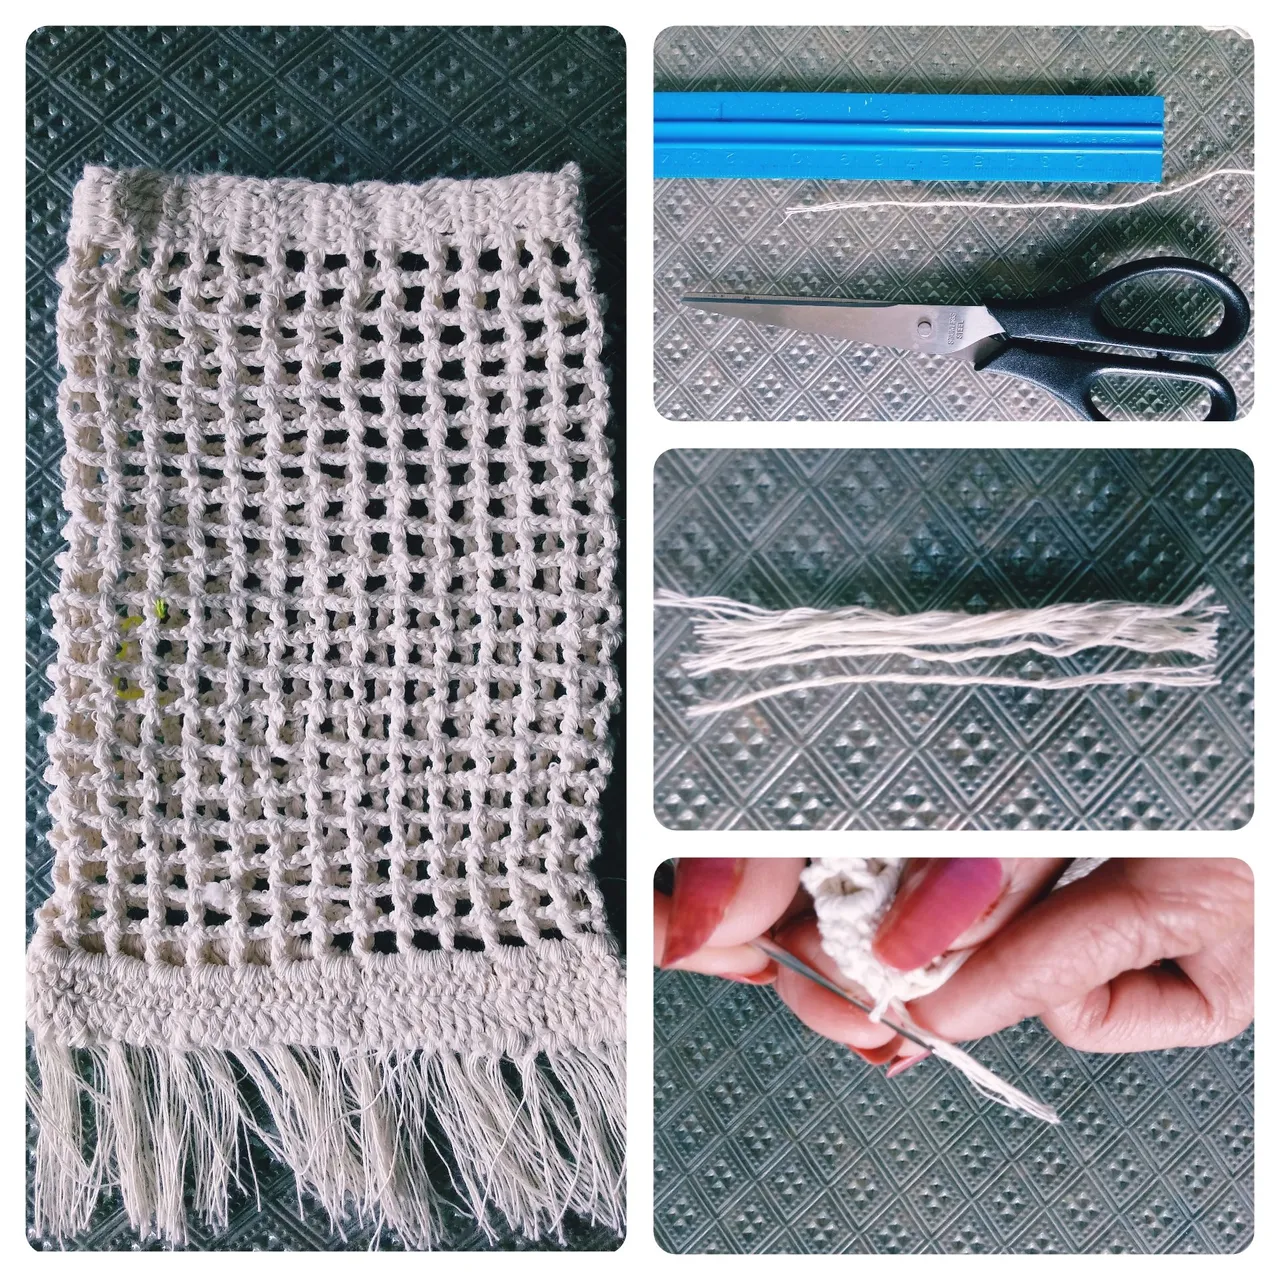
✨Materiales ✨
.Hilo de tejer
.Aguja de tejer
.Tijera
.Regla

✨Modo de confección✨
Para confeccionar nuestro bolso dividiremos el proceder en tres momentos donde realizaremos su parte superior , central e inferior.
✨Pasos para hacer la parte superior
1-Comenzamos tejiendo una cadeneta de 5 eslabones. Luego, se tejen 28 vueltas realizando en cada una: cadenetas de tres eslabones y cuatro puntos varetas.

✨Pasos para hacer la parte central
2-Terminadas las 28 vueltas, subimos tejiendo de forma horizontal con una cadeneta de seis eslabones, que bajaremos con una vareta hasta el primer espacio de las 28 vueltas tejidas anteriores, formando un primer cuadrito. Luego, realizamos una cadeneta de tres eslabones y bajamos al segundo espacio con punto vareta, formando un segundo cuadrito, así continuamos tejiendo hasta llegar a los 28 cuadritos en la primera vuelta. Realizamos este mismo procedimiento hasta lograr 22 vueltas.

✨Pasos para hacer la parte inferior
3-Tejemos a continuación de las 22 vueltas centrales, dos vueltas, que tendrán tres puntos varetas en cada uno de los espacios de los cuadritos.
4-Habiendo terminado las tres partes del bolsito, doblaremos el tejido dándole una forma rectangular, y pasaremos a unir sus laterales y parte inferior, con punto bajo.

✨Pasos para hacer el asa
5-Tejemos una cadeneta con la cantidad de eslabones correspondiente al largo deseado.Yo realicé 300 eslabones, luego, iniciamos una segunda vuelta con una cadeneta de 8 eslabones, y bajaremos hasta la cadeneta inicial con una vareta. Seguimos tejiendo una cadeneta de 5 eslabones, y volveremos a bajar con una vareta a la cadeneta inicial, así continuaremos hasta llegar al final de la cadeneta inicial logrando obtener lista nuestra asa, a la que unificaremos con punto deslizado ó cosiendo a nuestro bolso, por la parte superior interna.

Nuestro bolso esta listo , ahora pasaremos a decorarlo y a personalizarlo.
Ustedes amigos, no limiten su imaginación , botones, lentejuelas, tejidos , chapitas, pueden emplear para obtener un bello resultado.
Yo quise decorarlo con flequillos de hilo y la palabra Love(amor).
✨Pasos para hacer los flequillos
6- Cortamos hilos de aproximadamente 10cm utilizando la tijera. Luego, con ayuda de nuestra aguja vamos introduciéndolos en la parte inferior del bolso, mientras logramos su sostén mediante un punto bajo.
✨Pasos para decorar con la palabra Love(Amor)
7-Escogemos la tonalidad del hilo para decorar, yo escogí rojo , por significar pasión y amor. Luego, después limitar el espacio donde la deseemos, utilizando nuestra aguja, comenzamos a conformar las letras realizando el punto vareta en cada cuadrito.

Este pequeño bolso, amigos, me encantó como accesorio para mi teléfono.

Los exhorto a que se aventuren por el arte de tejer, pues además de resultar muy relajante, nos permite crear bellas y útiles manualidades.
Confecciones y fotografías propias.
English
Greetings community 🙋🌹
A beautiful and inspiring day for everyone.
Today, I want to share the tutorial of a beautiful woven bag, which I made advised by my mother, to wear and carry my phone in this month impregnated with love.Let's start your step by step!.
✨Materials ✨
.Knitting yarn
.Knitting needle
.Scissor
.Rule
✨Way of making✨
To make our bag we will divide the procedure into three moments where we will make its upper, central and lower part.
✨Steps to make the top
1-We start by knitting a 5-link chain. Then, 28 turns are knitted making in each one: three-link chains and four braided stitches.
✨Steps to make the central part
2-When the 28 turns are finished, we go up knitting horizontally with a six-link chain, which we will lower with a varette to the first space of the previous 28 knitted turns, forming a first square. Then, we make a three-link chain and go down to the second space with varette stitch, forming a second square, so we continue knitting until we reach 28 squares in the first round. We perform the same procedure until we achieve 22 laps.
✨Steps to make the bottom
3-We knit next the 22 central rounds, two rounds, which will have three crochet stitches in each of the spaces of the squares.
4-Having finished the three parts of the little bag, we will fold the fabric giving it a rectangular shape, and we will move on to join its sides and bottom, with a double crochet.
✨Steps to make the handle
5-We knit a chain with the number of links corresponding to the desired length.I made 300 links, then we started a second round with an 8-link chain, and we will go down to the initial chain with a varette. We continue knitting a chain of 5 links, and we will go down again with a string to the initial chain, so we will continue until we reach the end of the initial chain managing to get ready our handle, to which we will unify with slipped stitch or sewing to our bag, by the inner top.
Our bag is ready, now we will decorate and personalize it.
You friends, do not limit your imagination, buttons, sequins, fabrics, little beads, you can use to get a beautiful result.
I wanted to decorate it with yarn bangs and the word Love.
✨Steps to make the bangs
6- We cut threads of approximately 10cm using the scissors. Then, with the help of our needle we are introducing them into the bottom of the bag, while we achieve their support through a low stitch.
✨Steps to decorate with the word Love (Love)
7-We choose the shade of the thread to decorate, I chose red, because it means passion and love. Then, after limiting the space where we want it, using our needle, we begin to shape the letters by making the varette stitch in each square.
I loved this little bag, friends, as an accessory for my phone.
I urge you to venture into the art of knitting, because besides being very relaxing, it allows us to create beautiful and useful crafts.
Own clothing and photographs.