Welcome to Part 2!
If you missed the first post about my Canon AE-1 Program, you can find it here.
A question I receive often as a photographer is, "What camera are you using?"
In my opinion, gear, medium, and film are just as important information as the artist's name in any piece. So, for this reason, I decided to write some thoughts and experiences on the equipment I own and use. Again, I will try and keep my inner nerd to a healthy medium ... Enjoy!
Next up, the Minolta AUTOCORD
photo from flikr yoster

Amelia and I picked up this vintage Autocord at an antique shop in knoxville for a great price of $80 USD. You can find one for $250-$380 for a descent used model. Unfortunately, before we are able to experience the Autocord-bliss due to needing a CLA (Clean, Lubrication, & Adjustment), and possibly even repair. The bladed aperture is a step-less iris from ƒ/3.5 to ƒ/22, and is adjusted via a small lever on the left of the lens. Upon firing, the shutter will not open consistently - hence the reason for repair.
Photo by CasualPhotophile
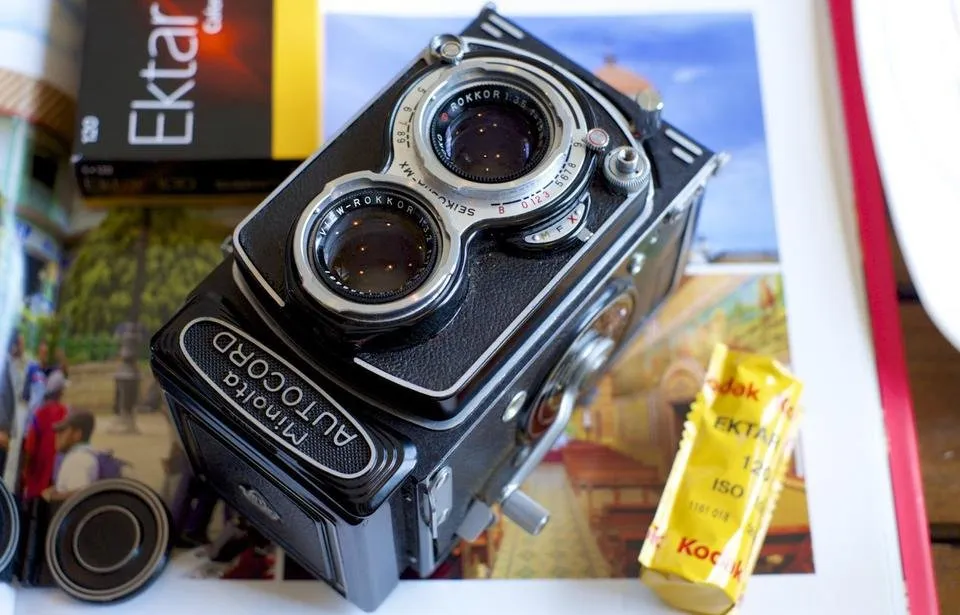
The Autocord’s twin lenses are the epitome of brilliance in a Japanese TLR; and probably the greatest asset of this camera. The top lens, known as the “viewing lens”, displays the image through the viewfinder on the top of the camera. The lower lens, known as the “taking lens”, is the lens through which the film is exposed. Both lenses use Rokkor optics and feature stainless steel surrounds to protect the front elements. The taking lens uses a 75mm focal length Rokkor assembly consisting of 4 elements in 3 groups.
More specs found here for the manual readers.
In terms of operation, this camera is a bit odd as compared to the rest in the TLRs. The film is loaded on the opposite direction of all other TLR in the market in which the film roll is at the bottom while the spool is at the top. Hence if you have a Rolleiflex or a Yashica Mat, you might be confused with the loading at times.
Focusing the Autocord for the very first time do feel a bit awkward...The focusing knob is located right below of the taking lens operating in a sweeping motion. The rest of the camera makers that I’ve had the privilege to use opted for the focus knob on the side of the camera body which I feel is more intuitive and ergonomic. From what I gathered from Minolta collectors, the sweeping focus allow one hand operation where the user could use the thumb and index finger to move the focus tab while using the ring finger to push the shutter release button. Whatever 🙄
Sneaky girl from the Minolta manual

While as for the waist level finder, I wouldn't say it's the brightest but as compared to the rest of the TLRs at this price range, it's a fair performer. Changing the focus screen would certainly help to ease out the focusing process but finding one with a decent price is certainly not easy. Lastly, the metering is non-existent in this camera of this era hence an external light meter is recommended.
Photo by CasualPhotophile

FINAL THOUGHTS
I feel this could one of the best bang per bucks TLR camera out there in the used market if it weren’t for the imminent repairs. The direct comparison for TLRs at this price range would be the Yashica Mat variants , more beat up condition Rolleicords and the China made Seagull or some called it Hai 'O. The lens is really nice, with decent built quality, but at f8 does it really make a difference? Ultimately at wide apertures more expensive lenses might prevail.
Stay tuned for Part 3 - I’ll be sharing my favorite camera in the Tang household!


Hey, my name is Tang. 👋
Most people know me for being a bus dweller - I converted a school bus into a custom RV, but I’m also a film photographer, dreadlocked Legolas, and a dad to a dog named Hobo. Right now, I'm experimenting with vintage cameras and expired film, learning how to mountain bike, and sharing my adventures along the way.
First time on my blog? Say hi below. 🤙