What Will I Learn?
- You will learn how to show images in ruby on rails
- You will learn how to add styles and resize the image in ruby on rails using the paperclip gem
Requirements
- OS: Ubuntu/Mac OS
- A text editor like sublime
- Basic understanding about Ruby on Rails
- And for better understanding must refer my previous tutorials (link added to the curriculum)
Difficulty
- Intermediate
Tutorial Contents
Hello and welcome to the next part of the tutorial. In this tutorial, we will learn how to show attachment i.e user image in ruby on rails & how to resize the attachments. So let's start our tutorial,
- Open the terminal and go to your project path that was built in our previous tutorials. If you haven't go through the previous tutorials, please refer those also.
- And now start rails server by entering the following command:
rails s
- Now open the project in the text editor like the sublime text editor.
- Now sign in to the project.
- You already know that we have built a simple application till now. In the previous tutorial, we have saved the user image but we haven't show them. So we have to show the user image also. Now open the home.html.erb page that was built in my previous tutorials. If you have not built them then please refer my previous tutorial also (link added in the curriculum) or you can download the project also (Github repository link also added at the end of the tutorial).
- Add the following code to the file
    <% if user_signed_in? %>
        Name: <%=current_user.first_name%> <%=current_user.last_name%> <br>
        Email: <%=current_user.email%> <br>
        Mobile Number: <%=current_user.mobile_number%> <br>
        Profile Image<br>
        <%= image_tag (current_user.avatar(:original)),height: '200px'%><br>
        <%= link_to 'Sign Out', destroy_user_session_path, method: :delete %><br>
    <%else%>
        <%= link_to 'Sign In', new_user_session_path%>
    <% end %>
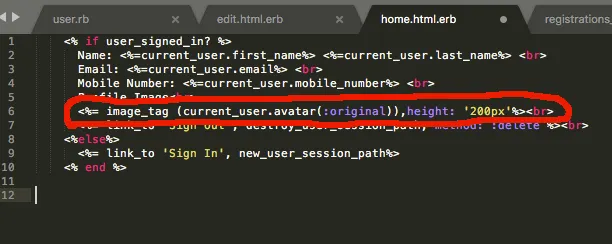
Or also you can see the highlighted part of the image is the code for showing the user image.
- Now save the file and refresh the localhost:3000 , now you can see the user image is showing, if you saved it. But if you not save the user image then you have to add the image for that you can refer the previous tutorial.

- You can see that we have given the height 200px to the image because we have to show the original image but if we have to save it to our own size and want to resize the image for that we have to change the code into the user model. Now go the user model and add some styles name with their own custom size. Like see the following code:
has_attached_file :avatar, styles: {thumb: '100x100#', medium: '300x300#'}
The thumb and medium name is the custom name for our style and with their respective sizes to resize the image

- Now this code will save the user image in three formats under the public/system/user.. folder into our project
- Original
- Medium
- Thumb

- Not it's time to show these images and for that change the home.html.erb code with the following and save it :
    <% if user_signed_in? %>
    Name: <%=current_user.first_name%> <%=current_user.last_name%> <br>
    Email: <%=current_user.email%> <br>
    Mobile Number: <%=current_user.mobile_number%> <br>
    Profile Image Thumb<br>
    <%= image_tag (current_user.avatar(:thumb))%><br>
    Profile Image Medium<br>
    <%= image_tag (current_user.avatar(:medium))%><br>
    <%= link_to 'Sign Out', destroy_user_session_path, method: :delete %><br>
    <%else%>
    <%= link_to 'Sign In', new_user_session_path%>
    <% end %>

- Now refresh the browser, you can see the thumb and medium styles are show and with the resize format.

- Note: If you are on a big already running project and not be able to upload all the images again then you can use the following command to regenerate the missing styles again.
rake paperclip:refresh:missing_styles

Download the GitHub sample project from the here
Curriculum
Posted on Utopian.io - Rewarding Open Source Contributors