Repository
https://github.com/Vheissu/meseeker-node-tutorial
What Will I Learn?
- How to install Redis (Step 1)
- How to install Node.js and Node Package Manager (Step 2)
- How to install Ruby via RVM (Step 3)
- How to install the Meeseeker package (Step 4)
- How to run the Meeseeker package (Step 5)
- How to subscribe and listen to Redis channels and messages in Node.js (Step 6)
Requirements
- A machine running Linux. If you're using Windows, you will need to install and configure the Windows Subsystem for Linux (WSL). An official guide for configuring and installing WSL can be found here on the Microsoft Docs website. I recommend installing the user-friendly Debian based Ubuntu distribution
- A machine with at least 8gb of ram, if you're installing on a server for dApp usage, you will want 8gb, preferrably 16gb if you want to increase the Redis keys size
- A decent understanding of Javascript and concepts
- (preferably) experience working with Node.js previously
- A code editor. I recommend Visual Studio Code by Microsoft. A free and fully-featured extensible coding environment
Difficulty
Intermediate
Tutorial Contents
While we will aim to cover quite a few topics as detailed in the, "What Will I Learn" section above, this tutorial will help you get comfortable with the Meeseeker package by 
Please keep in mind this tutorial will be done from within Ubuntu Linux. Commands may differ for other operating systems, especially if you're a macOS user, you will most likely be using the Homebrew package manager to install packages. Please refer to the website for the packages and tools installed in this tutorial for macOS.
Step 1: Installing Redis
Before installing new packages, we need to call the Apt update command to update the Apt package cache:
sudo apt update

Then to install Redis all we need to do is run:
sudo apt install redis-server

Because I am using Windows Subsystem for Linux (WSL) I had to run the following command to ensure Redis server started:
sudo service redis-server start

Step 2: Install Node.js
We are going to be installing the LTS release, which is the most stable and recommended version of Node.js to install. It has the best compatibility with packages within the Node ecosystem.
At the time of writing, the latest LTS is 10.15.3. Please check the Node.js official website to check the latest Node.js LTS version before installing.
As per the officially provided instructions here we are going to be installing Node.js for version 10.x.
curl -sL https://deb.nodesource.com/setup_10.x | sudo -E bash -

Once this command completes, we can then install Node.js using the Apt package manager:
sudo apt-get install -y nodejs

This command will install both Node.js as well as the Node Package Manager (npm). In my instance, I already had an older version of Node.js and Npm installed, so it updated Node and removed the older version of Npm before installing the newer version. If you have not installed Node before, nothing changes.
Once this command has finished, you can confirm that Node.js has properly installed by running the following command:
node -v

Similarly, you can also confirm Node Package Manager (npm) also installed by running:
npm -v

Step 3: Install Ruby via Ruby Version Manager (RVM)
Install RVM
We are going to be following the officially provided installation instructions from the rvm.io website. Please refer to the official website to confirm the following instructions are still up-to-date and relevant, specifically, the GPG keys.

For brevity, we are going to be following along with the official installation instructions here in this tutorial, but please confirm they're up-to-date from the above link before continuing.
The first installation instruction is to add the GPG key to your machine. When I first ran this command, I ran encountered an error because the gnupg2 package was not installed by default in Ubuntu (as can be seen below).

As you can see, Ubuntu told me the package was missing and how to install it. So, if you get the same missing package message, run the provided command like below.

I then run the GPG command again from the rvm.io website:

It is worth noting in my particular instance, I had to run this command twice for some reason because of an RPC error (as the screenshot above highlights). So, if you encounter any issues, try running it a second time.

And now finally, we install Ruby using RVM:
\curl -sSL https://get.rvm.io | bash -s stable

Pay close attention to the line towards the bottom of the completed installation command about needing to start RVM. Run the following command so you can use RVM within the current terminal window.
Pay close attention to the /home/username part below, you will want to run the command provided to you, which coincides with your currently logged in user. Replace dwayne below with your own username, don't just copy and paste the command or you will get an error (unless your username is also dwayne, ha).
source /home/dwayne/.rvm/scripts/rvm
If you have any issues with the installation, the solution posted here on SuperUser will help you fix any problematic permissions on your folders.
Install Ruby
We now need to download and install the latest stable version of Ruby. At the time of writing this, the latest stable version is 2.6.2 please refer to the official Ruby website before installing to ensure you have the latest.
rvm install "ruby-2.6.2"
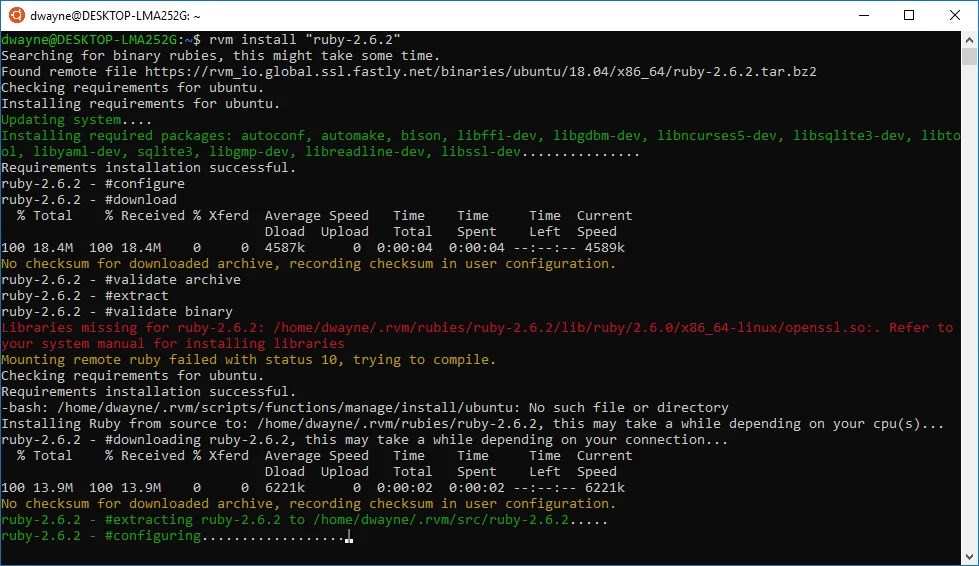
Depending on your machine and internet connection speed, this step might take a while as Ruby is downloaded and installed from source code (it's compiled). So, this step could take upwards of 10 or so minutes.
Step 4: Installing the Meeseeker Gem
This is by far the easiest step of them all, installing the Meeseeker package which is a Ruby Gem. Provided the previous Ruby installation went to plan, you should be able to run the following command to install Meeseeker.
gem install meeseeker

This step can take a few minutes depending on your machine and internet connection speed as packages are downloaded and built from source (similar to the Ruby installation process). Fortunately, this should be much faster than the previous step.
Once the installation of the Gem has completed, let's make sure Meeseeker installed correctly by running the help command:
meeseeker help

Step 5: Run Meeseeker
Now that we have meeseeker installed, we can run the sync command which will start streaming the Steem blockchain and add the results into Redis, which we can subscribe to using channels.
meeseeker sync

By default, the sync command does a lot and stores a lot of needless information (like virtual operations), which in many cases is not what you want to happen. A full list of supported configuration values via the command line can be found in the README for the official Meeseeker package here.
For the purposes of this tutorial, we only want to listen to transfers because we're making a transaction bot, so let's make Meeseeker run a little lighter.
We don't care about virtual operations, so let's set the MEESEEKER_INCLUDE_VIRTUAL environment variable to false. We also don't want the block header information (because it requires additional calls), so we set the MEESEEKER_INCLUDE_BLOCK_HEADER environment variable to false as well.
Finally, by default, keys are stored in Redis for 24 hours, which in some cases can use a lot of RAM, we want to reduce that to 10 minutes. By setting the MEESEEKER_EXPIRE_KEYS environment value (in seconds) we can reduce the memory usage of Redis.
The final command we arrive at is the following:
MEESEEKER_INCLUDE_VIRTUAL=false MEESEEKER_INCLUDE_BLOCK_HEADER=false MEESEEKER_EXPIRE_KEYS=600 meeseeker sync

Running the command will yield a constantly streaming wall of blockchain operations happening on Steem. In the next step, we'll create a simple Node.js application that subscribes to a Redis channel and gets transfers. Depending on your use case, you might want to explore different values to the above ones.
Keep this running and open up a new separate terminal window. We will be interfacing with Redis in the next step.
Step 6: Creating a Node.js application and subscribing to Redis channels
The Meeseeker package is publishing numerous Redis channels which we can subscribe to, depending on the events we are interested in. The official package repo provides a list of valid channels you can subscribe to here.
In Visual Studio Code (or editor of choice) we want to create a new file called api.js and save this somewhere (maybe a new folder specifically for the project).
The contents of our Node application will be the following:
const Redis = require('ioredis');
const subscriber = new Redis();
const redis = new Redis();

subscriber.subscribe('steem:op:transfer', () => {
        subscriber.on('message', async (channel, message) => {
                const payload = JSON.parse(message);
                const transfer = JSON.parse((await redis.get(payload['key'])));

                console.log(transfer);
        });
});
In your terminal window, navigate to the location of this file and run npm init:
npm init

We now need to install the ioredis package which allows us to communicate with our Redis server that we installed and started in Step 1.
npm install ioredis

If you copied and pasted the code snippet from above into api.js, and you still have meeseeker running, you can run our Node application by running the following:
node api.js

Every time I have ever run this code, I notice that 
transfer operations here on Steem. When you run the code, you'll see the same thing most likely.
The code line-by-line
There would be no use to providing you with a snippet of code that might look pretty foreign to some and not explain what is going on. The code above when run produces a wall of text like the first time we ran meeseeker, but you might notice it's a stream of transfers.
const Redis = require('ioredis');
This imports the ioredis package which allows us to interface with the Redis service. It's a standard Node style CommonJS require import.
const subscriber = new Redis();
const redis = new Redis();
These two lines are probably self-explanatory, but worth pointing out why there are two of them. The first one sets up a Redis instance for subscribing to channels. When you subscribe to channels in Redis, it makes the instance become subscriber only, so querying commands like get will not work.
We set up a second identical instance which will only be used for querying.
subscriber.subscribe('steem:op:transfer', () => {
Using our subscriber instance, we call the subscribe method and pass in the channel name. In this instance, we want to listen to transfers, so we use the steem:op:transfer channel.
subscriber.on('message', async (channel, message) => {
Once you are listening to the channel, you want to listen to all of the messages being emitted from within. Every transfer will fire off an event. You'll notice on the callback function we use the async keyword, this is because we want to call the get method later on and it returns a Javascript promise with the data.
const payload = JSON.parse(message);
The message in this instance is a JSON string which we parse back into an object using JSON.parse. The payload has a key which we can then use to pull the data out of Redis.
const transfer = JSON.parse((await redis.get(payload['key'])));
This line gets the actual Steem transfer information. The payload itself has a key property which we use to query Redis itself using redis.get('thekeyname') this is because Redis is a key/data store, where each item is stored by a unique key.
You might notice the await keyword, this accompanies the async keyword on the callback and allows us to await the promise that redis.get returns with the data. Also worth noting is we use the redis instance, not the subscriber instance, so we can call get to query Redis for the data.
console.log(transfer);
Self-explanatory if you know Javascript, this is what prints out the data from the Redis query as we saw in the above screenshot with transfer object data.
Try subscribing to different channels...
The code above will work for all channel types. Try changing steem:op:transfer to steem:op:comment or steem:op:vote and run the code to see different data. The code inside remains the same.
If you wanted to create a bot that watched for transfers to a specific account you would write something like this:
if (transfer.value.from === 'beggars') {
    // Someone sent something to my @beggars account
    // we could send back a thank you or in exchange, send them some Steem Engine tokens
}
And if you wanted to get the amount being sent and other details:
// Destructure the amount from the object
const { amount } = transfer.value.amount;

// Who sent the transfer
const from = transfer.value.from;

// Get the memo for the transfer
const memo = transfer.value.memo;
Conclusion
What we have here is the workings of a bot capable of listening to transactions and then using a client like the Steem-js SDK, react to those transfers accordingly. One common use-case would be to watch transfers to a specific account, get the amount and then react accordingly (upvote, send a custom Steem Engine token).
In a future tutorial we might expand upon this code and build a bot, but that is outside of the scope of this tutorial.