
A Liquid Crystal Displace is a flat panel display that uses light modulating properties of liquid crystals.
To know more about arduino : Click here
What Will I Learn?
- You will learn on how to Control LCD module
- You will learn on how to use Arduino Mega
- You will learn on how to use LiquidCrystal Library
Requirements
- LCD Module
- Arduino Mega
- Breadboard
- Jumping wires
- 10k ohm Potentiometer
Difficulty
- Basic
Tutorial Contents
Step 1: Physical Connection

LCD Module Pin outs
Connections :

- LCD pins 1,5, and 16 to the Ground
- LCD pins 2 and 15 to the VCC
- LCD pins 4,6,11,12,13 and 14 to digital pins of Arduino
- The middle pin of the Potentiometer to the LCD pin 3, others will be on VCC and Ground.
Step 2: Connection to IDE
Where to find the LiquidCrystal Library ?
go to Sketch > Include Library > then, find the LiquidCrystal Library.
and now, the library is on the sketch after clicking.


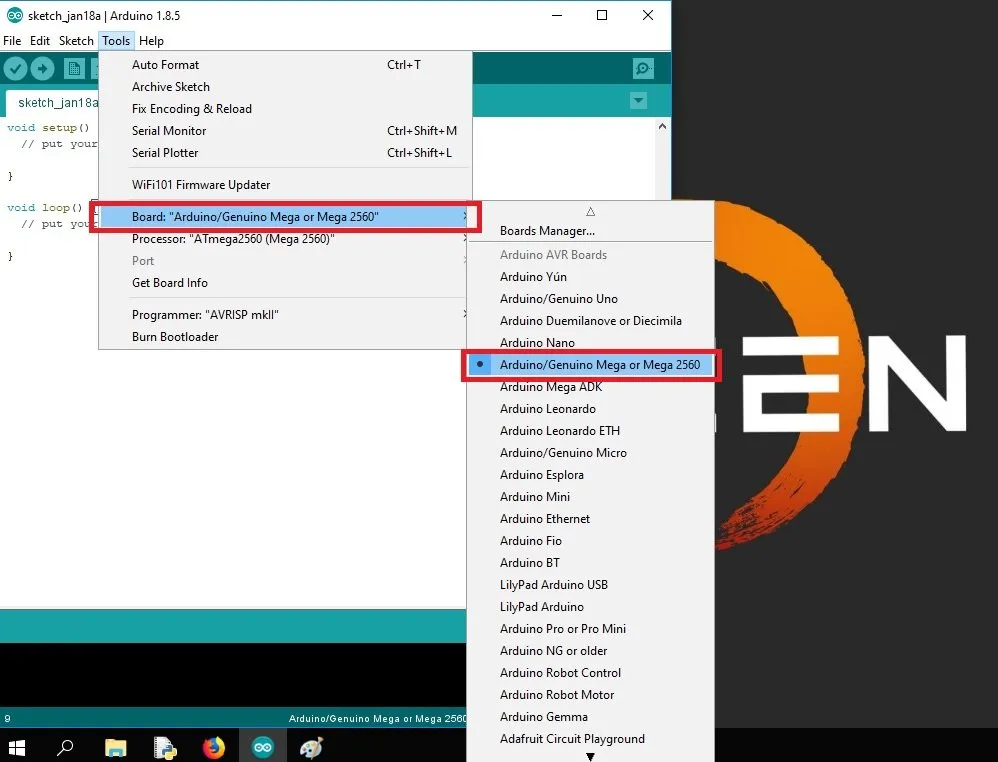
After that, you must select the board :
Open your IDE , go to Tools > Board > then choose Arduino/Genuino Mega or Mega 2560.
Step 3: Code

Code Block
    /*
    * Basic Arduino Mega Tutorial on how to Control LCD Module
   * Created by Loyd Stephen Jayme
    * https://utopian.io/@loydjayme25

    */
    #include  // includes the LiquidCrystal Library
    LiquidCrystal lcd(1, 2, 4, 5, 6, 7); // Creates an LC object. Parameters: (rs, enable, d4, d5, d6, d7)
    void setup() {
     lcd.begin(16,2); // Initializes the interface to the LCD screen, and specifies the dimensions (width and height) of the display }
    }
    void loop() {
     lcd.print("Arduino"); // Prints "Arduino" on the LCD
     delay(3000); // 3 seconds delay
     lcd.setCursor(2,1); // Sets the location at which subsequent text written to the LCD will be displayed
     lcd.print("LCD Tutorial");
     delay(3000);
     lcd.clear(); // Clears the display
     lcd.blink(); //Displays the blinking LCD cursor
     delay(4000);
     lcd.setCursor(7,1);
     delay(3000);
     lcd.noBlink(); // Turns off the blinking LCD cursor
     lcd.cursor(); // Displays an underscore (line) at the position to which the next character will be written
     delay(4000);
     lcd.noCursor(); // Hides the LCD cursor
     lcd.clear(); // Clears the LCD screen
    }
Step 4: Compile and Run
Output


Curriculum
You can also visit my other Tutorial/(s)
FAILURE is not a hindrance to success, yet FAILURE is a SUCCESS because you learn something from it.
Yours truly,
#steemit-engineering #steemph #cebu #philippines

Posted on Utopian.io - Rewarding Open Source Contributors