Good day everyone,
Today we will be learning how to control a servo motor using an arduino uno. But first, let me have a brief overview on what an arduino uno is, so that we can have an idea on what this technology is all about.

Understanding Arduino
Arduino is an open-source electronics platform that is based on easy to use hardware and software, they are designed to make electronics more accessible to designers, artists, hobbyist and anyone that is interested in creating interactive objects/environments.
Arduino boards like Arduino uno can be bought pre-assembled ,because it is an open-source hardware. The pre-assembled board includes a microcontroller, which is programmed using the Arduino language. The arduino programming language is a simplified C/C++ and it is called a ''sketch'', this uses basic programming structures, variables and functions.

Arduino Uno
Arduino Uno is a type of Arduino board that has a microcontroller based on the ATmega328. It has 14 input/output pins for digital signals, 6 analog input pins, a 16 Mhz quartz crystal, a Usb connection, a power jack, an ICSP header and a reset button. All this component is integrated together on this board to support the microcontroller, now all we need to do is just plug it to the computer and start playing with it. This is the best board to get when just starting to dive into the world of electronics and coding because of how robust this board is and it is affordable.
Servo motor
Servo motors are a rotary actuator or linear actuators that are made for precision, velocity and acceleration. It can precisely control it angular or linear position. it is made up of motors that are coupled to a sensor for postition feedback. Servo motors are controlled by sending electrical impulse of variable width, or pulse width modulation(pwm), through the control wire. A servo motor can only turn up to 180°, but I would advise you to avoid using the full 180 degrees because it can damage the servo motor.

Controlling the servo motor
Now that we have learned about the components that we are using today, let us get started in how to control our servo motor using Arduino Uno.
First Step(Connecting the wires)
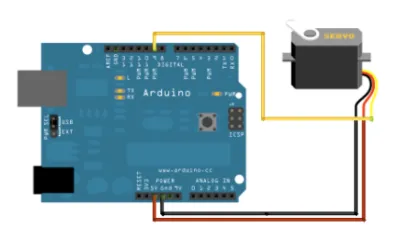
We connect the black wire from the servo to the GND pin on the Arduino Uno, then next is we connect the red wire from the servo to the +5V pin on the Arduino Uno and lastly we connect the yellow wire or sometimes white wire from the servo to the digital pin on the Arduino Uno, it can be in any of the 14 digital pins as long as you remember what number is that pin.
The Schematic

Second Step(Coding)
Now that we are done with connecting the wires from the servo motor to the Arduino Uno, let us now start with the coding. The codes that I used is right down below.
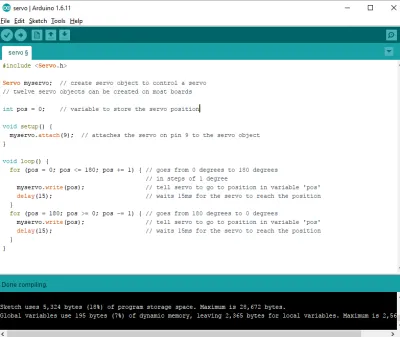
#include<Servo.h> - This declaration tells the Arduino editor that you want access to the Servo library functions.
Servo myservo; -This will create a servo object to control a servo, there can be 12 servo objects that can be created on most boards.
int pos = 0; -This is the variable to store the servo position.
void setup()- This is where we put the initialization process.
myservo.attach(9); -This attaches the servo that is on pin 9 to the servo object.
void loop() - This is where we put the program that we want to run forever.
for (pos = 0; pos <= 180; pos += 1) -The position of the servo will go from 0 degrees to 180 degrees in steps of 1 degree.
myservo.write(pos); - This will tell the servo to go to position in variable 'pos'
delay(15); -This will make the servo wait 15ms(milliseconds) for the servo to reach the position.
for (pos = 180; pos >= 0; pos -= 1) -This will tell the servo to go from 180 degrees to 0 degrees.
myservo.write(pos);-This will tell the servo to go to position in variable 'pos'
delay(15); - This will make the servo wait 15ms(milliseconds) for the servo to reach the position.
That is it for the explanation for the codes. Now, after you have typed the codes, click the Verify button in the upper left of the Arduino IDE and then press Upload to upload the sketch to your board (make sure that you have your board connected to your computer and you selected the your Arduino Uno board in the Arduino IDE) .
Now, you have accomplished in controlling the servo motor. It is all up to you now, play with it to your heart's content.
That's all for now
ted7
signing out,
Posted on Utopian.io - Rewarding Open Source Contributors