
Hello Friends, In this post I want to show you about how to use GIMP Software. GIMP is a free and open-source raster graphics editor used for image retouching and editing, free-form drawing, converting between different image formats, and more specialized tasks.
Before we start the Tutorial, if you don't have GIMP installed in your Computer, you need to download the GIMP Software in their official site
How to Make a Color Grid Effect in Your Photo
First of all, You need to open the photo file that you want to edit. For me, I use this one:
Create a new layer with a transparency mode, and then in the new layer choose Filters-Pattern-Grid menu.
Next, choose the size of the box and the line color as you wish ( For me, I prefer the black color).


After you click OK , it will looks like this:

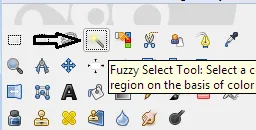
Use the Fuzzy Select Tool to select the boxes one by one.
In this Tutorial, I named the grid layer as grid and the object layer as evan-rachel (You can named them as you like).
Choose or Select the grid layer using fuzzy select tool while pressing the Shift button in your keyboard to add more selection in the boxes like this one:
If you already choose your desire box selection, then move to the object layer(evan-rachel) and choose the Colors-Colorize menu.
Set the Lightness to 100 so it will turns white.
then choose the Sellect-None menu
Repeat the 3,4,5 step but using another color (the one you like) like this:
and then this:
For the final touch, I will change the grid layer color into white(I use black early) by clicking the grid layer and then choose the Colors menu and choose white like the first picture.


I hope you like my Tutorial, I'm trying to explain it as easy as I can.


Posted on Utopian.io - Rewarding Open Source Contributors