Fermentation is both exciting an very boring at the same time...

Fermentation is a fascinating topic that can be as easy as just sprinkling a packet of dry beer yeast on top of the wort in the fermenting tank or a multi-stage process with several different yeasts added sequentially to push the beer higher and higher in alcoholic content! It is also possible to just leave the fermentation tank open and letting the natural yeast in the local environment do the job, probably with a different result each time! I use the Nottingham dry yeast from Danstar regularly and liquid yeast packs when I do a more complex beer. My Elder flower cider uses the natural yeast on the flowers themselves to ferment, usually this works very well!
The fermentation starts with the addition of the yeast to the wort, preferably directly after cooling the wort from boiling temperature to room temperature. A rehydration step is recommended when using dry yeast, just sprinkle the packet over 1dl/0.1qt room temperature water and let it sit for 30 minutes. A yeast starter can also be used with both dry and liquid yeast but that is another story!
The yeast will start to work almost immediately but it can take 12-24h before it is obvious that the fermentation is on its way. At full krausen (peak yeast activity) it will look something like in the picture above!
The fermentation schedule can be found at the bottom of the Brew Sheet from the Beersmith software:
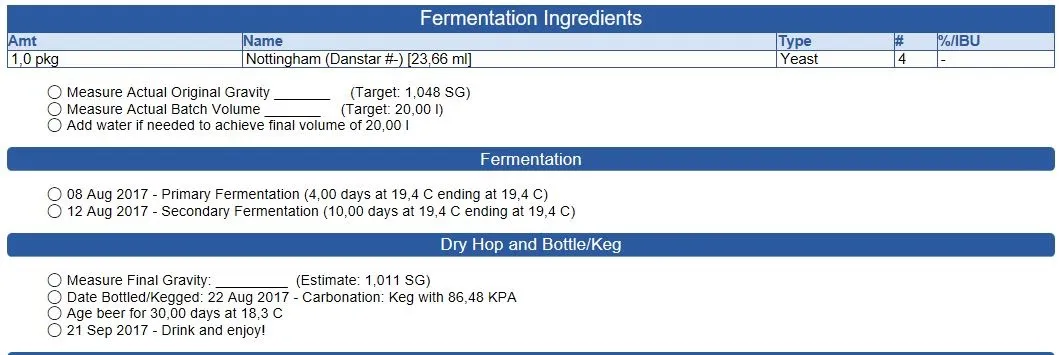
Here you can read that the primary fermentation will last for 4 days, after which you can siphon off the wort into another fermentation tank for the secondary fermentation step, or you can just leave the wort in the first tank and let it sit for another 10 days secondary fermentation before siphoning out the finished beer!
Since I have a FastFerment tank I leave the bottom valve closed during the primary fermentation. I open the valve and the air (or preferably CO2...)will bubble up through the tank stirring the content. The bottom sediment will then settle into the bulb beneath the bottom valve and it can easily be removed after the secondary fermentation. I then put a clean and sanitized cornelius keg beneath the Fastferment and open the bottom valve, letting the beer pour into the keg, ready for the CO2 addition!
That is all for today, tomorrow I will describe my kegs and the serving tap system!