¡Bienvenidos a mi Blog!
Welcome to my Blog!
A warm greeting to all my beautiful hive friends, today I am with you again and glad to be with you. How great it is to be able to share my recipes with my #hivers. If we talk about creativity in the kitchen we can execute it, the culinary art is and will be a marvel, giving our palate a good taste will always be a pleasure.


Hoy les trigo unas ricas arepitas dulces las cuales pueden degustar en un rico desayuno o en una tarde de merienda. Muy fáciles y rápidas de hacer. ¡Vénganse conmigo!
Today I'm making some delicious sweet arepitas which you can enjoy for a delicious breakfast or an afternoon snack. Very easy and quick to make, come with me!

• Harina de Maíz. (150g)
• Harina de Trigo. (100g)
• Agua. (2 tazas)
• Azucar. (120g)
• Una cucharadita de polvo para hornear.
• Una cucharadita de semillas de anís.
• Queso blanco rallado.
• Aceite.
- Corn flour. (150g)
- Wheat flour. (100g)
- Water. (2 cups)
- Sugar. (120g)
- One teaspoon of baking powder.
- One teaspoon of anise seeds.
- Grated white cheese.
- Oil.


Paso 1
Step 1

Paso 2
Step 2


Paso 3
Ya con nuestra masa lista, agarramos film plástico, (en particular use una bolsa plástica, lave muy bien y corte en forma de rectángulo y puse sobre el mesón de mi cocina) hacemos una bolita con la masa, la colocamos sobre el plástico, envolvemos con el mismo papel y con la ayuda de un rodillo aplanamos nuestra masa. Nota: Yo use mi tabla de picar alimentos para aplanar. Es importante aplanarlas bien que nos queden muy delgadas. Agarramos una taza redonda para hacer el corte, como les mostrare en la imagen.
Step 3
Once our dough is ready, we take plastic wrap, (in my particular case I used a plastic bag, wash it very well and cut it into a rectangle and put it on my kitchen counter) we make a small ball with the dough, we place it on the plastic wrap, wrap it with the same paper and with the help of a rolling pin we flatten our dough. Note: I used my chopping board to flatten. It is important to flatten them well so that they are very thin. We take a round cup to make the cut, as I will show you in the image.


Y así queda nuestra arepa dulce cortada con el molde.
And this is what our sweet arepa looks like when cut with the mold.

Paso 4
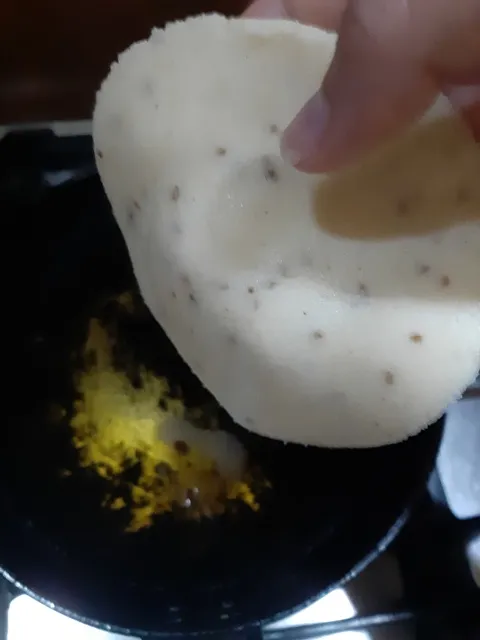
En un sartén común agregamos aceite abúndate, ponemos a calentar en la estufa, cuando el aceite este bien caliente procedemos a colocar nuestra arepa dulce freímos por 2 minutos de ambos lados. La retiramos del aceite la pones a escurrir en papel absorbente y procedemos a rellenar con queso blanco rayado y listo así quedan divinas.
Paso 4
In a common frying pan add oil abúndate, put to heat on the stove, when the oil is very hot proceed to place our sweet arepa fry for 2 minutes on both sides. We remove it from the oil, put it to drain on absorbent paper and proceed to fill it with grated white cheese and ready to be divine.


Y finalmente así quedan nuestras arepas dulces. Hoy fueron mi desayuno. Divinas! Si las hacen me cuenta.
And finally this is how our sweet arepas look like. Today they were my breakfast. Divine! If you make them tell me about it.

Thank you for reading me. I send you lots of blessings, positive energy and a big hug.


Las fotografías son de autoría, tomadas con mi celular Samsung Galaxy A50. La traducción fue realizada en traductor Deelp. https://www.deepl.com/es/translator Los separadores de texto son creados por mí en powerpoint2010. El collage de fotos lo realice en Fotofet. https://www.fotojet.com/apps/?entry=collage La primera fotografía es de mi propiedad y editada en la herramienta de PowerPoint2010.

The pictures are authored by me, taken with my Samsung Galaxy A50 cell phone. The translation was done in Deelp translator. https://www.deepl.com/es/translator The text separators are created by me in powerpoint2010. The photo collage was made in Fotofet. https://www.fotojet.com/apps/?entry=collage The first photo is my own and edited in powerpoint2010 tool.
