Imagen diseñada en GridArt
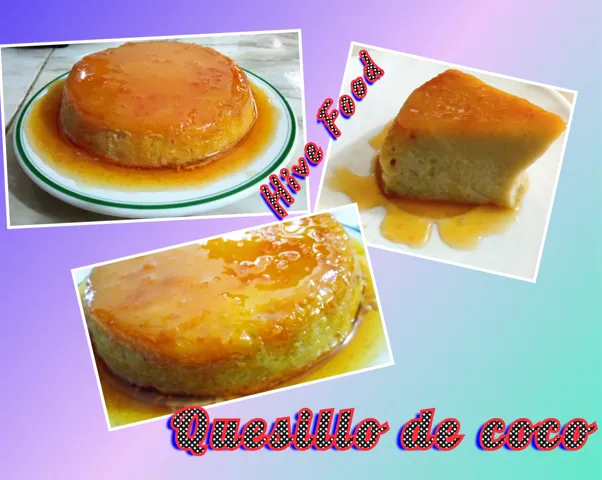
Saludos amigos de Hive Food, aquí estoy de vuelta por esta linda comunidad para compartir con todos ustedes un delicioso postre, un quesillo de coco, mi favorito. El coco es una fruta muy sabrosa al natural, el coco tierno es una delicia, ni hablar del agua cuando está bien fría, sin lugar a dudas, es una excelente opción para apaciguar el calor, nos hidrata y nos aporta muchas vitaminas. El coco seco aunque es más duro tiene su encanto, no pierde ese sabor característico que lo hacen apetecible y deseado.
Ahora bien, esta fruta no invita a preparar muchísimas recetas, en especial los dulces. En lo particular, me encantan los helados y el quesillo, este último suele ser costoso en las cafeterías, restaurantes y panaderías, quizás por la cantidad de huevos (entre más sean mejor) y la leche condensada que no es muy asequible en nuestro país, Venezuela. Aunque he preparado quesillo un par de veces nada más, esta vez opté por hacerlo sin leche condensada, a ver que tal, y les cuento que quedó súper delicioso. Además, me ahorré una buena cantidad de dinero, ya que solo necesité poca azúcar. Mientras 1 Kg de azúcar cuesta mucho menos que una lata de leche condensada, me queda suficiente para endulzar otras cosas además del quesillo. En cambio, una lata de leche condensada es mucho más costosa y la gasto de una sola vez en la receta.
El quesillo es un postre muy rico, y si es de coco, mucho mejor, es mi sabor predilecto, así que no desaproveché la oportunidad de la temporada para preparar uno. Este postre se realiza muy rápido, es muy fácil, solo se debe prestar especial atención al caramelo, aunque les confieso que para mí lo más tedioso es el procedimiento de extraer la leche del coco, es cuestión de gustos, hay quienes opinan que es lo más sencillo de todo.
Greetings friends of Hive Food, here I am back in this beautiful community to share with you all a delicious dessert, a coconut quesillo, my favorite. Coconut is a very tasty fruit in its natural state, tender coconut is a delight, not to mention the water when it is very cold, without a doubt, it is an excellent option to appease the heat, it hydrates us and provides us with many vitamins. The dried coconut, although it is harder, has its charm, it does not lose that characteristic flavor that makes it appetizing and desired.
However, this fruit does not invite to prepare many recipes, especially sweets. In particular, I love ice cream and quesillo, the latter is usually expensive in cafes, restaurants and bakeries, perhaps because of the amount of eggs (the more the better) and condensed milk that is not very affordable in our country, Venezuela. Although I have prepared quesillo a couple of times, this time I decided to make it without condensed milk, to see how it turned out, and I can tell you that it was super delicious. Besides, I saved a good amount of money, since I only needed a little sugar. While 1 kg of sugar costs much less than a can of condensed milk, I have enough left to sweeten other things besides the quesillo. On the other hand, a can of condensed milk is much more expensive and I spend it all at once in the recipe.
Quesillo is a very tasty dessert, and if it is made with coconut, so much better, it is my favorite flavor, so I did not miss the opportunity of the season to prepare one. This dessert is made very quickly, it is very easy, you only have to pay special attention to the caramel, although I confess that for me the most tedious part is the procedure of extracting the coconut milk, it is a matter of taste, some people think it is the easiest of all.
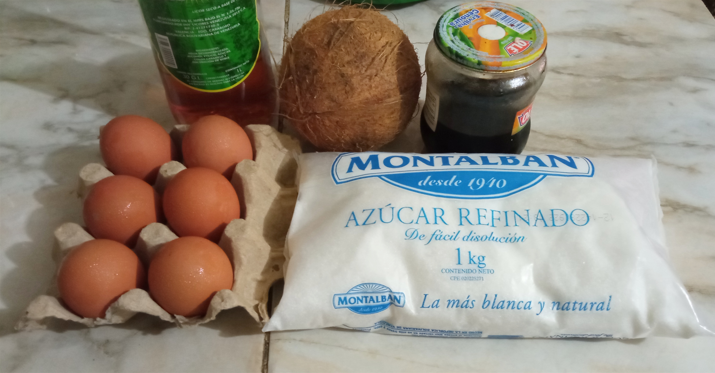
Ingredientes || Ingredients
- 1 Coco seco || 1 Dried coconut
- 6 Huevos || 6 Eggs
- 2 ½ Tazas de azúcar || 2 ½ cups sugar
- 1 Cucharadita de Vainilla || 1 teaspoon vanilla
- 1 Cucharadita de licor (opcional) || 1 teaspoon of liqueur (optional)
Preparación || Preparation
1.- Lo primero que haremos es preparar el caramelo porque debe estar a temperatura ambiente cuando le agreguemos la mezcla líquida del quesillo. Hay varias formas de hacerlo, yo elegí derretir en una olla 1 taza de azúcar, sin dejar de remover para que no se queme ni se pegue. Si se quema tomará un sabor amargo y así no servirá, habrá que tirar todo y hacerlo de nuevo. Comenzamos con fuego medio y cuando inicie el derretido bajamos un poco la llama, a fuego lento hasta que se derrita por el completo el azúcar, siempre removiendo. Una vez listo y con el color caramelo deseado, apagamos el fuego para que se enfríe a temperatura ambiente.
1.- The first thing we will do is to prepare the caramel because it must be at room temperature when we add the liquid mixture of the quesillo. There are several ways to do it, I chose to melt 1 cup of sugar in a saucepan, stirring constantly so it does not burn or stick. If it burns it will take a bitter taste and so it will not work, you will have to throw it all away and do it again. We begin with medium heat and when it begins to melt we lower the flame a little, to slow fire until the sugar melts completely, always stirring. Once ready and with the desired caramel color, we turn off the fire so that it cools down to room temperature.

2.- Luego, procedemos a extraer la leche del coco seco. Rompemos la cáscara, retiramos la pupa y la lavamos bien para después cortarla en trozos y llevarla a la licuadora con suficiente agua. Luego, colamos y ya está lista, tenemos la leche del coco, nuestra base del sabor del quesillo.
2.- Then, we proceed to extract the milk from the dried coconut. We break the shell, remove the pupa and wash it well and then cut it into pieces and take it to the blender with enough water. Then, we strain it and it is ready, we have the coconut milk, our base for the quesillo flavor.

3.- Ahora, el siguiente paso es elaborar la mezcla del quesillo que luego llevaremos a cocinar a baño de María. En la licuadora, colocamos 1 ½ taza de azúcar, 1 ½ taza de leche de coco, 6 huevos, 1 cucharadita de vainilla y 1 cucharadita de licor (opcional), éste último le aporta un sabor extra, es a gusto de cada quien. Luego licuamos por unos 2 ó 3 minutos y colocamos la mezcla en una quesillera con su tapa. De no tenerla, en una olla donde quepa la mezcla y se tapa herméticamente con papel aluminio, cuidando que no le entre agua. A la olla grande, donde se introduce la quesillera, también le colocamos una tapa. Se cocina a baño de María de 45 minutos a 1 hora a fuego medio alto. Cuando se haya cumplido el tiempo, se verifica con un palillo de madera, se introduce con cuidado, si sale limpio, está listo el quesillo. Apagamos el fuego.
3.- Now, the next step is to prepare the quesillo mixture that will be cooked in a double boiler. In the blender, place 1 ½ cup of sugar, 1 ½ cup of coconut milk, 6 eggs, 1 teaspoon of vanilla and 1 teaspoon of liqueur (optional), this last one adds an extra flavor, it is up to each person's taste. Then blend for about 2 or 3 minutes and place the mixture in a cheesecake maker with its lid. If it does not have one, place it in a pot where the mixture fits and cover it hermetically with aluminum foil, making sure that no water gets into it. We also put a lid on the large pot, where the cheesemaker is placed. Cook in a bain-marie for 45 minutes to 1 hour over medium-high heat. When the time has elapsed, check with a wooden toothpick, carefully insert it, if it comes out clean, the quesillo is ready. Turn off the heat.

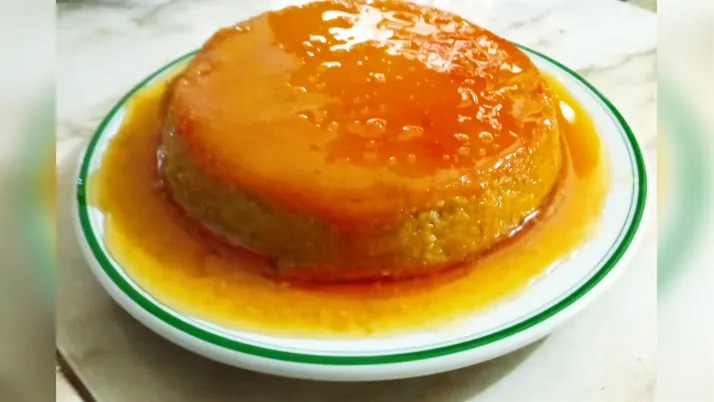
4.- Dejamos enfriar el quesillo en la misma olla donde lo pusismos a cocinar a baño de María hasta que alcance la temperatura ambiente. Luego, llevamos la olla con el quesillo a refrigerar (no al congelador) toda la noche y se desmolda a la mañana siguiente para que tome consistencia. Nunca desmoldar caliente.
4.- Let the quesillo cool in the same pot where you put it to cook in a bain-marie until it reaches room temperature. Then, take the pot with the quesillo to refrigerate (not to the freezer) overnight and unmold it the next morning so that it takes consistency. Never unmold hot.
5.- ¿Quién quiere una probadita?.
5.- Who wants a taste?.


Espero que les haya gustado. Nos vemos en la próxima oportunidad.
I hope you liked it. See you next time.
Todas las fotografías son originales, tomadas con mi celular Xiaomi Redmi 9. Las ediciones las hice con la aplicación Foto Collage y PicAap
