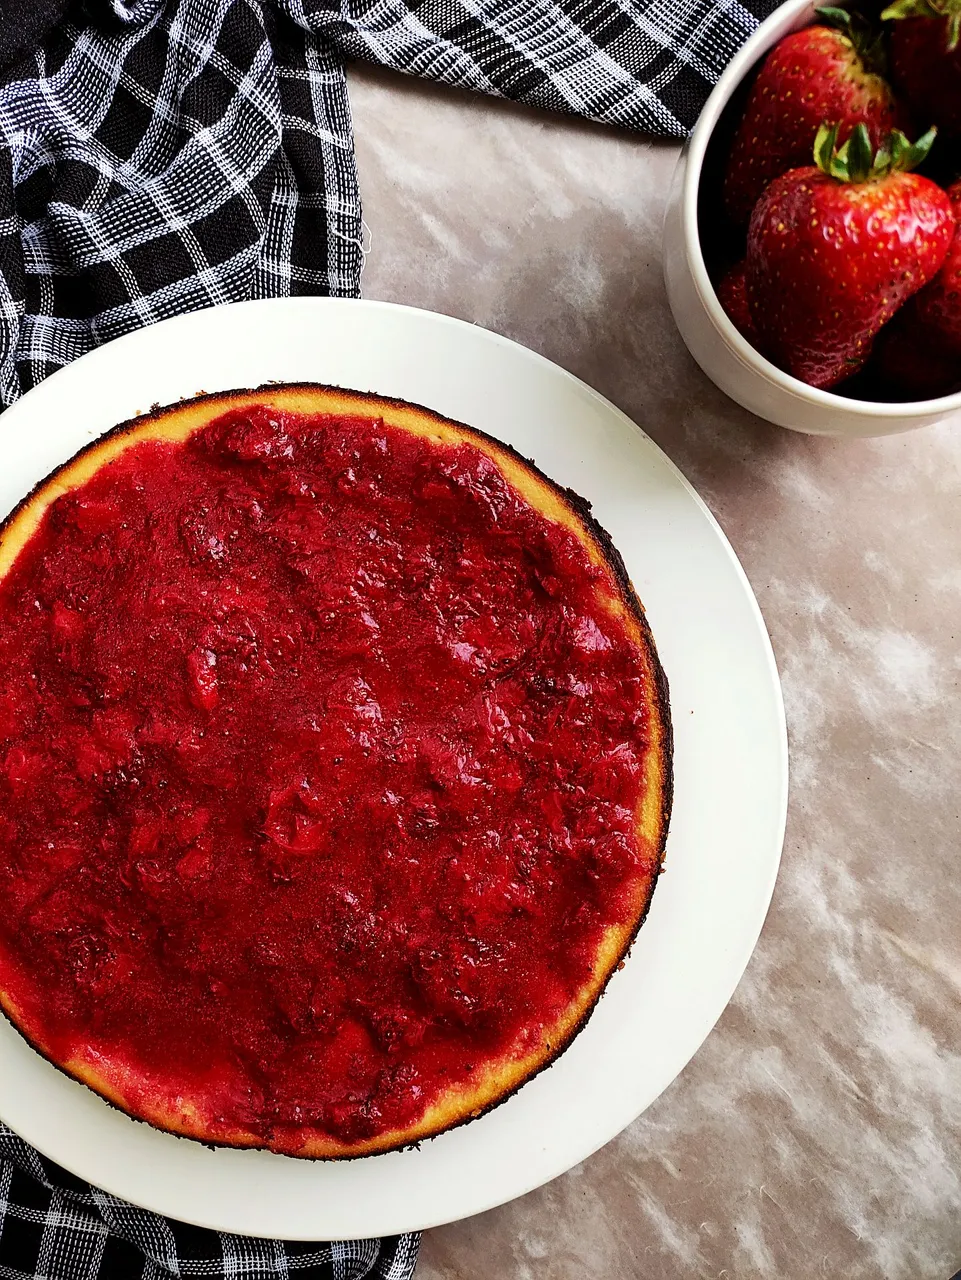
Hace tiempo atrás, el año pasado si no me equivoco, preparé mi primera cheesecake versión saludable. El resultó simplemente me encantó, aunque no se llevó un 10/10 porque, a pesar de que el sabor quedó completamente en su punto, visualmente no había resultado como yo quería (cosa que volvió a ocurrir en esta oportunidad 😅...jeje, ups). Así que me prometí que seguiría haciendo intentos hasta lograr preparar el cheesecake versión saludable perfecto.
Yo soy amante de las cheesecake y siempre me ha parecido que preparar una que recibe un 10/10 es todo un arte. La situación se vuelve un poco más compleja si de trata de hacer su versión saludable, pues hay que saber encontrar el equilibrio entre cada uno de los ingredientes que no actúan de igual forma que los ingredientes de repostería tradicional...pero bueno, uno hace sus intentos. Casi dos años después en qué prepararé esa cheesecake de maracuyá, hoy vuelvo a compartir una receta de cheesecake pero esta vez de sabor a fresa...¡una de mis favoritas!

Some time ago, last year if I'm not mistaken, I made my first healthy cheesecake. I simply loved the result, although it didn't get a 10/10 because, although the flavor was completely right, visually it didn't turn out the way I wanted it to (which happened again this time 😅...hehe, oops). So I promised myself that I would keep trying until I made the perfect healthy version of cheesecake.
I am a cheesecake lover and I have always found that preparing one that receives a 10/10 is quite an art. The situation becomes a little more complex if you try to make a healthy version, because you have to know how to find the balance between each of the ingredients that do not act in the same way as the traditional pastry ingredients...but well, you make your attempts. Almost two years after I prepared that passion fruit cheesecake, today I share again a cheesecake recipe but this time with strawberry flavor...one of my favorites!

INGREDIENTES
INGREDIENTS

PARA LA BASE
✔ 1 huevo
✔ 3 cucharadas de endulzante (yo suelo emplear extracto de estevia)
✔ 2 cucharadas de mantequilla derretida
✔ ¼ taza de harina de avena + ¼ taza de harina de almendras (puede emplearse un solo tipo de harina, pero la harina de almendras suele dar un toque más crujiente y por eso me gusta combinarla)
✔ 1 cucharadita de polvo para hornear y esencia de vainilla al gusto
FOR THE BASE
✔ 1 egg
✔ 3 tablespoons of sweetener (I usually use stevia extract).
✔ 2 tablespoons melted butter.
✔ ¼ cup oat flour + ¼ cup almond flour (you can use just one type of flour, but almond flour usually gives a crunchier touch and that's why I like to combine it)
✔ 1 teaspoon baking powder and vanilla essence to taste.
PARA LA TORTA
✔ 3 huevos
✔ 65 gramos –aproximadamente– de yogur natural
✔ 200 gramos –aproximadamente– de yqueso ricotta
✔ 1 cucharada de esencia de vainilla
✔ Jugo de medio limón
✔ 2 cucharadas de fécula de maíz
✔ ⅓ de taza de endulzante
FOR THE BASE
✔ 3 eggs
✔ 65 grams -approximately- natural yogurt
✔ 200 grams -approximately- of ricotta cheese
✔ 1 tablespoon of vanilla essence.
✔ Juice of half a lemon
✔ 2 tablespoons cornstarch
✔ ⅓ cup of sweetener
PARA LA CUBIERTA
✔ Fresas (no sé qué cantidad exacta empleé, porque la cubierta la prepararé "al ojo")
✔ Endulzante al gusto
FOR THE COVER
✔ Strawberries (I don't know what exact amount I used, because I will prepare the topping "al ojo").
✔ Sweetener to taste.
PREPARACIÓN
PREPARATION

El primer paso es preparar la base de galleta para la torta y para ello comenzaremos mezclando, en primer lugar, los ingredientes secos: harinas, polvo para hornear y endulzante. Se abre un pequeño hoyo en el centro y se agrega la mantequilla junto con los ingredientes líquidos: huevo y esencia de vainilla.
The first step is to prepare the cookie base for the cake and to do this we will start by mixing, first, the dry ingredients: flour, baking powder and sweetener. A small hole is opened in the center and the butter is added along with the liquid ingredients: egg and vanilla essence.

Se mezcla muy bien para obtener una masa que, en un comienzo, parecerá poco amigable por lo pegajosa que es, pero al amasar se irá compactando poco a poco. Cuando ya la masa esté lista, se procede a colocarla en el molde. Yo recubrí el fondo del molde con papel aluminio, lo unté ligeramente con mantequilla y comencé a agregar la masa, procurando que toda la superficie estuviese uniforme. Reservar.
Mix very well to obtain a dough that, at the beginning, will seem unfriendly because of its stickiness, but when kneaded, it will compact little by little. When the dough is ready, place it in the mold. I covered the bottom of the mold with aluminum foil, spread it lightly with butter and began to add the dough, making sure that the entire surface was uniform. Set aside.

Con la base lista, se procede a preparar el relleno de la torta y esto es más sencillo que el paso anterior. Simplemente llevaremos todos los ingredientes a la licuadora (queso, yogurt, endulzante, huevos, esencia de vainilla, fécula de maíz y zumo de limón) y trituraremos hasta obtener un mezcla que no sea demasiado líquida, pero tampoco demasiado espesa. Vertemos la mezcla sobre la base y horneamos este conjunto aproximadamente 40 minutos a una temperatura de 180 °C.
With the base ready, we proceed to prepare the filling for the cake and this is simpler than the previous step. We will simply take all the ingredients to the blender (cheese, yogurt, sweetener, eggs, vanilla essence, cornstarch and lemon juice) and blend until we obtain a mixture that is not too liquid, but not too thick either. Pour the mixture over the base and bake for approximately 40 minutes at a temperature of 180 °C.

Mientras la torta está en el horno, se puede ir preparando la cobertura de fresa. En una olla a fuego medio-bajo colocar las fresas y cocinar durante un par de minutos. Remover de vez en cuando para evitar que la fruta se pegue al fondo de la olla. No es necesario que se trituren las fresas, pues ellas se irán deshaciendo poco a poco durante el proceso de cocción. Luego, se añade el jugo de limón, y el endulzante. Remover ocasionalmente durante unos 2 o 3 minutos más. Rectificar el dulzor y apartar de la olla cuando el líquido comience reduzca casi por completo.
While the cake is in the oven, you can prepare the strawberry topping. Place the strawberries in a saucepan over medium-low heat and cook for a couple of minutes. Stir from time to time to prevent the fruit from sticking to the bottom of the pan. It is not necessary to mash the strawberries, as they will gradually break down during the cooking process. Then add the lemon juice and the sweetener. Stir occasionally for about 2 or 3 minutes more. Rectify the sweetness and remove from the pot when the liquid begins to reduce almost completely.
RECOMENDACIONES
RECOMMENDATIONS
✔ Las cheesecake se diferencian de los pays no sólo por sus ingredientes, sino también por su estética. La primeras suelen ser mucho más "altas" y ahí fue justo donde estuvo mi error: no emplear un molde más pequeño. Entonces, esta es mi primera recomendación: emplear un molde pequeño para que tu cheesecake no resulte demasiado plana, tal y como sería un pay.
✔ Una segunda recomendación es que al retirar la preparación del horno, dejarla enfriar por completo a temperatura ambiente y luego refrigerarla un buen rato antes de consumirla. De esta manera la torta y la galleta estarán mucho más firmes.

✔ En lo personal, a mí me encanta consumir las porciones al día siguiente, luego de haber dejado la preparación en la nevara casi toda la noche porque siento que los sabores se potencian mucho más. Hay algunas preparaciones que resulta mucho más consumirlas apenas son sacadas del horno, pero siento que eso no aplica para nada con las cheesecakes.
✔ The cheesecake are different from the pays not only for their ingredients, but also for their aesthetics. The former are usually much "higher" and that's exactly where my mistake was: not employing a smaller mold. So, this is my first recommendation: employ a small mold so that your cheesecake doesn't turn out too flat, just like a pie would be.
✔ A second recommendation is that when you remove the preparation from the oven, let it cool completely at room temperature and then refrigerate it for a good while before consuming it. This way the cake and the cookie will be much firmer.
✔ Personally, I love to eat the portions the next day, after having left the preparation in the refrigerator almost overnight because I feel that the flavors are much more enhanced. There are some preparations that are much better to consume as soon as they are taken out of the oven, but I feel that this does not apply at all with cheesecakes.
RESULTADOS
RESULTS

Es increíble como un sólo ingrediente puede cambiar por completo toda la preparación. Esto lo digo porque cuando preparé el cheesecake de maracuyá empleé un tipo de queso diferente y en proporciones distintas y sí pude percibir el cambio en el sabor. Creo que definitivamente me quedaré con la receta anterior de cheesecake, no es que esta no me haya gustado pero sinceramente no quedó tan espectacular.
It is amazing how a single ingredient can completely change the whole preparation. I say this because when I prepared the passion fruit cheesecake I used a different type of cheese and in different proportions and I could perceive the change in the flavor. I think I will definitely stick with the previous cheesecake recipe, not that I didn't like this one but honestly it was not as spectacular.

Creo que seguiré experimentado con los cheesecake. El próximo que tengo en mente es uno de chocolate, así que ya veremos qué tal resulta eso. Bueno...chocolate o algo así tipo crumble de manzana, todavía no me decido. Lo cierto es que no descansaré hasta dar con la receta perfecta de cheesecake en versión saludable.
I think I'll keep experimenting with cheesecake. The next one I have in mind is a chocolate one, so we'll see how that turns out. Well...chocolate or something like apple crumble, I haven't decided yet. The truth is that I won't rest until I find the perfect cheesecake recipe in a healthy version.

Gracias por leer esta publicación. ¡Hasta la próxima!
Thanks for reading this post. See you next time!
📷 Fotografía por | Photography by: 
✎ Edición por | Edition by:
✂ Separador | Separator: Separadores de texto para Blog
Translated with www.DeepL.com/Translator (free version)
