

Hello everyone! Are you ready for a new house purchase and turn it from horror to cheerer? 😇
Yeah, I tried to make a small rhyme there, not sure how successful it was, lol, but hey! It's Tuesday, so what better way to spend it if not by restoring one of those scary-looking abandoned houses that creative minds see them more of an opportunity to turn into art? 😇
Honestly, I sort of got used to having this activity once in a while, which is not just very relaxing but also a great way to exercise my skills of decorating places for the moment when I'll finally move to my own house and be able to arrange everything as I dreamed for a long while.
Shall we begin? 🤜🤛

The house purchased
And just because I don't like hiding things from my readers, the house I was actually purchasing was very similar to one of the others presented in the previous articles having the same size and room compartmentation, but since I try to always come with something new, I decided to renovate that by myself without taking pictures of it anymore, and then buy a new one which is, of course, the one presented above.
This one is perhaps the biggest house purchased by myself so far, which was destroyed by a flood, so we can compare it with another disaster happened at the Burned house presented previously, but which I really hope, it won't come as catastrophic as that one, lol.

DURING the renovation
Anyway, I like to see some more things on the outside since it was a good reminder that I should put my hands on the DLCs of the game that will allow me to renovate the garden too, or even buy pets, but for now, I decided to get rid of everything since they were damaged anyway.
As soon as I did that, I started cleaning the alley to the house and then the walls of it which were pretty damaged and dirty too, being followed by buying some panels to change the looking of the house but still keep it close to its original style which I think it's looking pretty well.

AFTER the renovation
Adding panels is, perhaps, one of the fastest tools you can enjoy in House Flipper, so the task was completed pretty quickly, the single exception being to add these on the upper part of the house where I needed a scaffold but which I sold back as soon as I finished working with it, so you are not going to lose too much money with it.

BEFORE renovation
Anyway, time to move a little bit further and finally open that front door of the house! 😏
As it happens in most cases, the biggest chances are to get yourself on the main corridor of the house, the single exception being only if the corridor it's an open space one with a living room or kitchen, but in this case, we are talking only about a 9 squared meters corridor that seemed like being the less dirty place of the house, so I decided to begin my renovation here with nothing else, but this one.

AFTER renovation
Since I noticed that most of the people tend to neglect corridors paying less attention on details to these but mainly focus on the rest of the rooms, I wanted to do this a little bit different than I was used to, and added a pretty sober colour for the walls but which in my head turned out as the best mix with the spotlights from the ceiling which I would love to get for myself too.
However, being a corridor, there shouldn't be ever missing a huge mirror where to take pictures with your favourite outfits, the hanger or the furniture for small things or shoes.
And just like I already mentioned it most likely in all my posts, I like having as many posters and flowers in the whole house, so I got two small plants even for the first part of the house.

BEFORE renovation
On a quick mathematical calculation, I figured out that since there are 5 doors I will have 5 rooms to take care of, so I decided to take them in order starting from the left where I entered a room that was just 1 squared meter bigger than the corridor.
Even though some of the furniture and chairs could still be used, I sold them all and then cleaned the surface just to make everything more clear in my head, but since the house was affected by a flood, all the walls needed to be plastered before applying a different colour to them.
 |  |
|---|
Click on the images to see them in full resolution
DURING the renovation
As soon as I finished plastering the walls, I kept searching on the store for a colour that would go along with the vintage furniture I had in plan to purchase for the kitchen, but since there seemed like none of them would work together, I bought a few sets of tiles that I think will save the situation in many cases.


AFTER renovation
And here we go!
To be honest, I would never buy such furniture at my house just because I am a fan of the modern and hi-tech things when it comes to home decorations, but since I kept seeing this set on the market and there was also that client which was still asking for expensive furniture, I thought that it's a good opportunity to implement these somehow, so I hope I managed to do it nicely.
It's true that I focused more on the furniture itself rather than keeping some space for the table, but I think a medium table placed in the middle of the room or even in the living room will fit just right.
🔓 What do you think though?

BEFORE renovation
The next room that I will renovate is also the one that is linked with the kitchen, which served as a living room before but while I noticed there are some bigger rooms in the house that I could use with this purpose, I decided to take advantage of the 13 squared meters to create a proper sauna place while in my previous post this was sort of mixed with the bathroom and I wasn't really happy with the results.

DURING the renovation
To be honest, I've never attended a SPA or sauna place so I have no idea what this should look like, but since I've seen quite a few pictures with it along with sequences in movies, I figured out that most of them have this kind of wood panels on the walls, so I looked on the market for something that will have a pretty similar colour with the floor.

AFTER renovation
Here's how everything turned out.
I know that there was plenty of space and perhaps I could add a lot more things to this room, but since I wanted to keep everything minimalistic and not too busy, I used the whole space to add lots of benches that could be used by a big family sauna session or even with friends, lol.
Since most likely you will need a towel or more, I added a few shelves with white towels but also a few more SPA decorations and burning candles that will create a beautiful ambient mood. 😌

BEFORE renovation
The 3rd room that is at the end of the corridor I reserved for the bathroom which is also what it previously served for.
However, since none of the things placed here couldn't be used further, I decided to sell everything and then clean the floor and plaster the walls before starting to purchase stuff.


AFTER renovation
Since the sauna has a pretty sober colour of the walls, I decided to keep the bathroom in the same style and even purchase a part of the objects placed here containing dark shades, along with the gold ones that always create a great mix together.
It was the first time purchasing a mirror like this or wall bodies but I simply love how everything turned out and I think it's my favourite room out of all. 😁

BEFORE renovation
Since we have two more rooms left to renovate and still didn't renovate any of them for bedroom or living room, I think we all know how these are going to be used. 😄
The biggest room of the house used to be a library before, measuring around 24 squared meters, but while I always dreamed on having a bedroom with a fireplace in it that you can look at until you fall asleep, I took advantage of the available size here and that's exactly what I did as soon as I finished cleaning the surface and getting rid of the trash here.
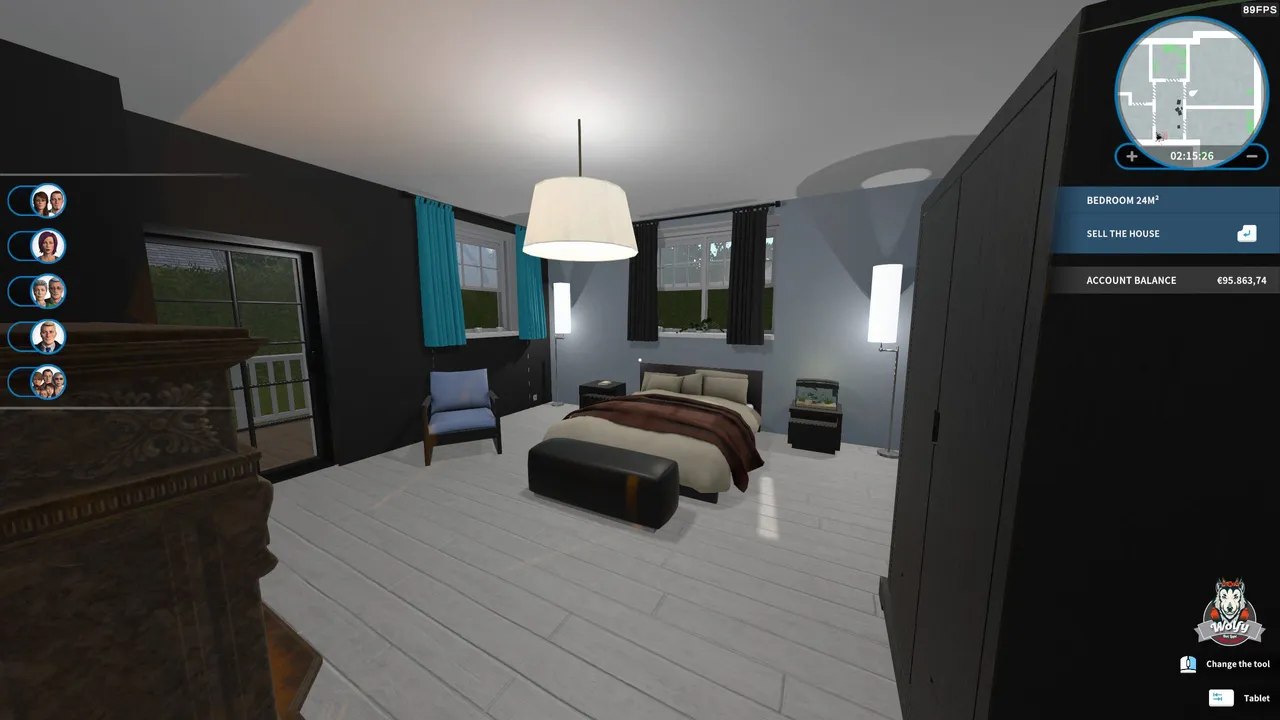

AFTER renovation
I usually like to see two colours in a room so I added two different shades on the walls along with the things you will see around which are mainly based on black or white colours.
However, this is pretty minimalistic done but what I really loved on this room is that it has access to the terrace which it's a great way to start your morning having a coffee outside or even playing with your pet if you own one.

BEFORE renovation
The 5th and last room is what they also called a library room, but since I think you don't need an entire room for keeping your books or studying, I thought about getting rid fast of everything left in the room, cleaning the surface, and then rearrange everything for a living room but also a place where you do the laundry since there wasn't space left in the bathroom for a washing machine.


AFTER renovation
So this is how everything turned out!
I went a little bit YOLO with the wallpaper used but I had a crazy idea of mixing the days when you have to do the laundry with these when you can watch a movie or play some games on a console while the washing machine completes its process.
Plus, those stars on the walls could turn out really nice if you use a projector to see movies, lol. 😄

Selling the house
Anyway, as much as I enjoyed working on this house and also how it turned out, I decided to sell it for now and keep in mind some of the ideas used for the time when I'll renovate my future house in the game.
I also managed to negotiate the price a little and get an extra €1,579 to the total price of the house which even though it seemed like not being a happy negotiation for my client, I'm happy I managed to step away from the little profit I was earning in the past few weeks which was around €17,000 only. 🤑
🔓 Anyway, that was all for today's renovation so...
What do you think of how everything turned out? And what's your favourite place from the house?
For me, it's either the bathroom or bedroom. I can't decide between the two. 😄
As always, thanks for using some of your time to check out my post!
And please don't hesitate to share your thoughts on this article down below! 💚
| Game | House Flipper |
|---|---|
| Release Date | 17th May 2018 |
| Played On | Steam |
| Genre | Simulation |
| Hours Played | 37.8 hrs |

| Episodes | |
|---|---|
| 15. | Kindergarten |
| 16. | Clean up the house, please |
| 17. | House to refresh, need help! |
| 18. | Aunt's home to redecorate |
| 19. | Camping bungalow |
| 20. | Burned house |
| 21. | House after the flood |
| 22. | Turtle house |
| 23. | Uncle's bunker |
| 24. | Easter Edition |
| More coming soon... |
Don't forget to check out my travel journeys too! ❤️

FIND ME ON:
↪ Blog: http://gabrielastravels.wordpress.com/
↪ Fiverr: https://www.fiverr.com/gabrielatv/
↪ YouTube: https://www.youtube.com/gabiivdesign
↪ Instagram: https://www.instagram.com/gabriela.tv/
↪ TikTok: https://tiktok.com/@gabrielastravels/
↪ Discord: GabrielaTravels#0104
↪ Facebook: https://www.facebook.com/gabrielaistraveling/
↪ Twitter: https://twitter.com/GabrielaTravels
↪ PayPal/Contact: gabriela.valceanu19@gmail.com